How to create a REST API
Introduction
In this Velosimo Tutorial, we will create a basic REST API using the Velosimo Platform. The API will be able to create a new record and retrieve all records from a Velosimo database. We will create a Data Base, create a new API, and then test our new API using Postman.
Prerequisites and assumptions:
- Access to your Velosimo tenant and your Tenant Authorization Key and Token values.
- An account with Postman..
Global instructions
- Replace HIGHLIGHTED CAPITALIZED text with your specific information.
- The overlay menu is considered the main menu and is the launching point of many steps. It is accessed by clicking the Caret after the velosimo logo on the top left of the user interface.
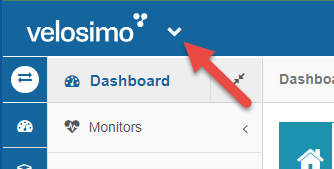
Table of Contents
Creating a Data Base
First, we need to create a database which is known as Data Type within Velosimo. The terms Database and Data Type are used interchangeably. The Data Type is a Definition of the data fields and types for our new JSON database within Velosimo.
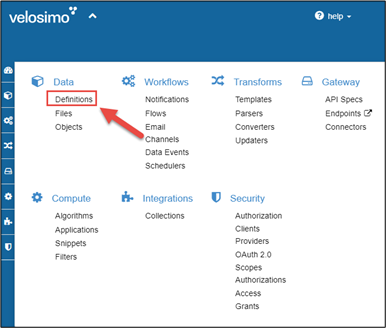
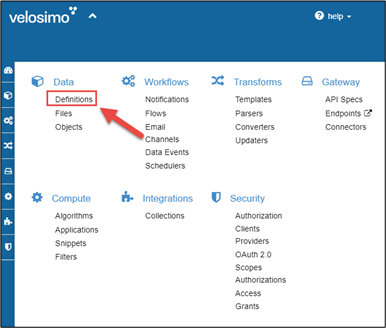
Select Definitions under the Data section of the main menu:
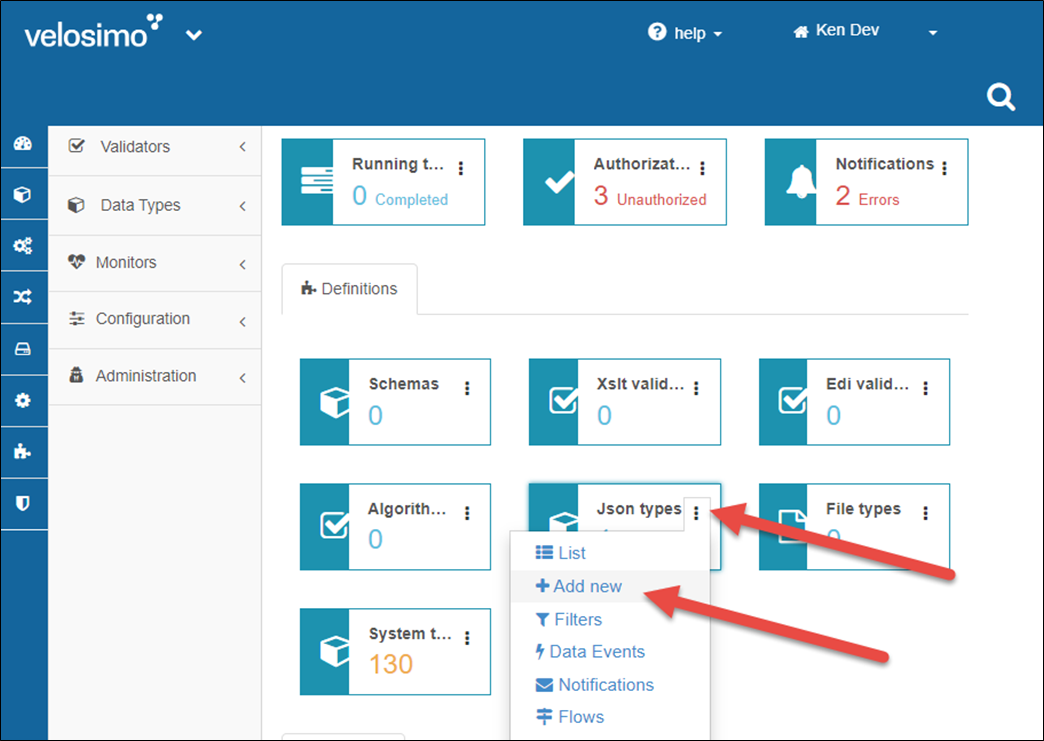
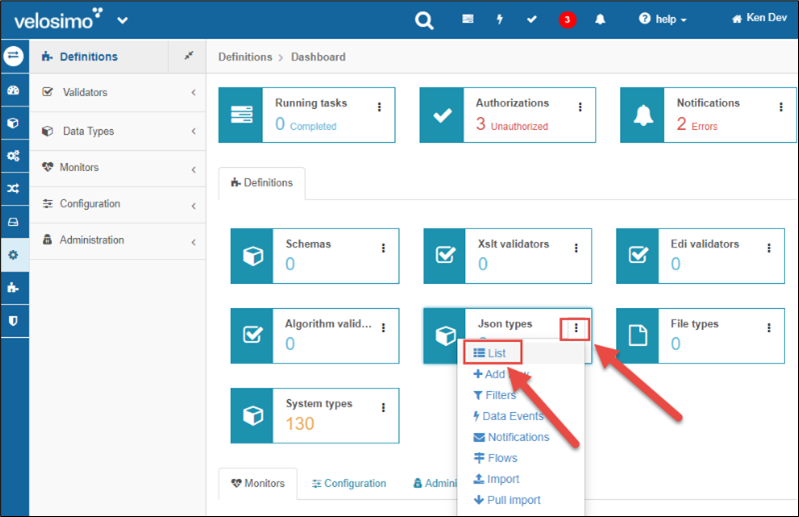
Next, click the Kebab icon next to "Json Types" and select "+ Add New."
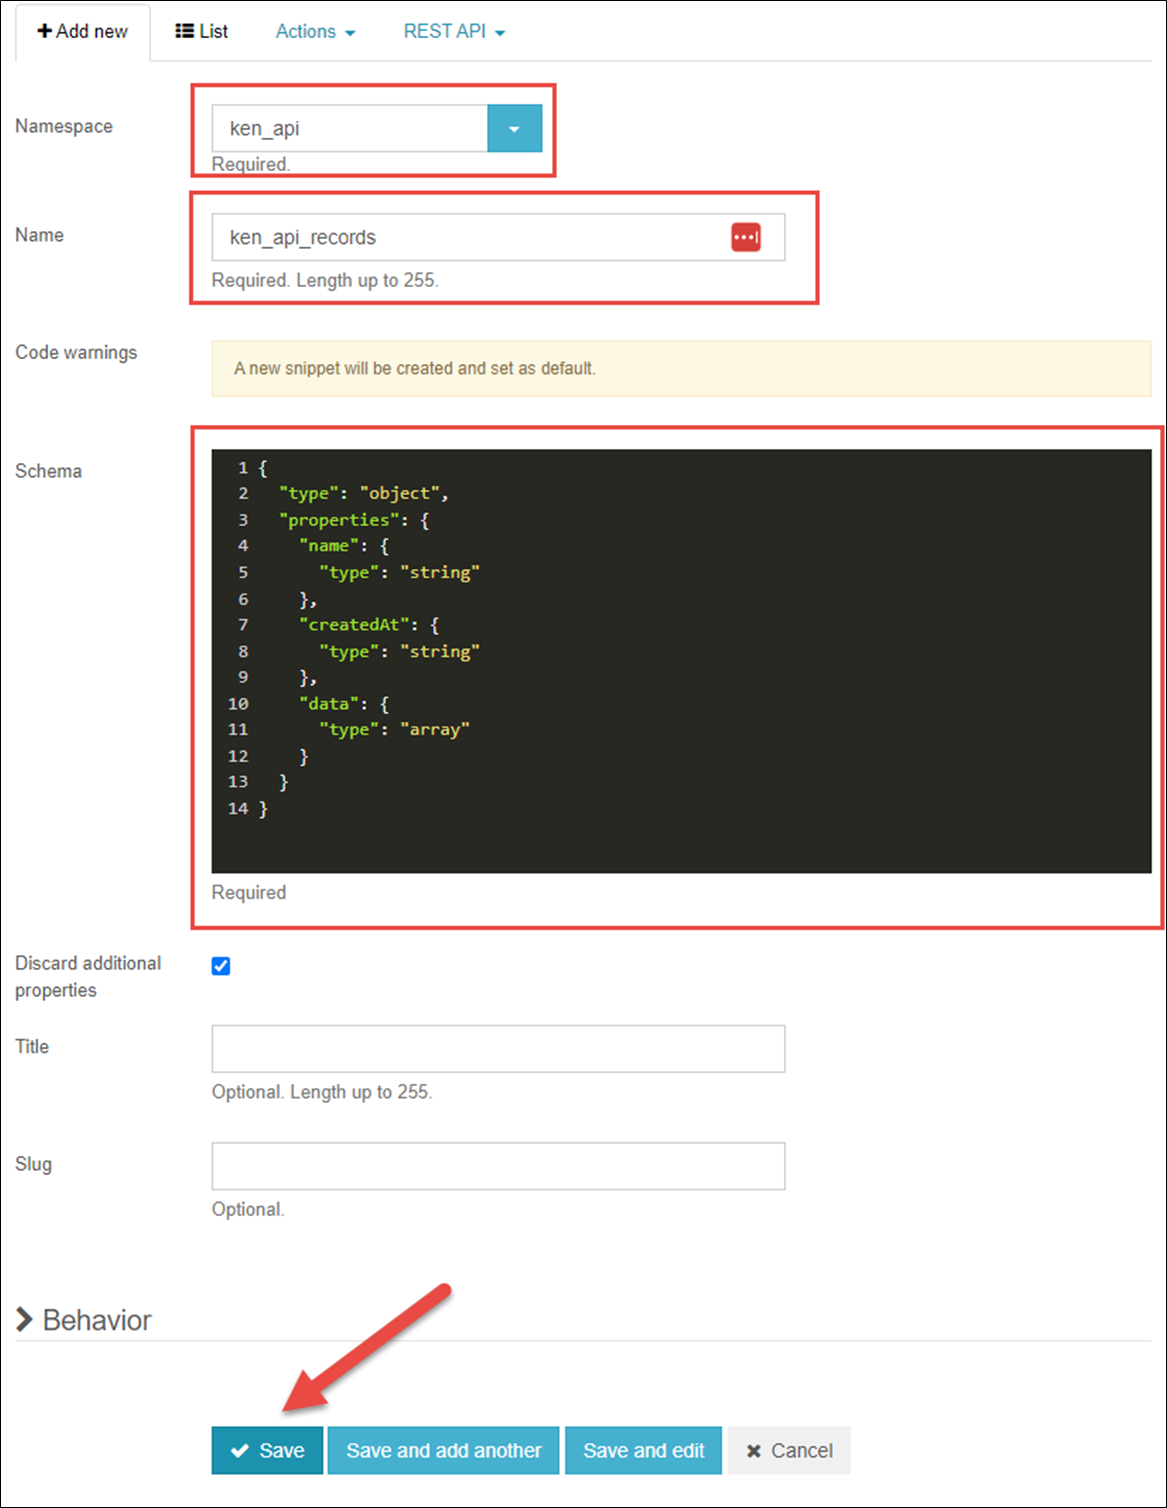
Enter the details of your new Data Type and click Save.
Form Field | Description | Content |
|---|---|---|
Namespace* | Unique name which is used for all components of your new API | [YOUR NAME]_api |
Name* | Name for your new Database/Data Type | [YOUR NAME]_api_records |
Schema | Field names and types. The JSON schema for the data structure. | See code below |
*Your Name Space and Data Type Names will be used later in this exercise
{
  "type": "object",
  "properties": {
    "name": {
      "type": "string"
    },
        "createdAt": {
      "type": "string"
    },
        "data": {
      "type": "string"
    }
  }
}
If the creation were successful, you would be redirected to the JSON Data Types listing page, where you will see your newly-created data type.

Now that we have a database to use, it's time to create the API app, which will interact with the database. In Velosimo, APIs are a type of application.
Creating the API
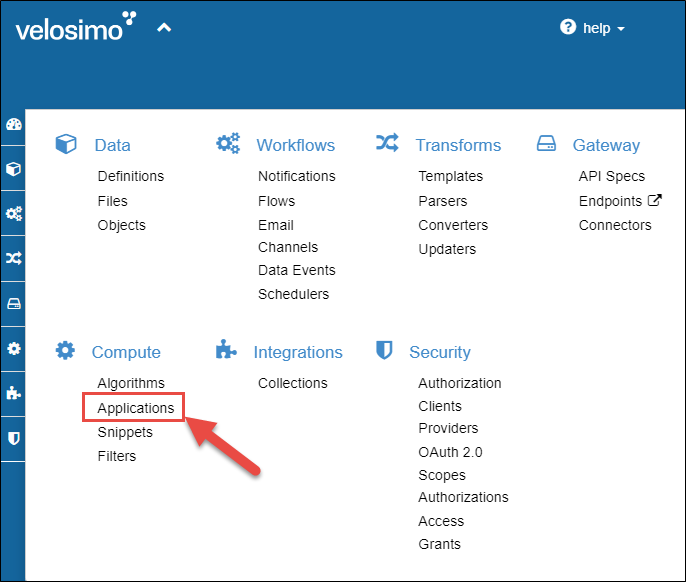
Select Applications under the Compute section of the main menu:
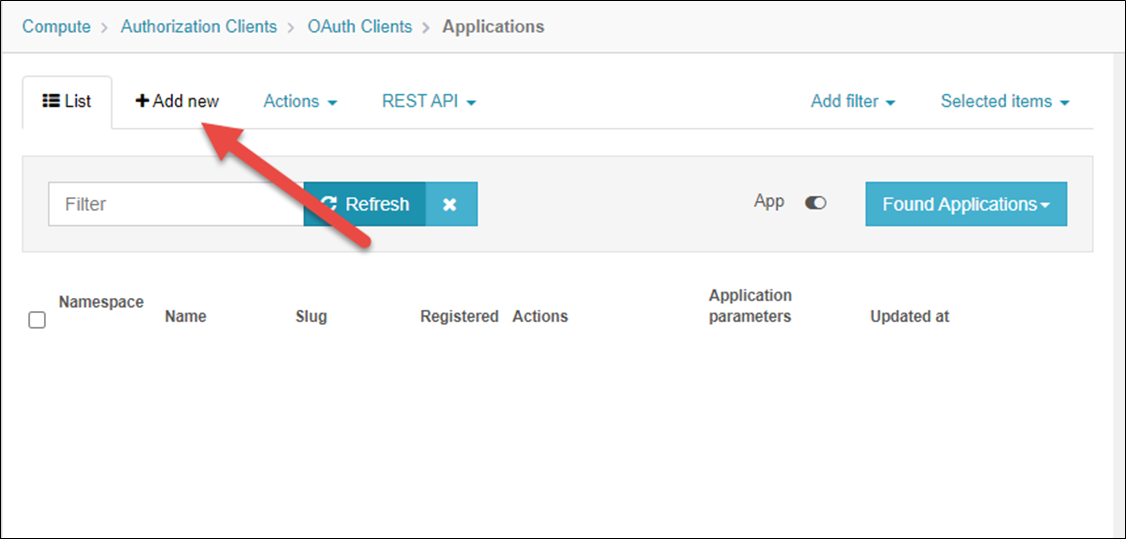
You will be redirected to the Applications list page. Select "+ Add new" on the top menu of the page.
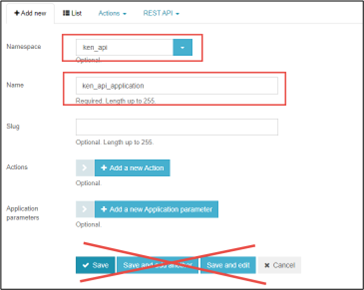
Enter the initial values of your new Application, but do not hit save yet
Form Field | Description | Content |
|---|---|---|
Namespace | Unique name which is used for all components of your new API | Enter your namespace from prior |
Name | Name for your new API Application | [YOUR NAME]_api_application |
Next we need to create Actions for the app. Actions in Velosimo are the API endpoints for an Application, the API calls. Each Action has an endpoint that executes a block of code when called.
For this tutorial, we will be creating two actions:
- POST / Create a new entry in the database
- GET / Retrieve all records from the database
P ST /Create a Record
The first action that will be created will be the action we call when we want to create a new record in our database (data type).
Click "+ Add new Action"
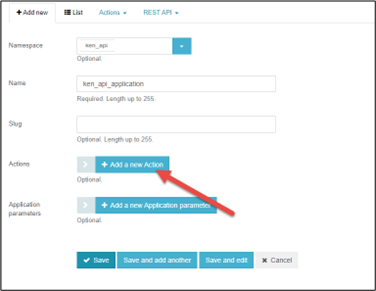
Enter the values for your new post action:
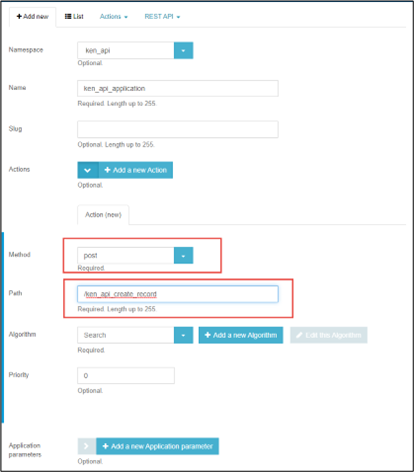
Form Field | Description | Content |
|---|---|---|
Method | The REST method to use for this action. We chose POST because we want to add a new record to the database when this action is called | Post |
Path* | The path for your new application used when calling this action. | [YOUR NAME]_api_create_record |
*Your POST Action path name will be used later in this exercise
Now we need to create the functionality for the Post Action by creating an algorithm. Algorithms are snippets of code that perform a specific function when executed.
Click "+ Add new Algorithm".
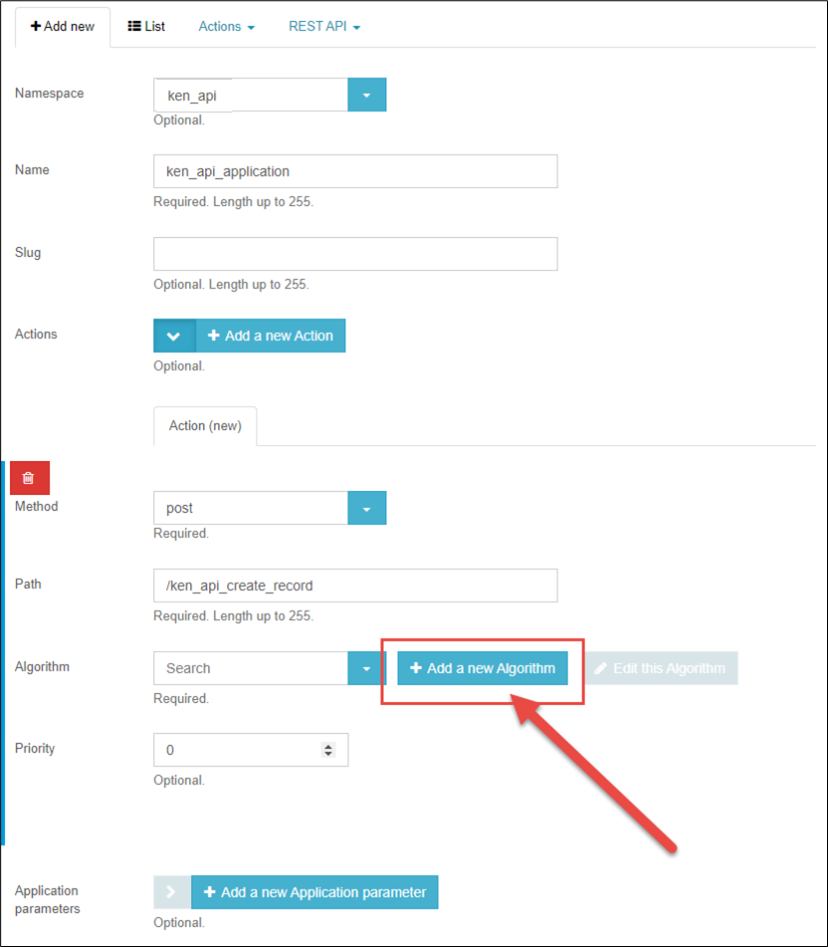
Enter the values for your new algorithm:
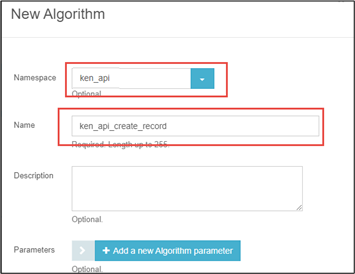
Form Field | Description | Content |
|---|---|---|
Namepsace | Unique name which is used for all components of your new API | Enter your namespace from prior |
Name | Name for your new post algorithm | [YOUR NAME]_api_create_record |
Next we need to add a few parameters to the algorithm:
- controller - variable used to create JSON from data in the Ruby code.
- params - variable used to retrieve data passed through body params in the POST request.
Click "+ Add new Algorithm parameter.
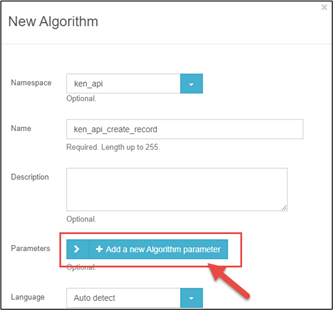
Enter the name for your new algorithm parameter:
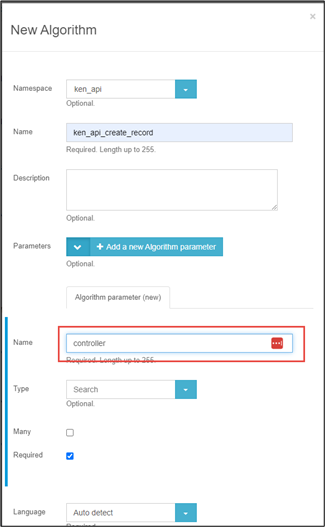
Form Field | Description | Content |
|---|---|---|
Name | Name for your new algorithm parameter | controller |
Now let's add the second parameter. Click "+ Add new Algorithm parameter again.
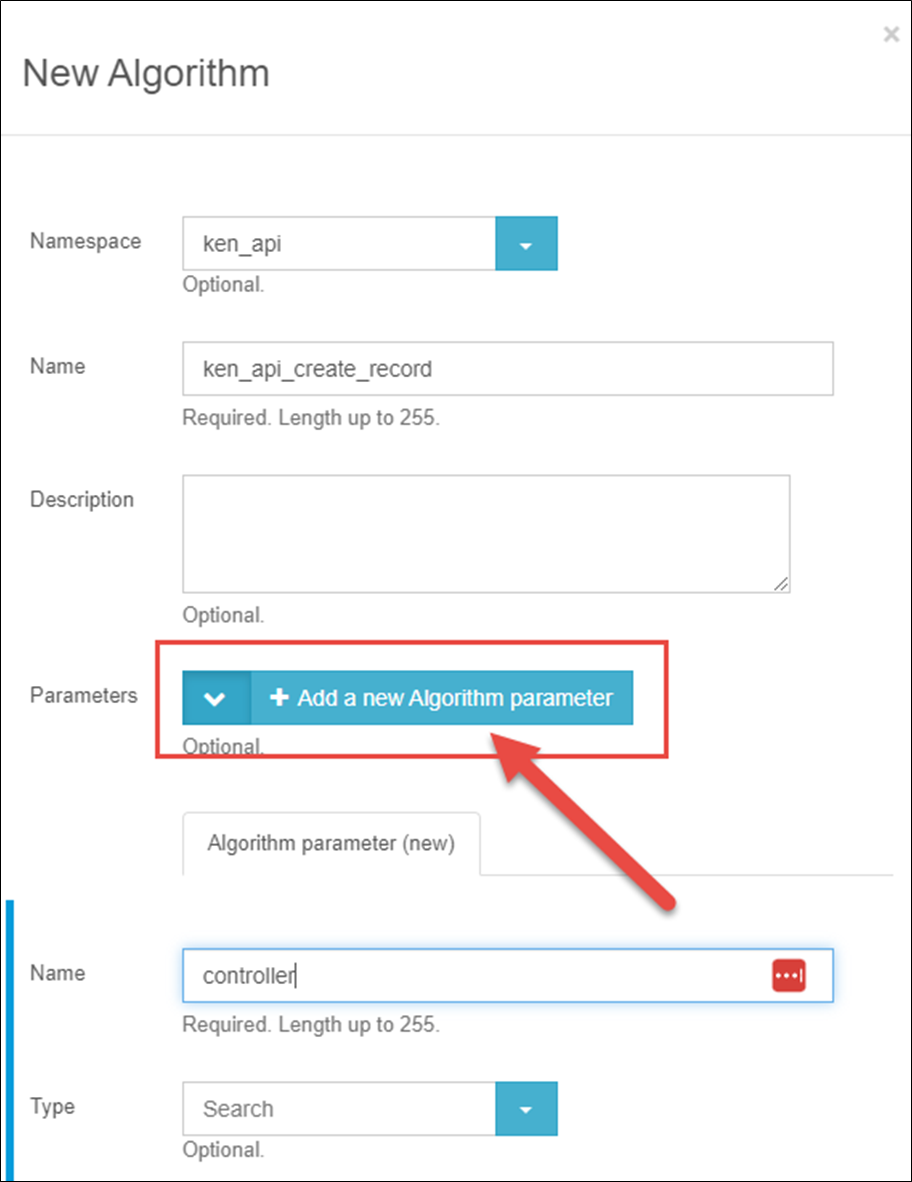
Enter the name for your new algorithm parameter:
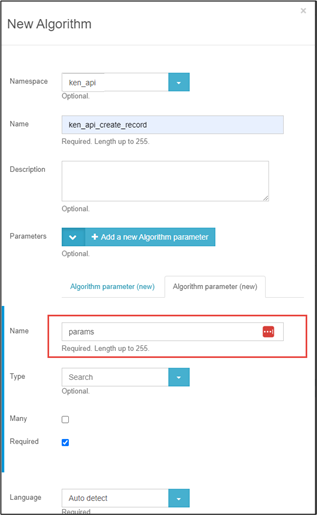
Form Field | Description | Content |
|---|---|---|
Name | Name for your new algorithm parameter | params |
The final step is to create the block of code that executes when the Action/Algorithm is called. For this tutorial, we want to create an algorithm that receives the POST body data through params and converts it to a JSON object which can be used to create a new record in our data type.
Enter language type and code, then click save.
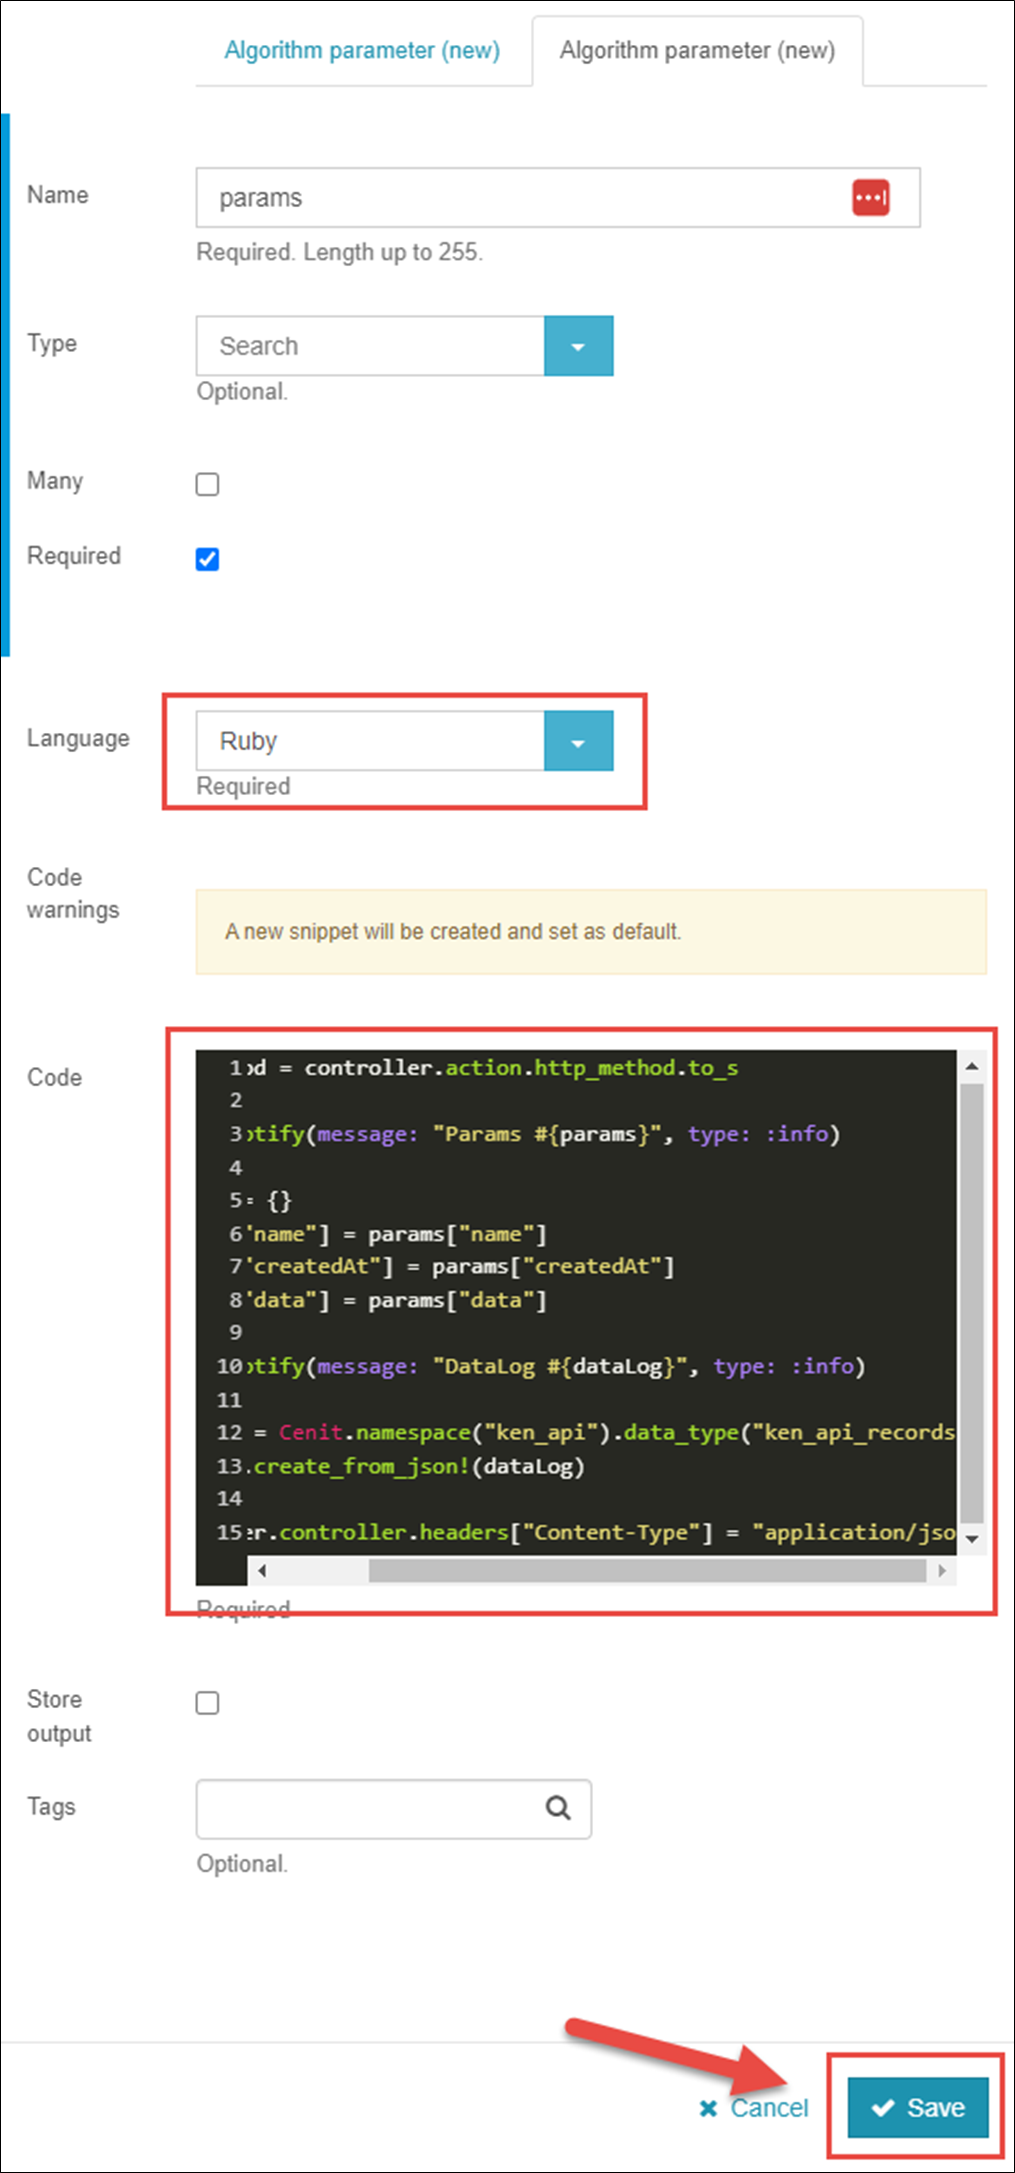
Form Field | Description | Content |
|---|---|---|
Language | Your code language | Ruby |
Code | The code that executes when the Action/Algorithm is called. | See code below. Replace the CAPILAIZED text YOUR-NAME-SPACE and YOUR-DATA-TYPE with your values |
httpMethod = controller.action.http_method.to_s

Tenant.notify(message: "Params #{params}", type: :info)

dataLog = {}
dataLog["name"] = params["name"]
dataLog["createdAt"] = params["createdAt"]
dataLog["data"] = params["data"]

Tenant.notify(message: "DataLog #{dataLog}", type: :info)

recordDT = Cenit.namespace("YOUR-NAME-SPACE").data_type("YOUR-DATA-TYPE")
recordDT.create_from_json!(dataLog)

controller.controller.headers["Content-Type"] = "application/json"
You will be redirected back to your new application page, where you will see your newly created algorithm has been auto-selected for this action.
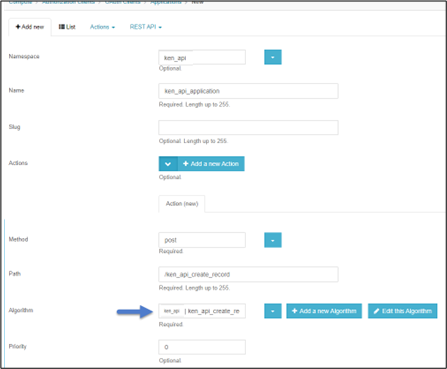
Now we have an Action that can create a new record entry from data passed in through Postman. The next step is to create an algorithm that will retrieve our record entries from the data type.
GET / Get All Records
Our next action that will be created will be the action we call when we want to retrieve all records from our database (data type). Click "+ Add new Action"
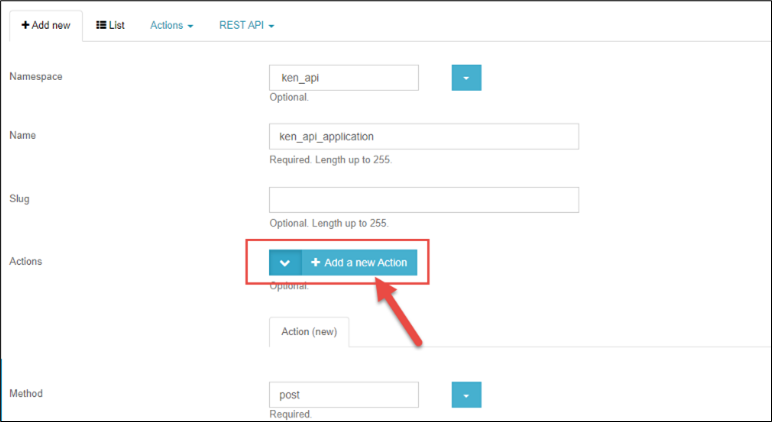
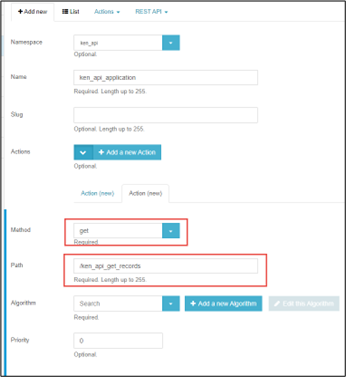
Enter the values for your new get action:
Form Field | Description | Content |
|---|---|---|
Method | The REST method to use for this action. We select GET because we want to add a new record to the database when calling this action. | get |
Path* | Name for your new get algorithm | [YOUR NAME]_api_get_records |
*Your GET action path will be used later in this exercise
Now we need to create the functionality for the Action by creating an algorithm. Algorithms are snippets of code that perform a specific function when executed. Click "+ Add new Algorithm".
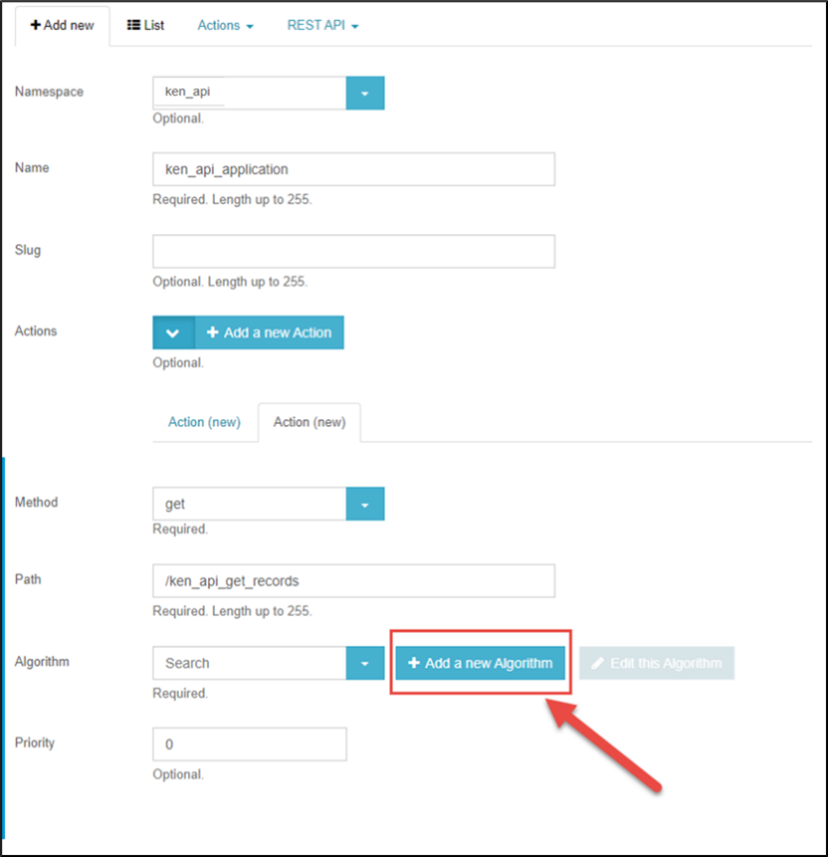
Enter the values for your new algorithm:
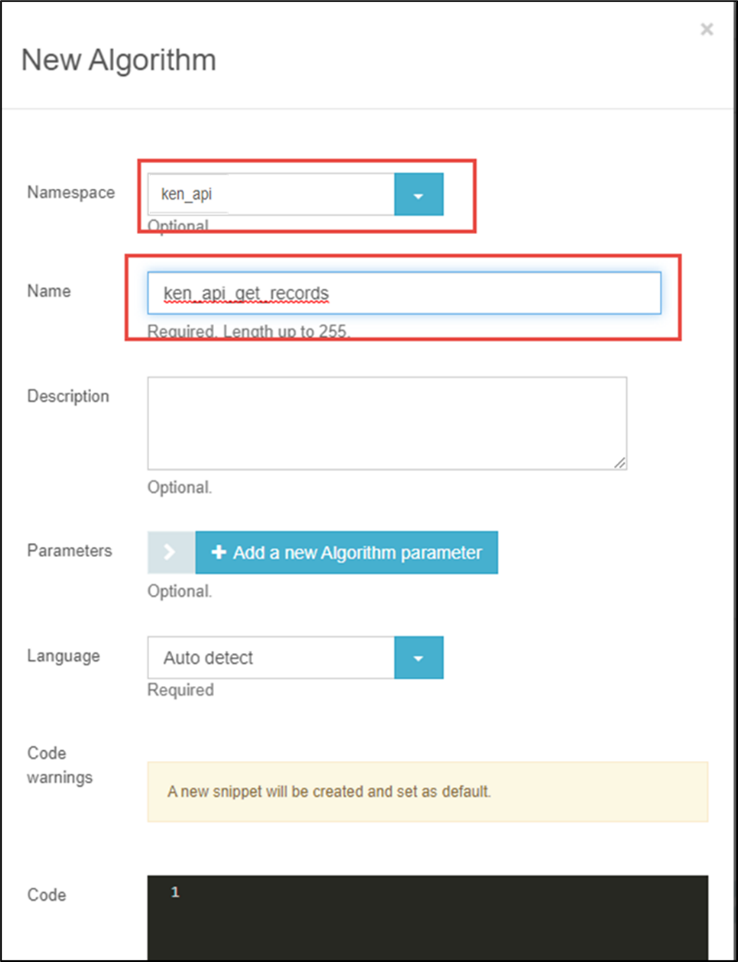
Form Field | Description | Content |
|---|---|---|
Namespace | Unique name which is used for all components of your new API | copy from prior steps |
Name* | Name for your new algorith | [YOUR NAME]_api__getrecords |
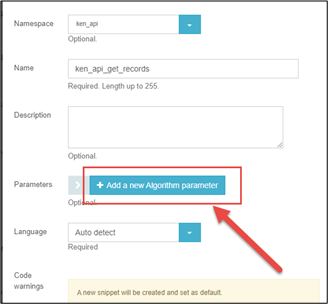
Add the controller Algorithm parameter to this Algorithm as well. Click "+ Add new Algorithm parameter.
Enter the name for your new algorithm parameter:
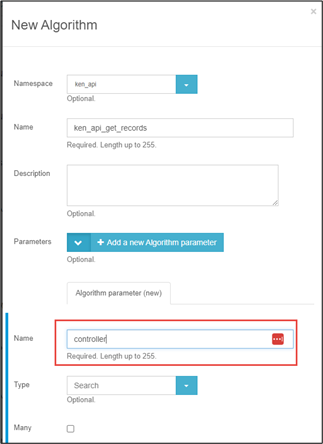
Form Field | Description | Content |
|---|---|---|
Name | Name for your new algorithm parameter | controller |
Add the controller Params parameter to this Algorithm as well. Click "+ Add new Algorithm parameter".
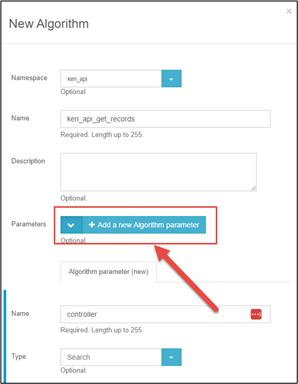
Enter the name for your new algorithm parameter:
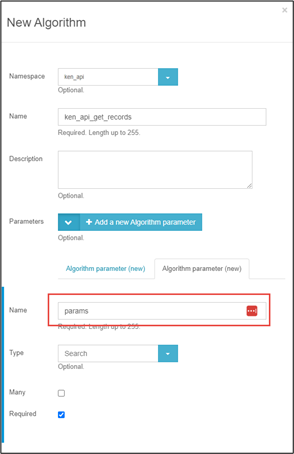
Form Field | Description | Content |
|---|---|---|
Name | Name for your new algorithm parameter | params |
Next, let's add the code to retrieve records from the ou data type and convert the entries to a JSON object. Enter your Ruby Code and then click "Save."
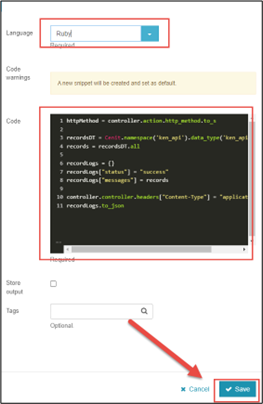
Form Field | Description | Content |
|---|---|---|
Language | Your code language | Ruby |
Code | The code that executes when the Action/Algorithm is called. | See code below. Replace the CAPILAIZED text YOUR-NAME-SPACE and YOUR-DATA-TYPE with your values |
httpMethod = controller.action.http_method.to_s

recordDT = Cenit.namespace("YOUR-NAME-SPACE").data_type("YOUR-DATA-TYPE")
records = recordsDT.all

recordLogs = {}
recordLogs["status"] = "success"
recordLogs["messages"] = records

controller.controller.headers["Content-Type"] = "application/json"
recordLogs.to_json
Now that the Actions have been created, we can save our new API Application.
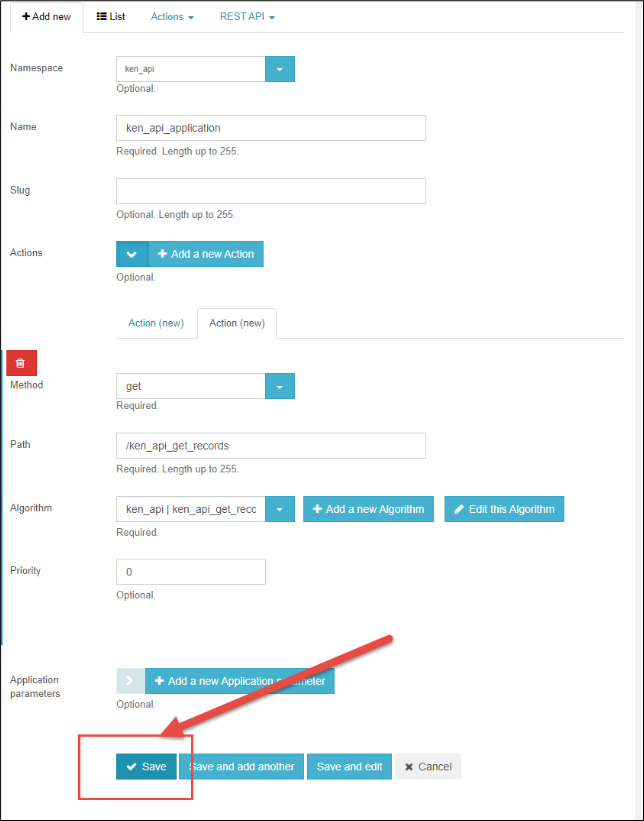
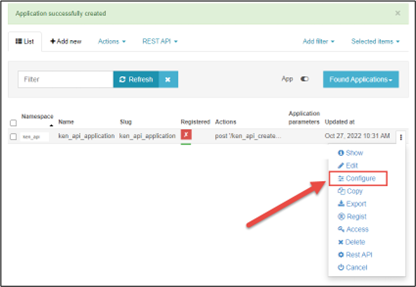
You will be redirected to your application list page, which will now show your new API application listed and a message confirming the application was created successfully.
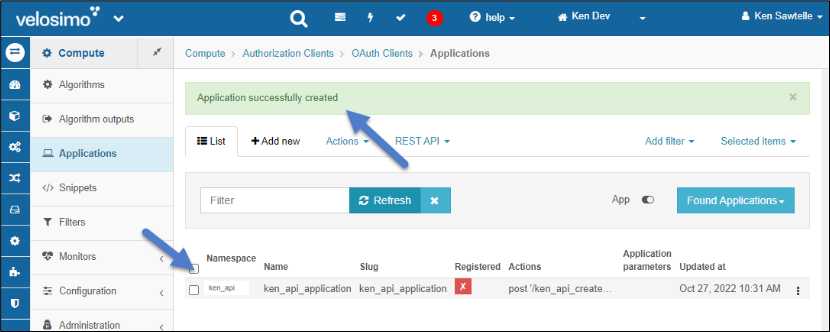
Next, we will add authentication, register our new app, and then test the endpoints on Postman. Select the Kabab menu on your application row and then click "Configure."
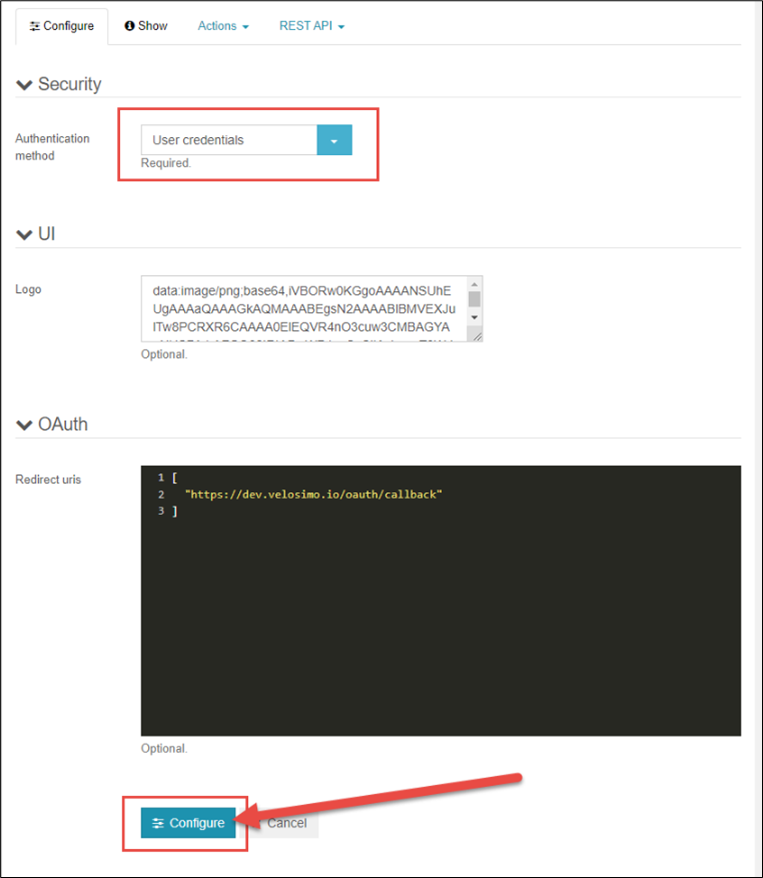
To use your application, you must provide some form of Authentication. In Velosimo, there are two to choose from:
- User Credentials: Requires Tenant Authorization Key and Token to use app URL
- Application ID: Only requires the app slug name to be passed to the URL
We will use User Credentials for this tutorial because it is a more secure practice. Select "User Credentials" from the Authentication Method drop-down, then click the "Configure" button (which saves your changes).
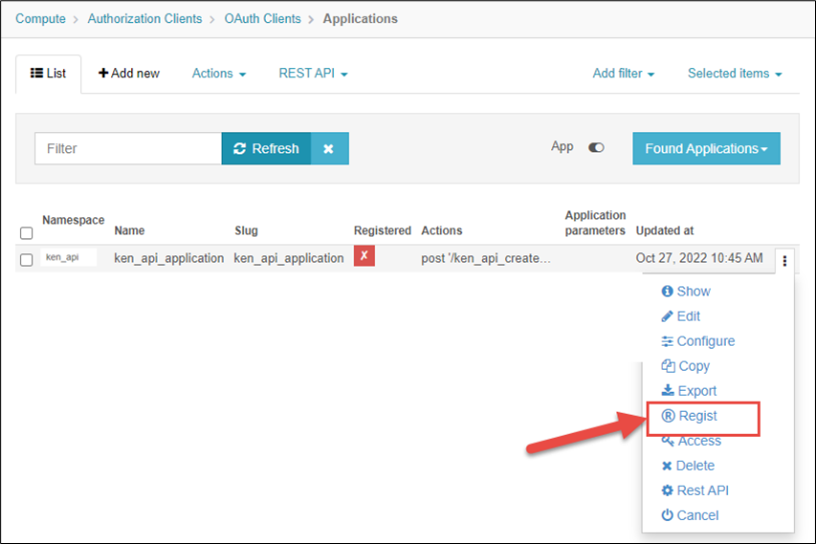
Now we need to Register the app and set its slug/URL. Registering your app is a requirement for external use outside Velosimo. Select the Kabab menu on your application row and then click "Regist."
Create a slug name for the app, enter the same name for the Oauth name input, and then click the Regist button (save).
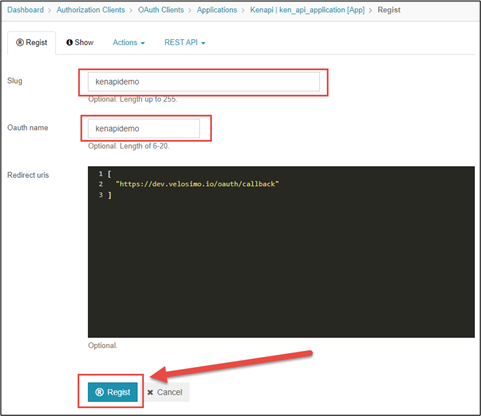
Form Field | Description | Content |
|---|---|---|
Slug* | Name used to call the app and its endpoints | [YOUR NAME]apidemo |
Oauth Name* | Same as above |
*The content entered for these values cannot include spaces
Using the API
Now that our new API application is registered, we can test our application post and get actions (test our new endpoints) using Postman.
Please obtain your Tenant Authorization Key and Token from Velosimo.
First, log in to Postman, navigate to your workspace and click "Create new collection."
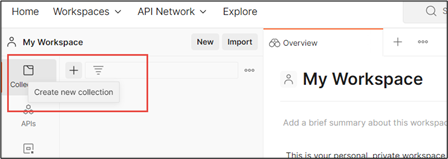
Name your new workspace the same as your Velosimo Namespace in this tutorial.
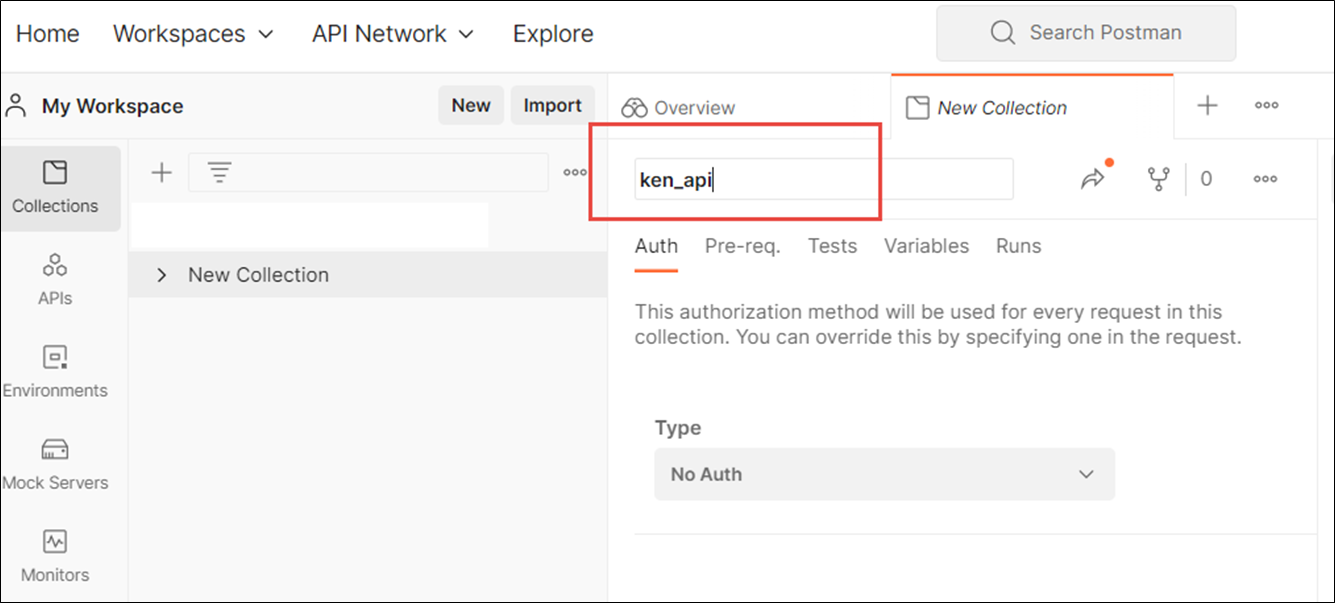
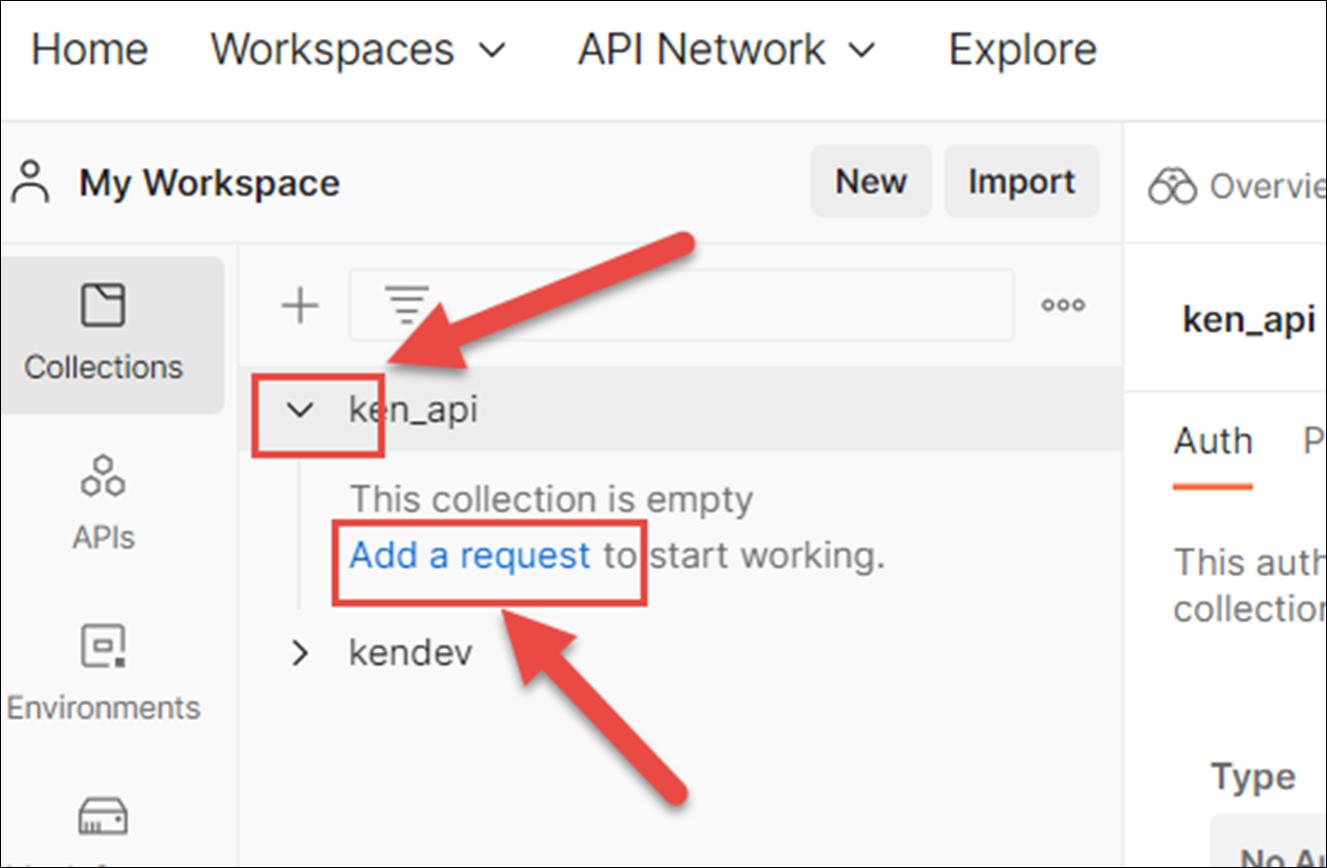
Next, click the Caret and then select the "Add a request "link
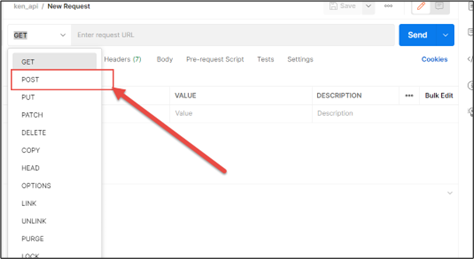
Next select "Post" from the drop-down
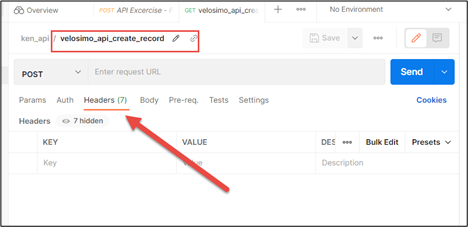
Set the name of your new Postman POST request to “velosimo_api_create_record” and then click the "Headers" link.
Add two entries or rows (Key/Value pairs) - the Access key and Token authentication values to access your new Velosimo API application.
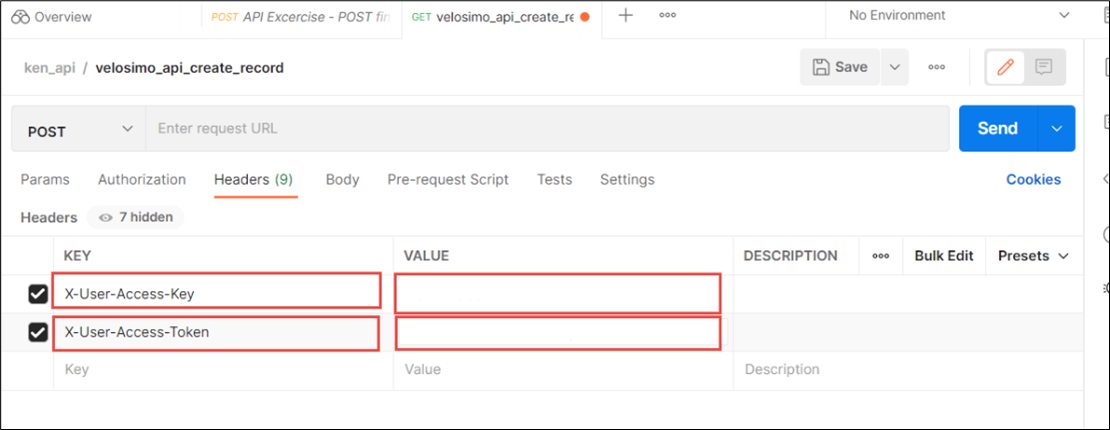
ROW | KEY | VALUE |
|---|---|---|
1 | X-User-Access-Key | YOUR-ACCESS-KEY |
2 | X-User-Access-Token | YOUR-ACCESS-TOKEN |
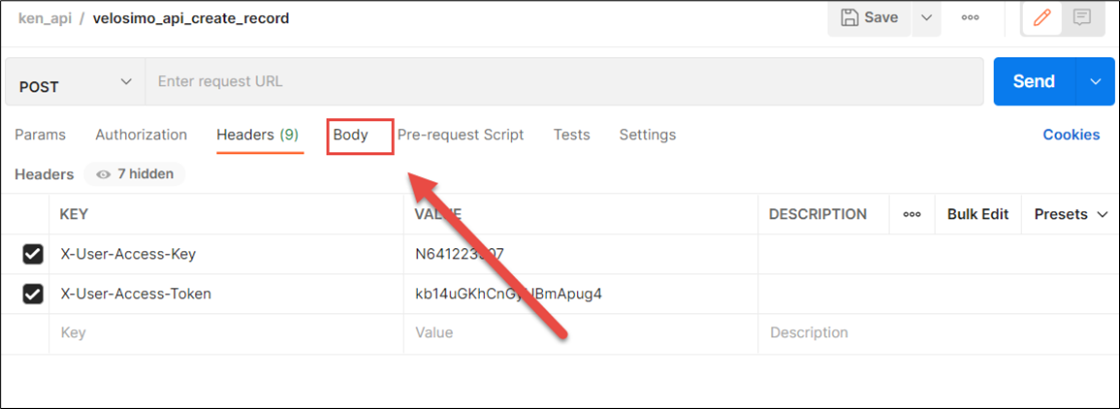
Next, click "Body."
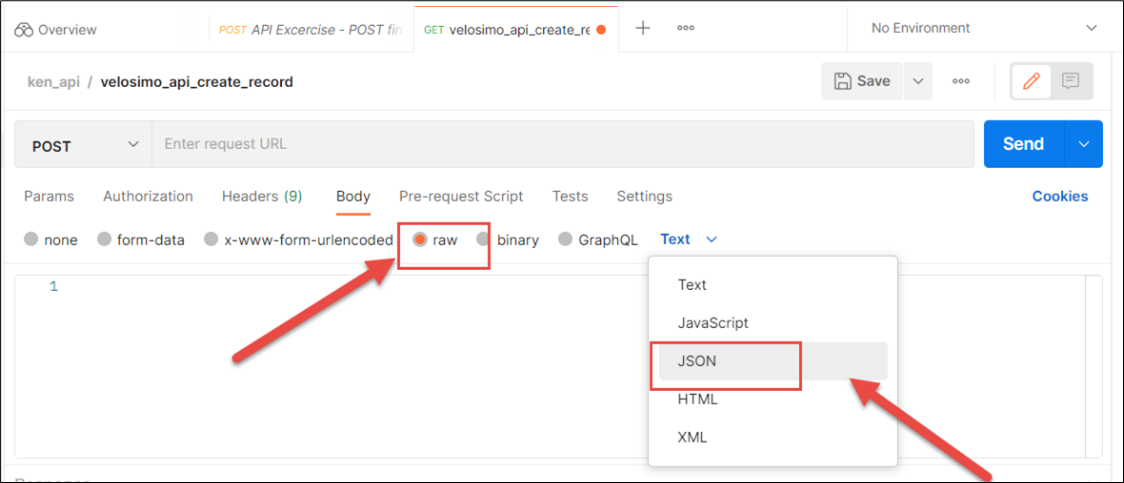
Next, click "raw," and then click "Text" and select "JSON."
Next, create a JSON data object based on the schema of the data type you made.
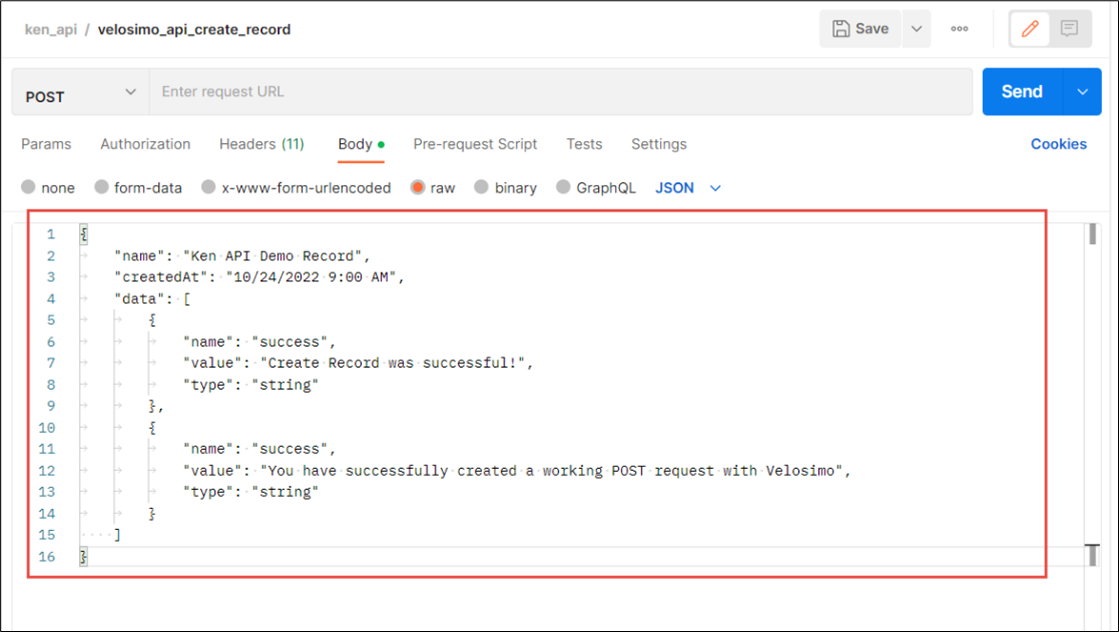
{
    "name": "YOUR-NAME API Demo Record",
    "createdAt": "10/24/2022 9:00 AM",
    "data": [
        {
            "name": "success",
            "value": "Create Record was successful!",
            "type": "string"
        },
        {
            "name": "success",
            "value": "You have successfully created a working POST request with Velosimo",
            "type": "string"
        }
    ]
}
Next, enter the request URL and click "Save."
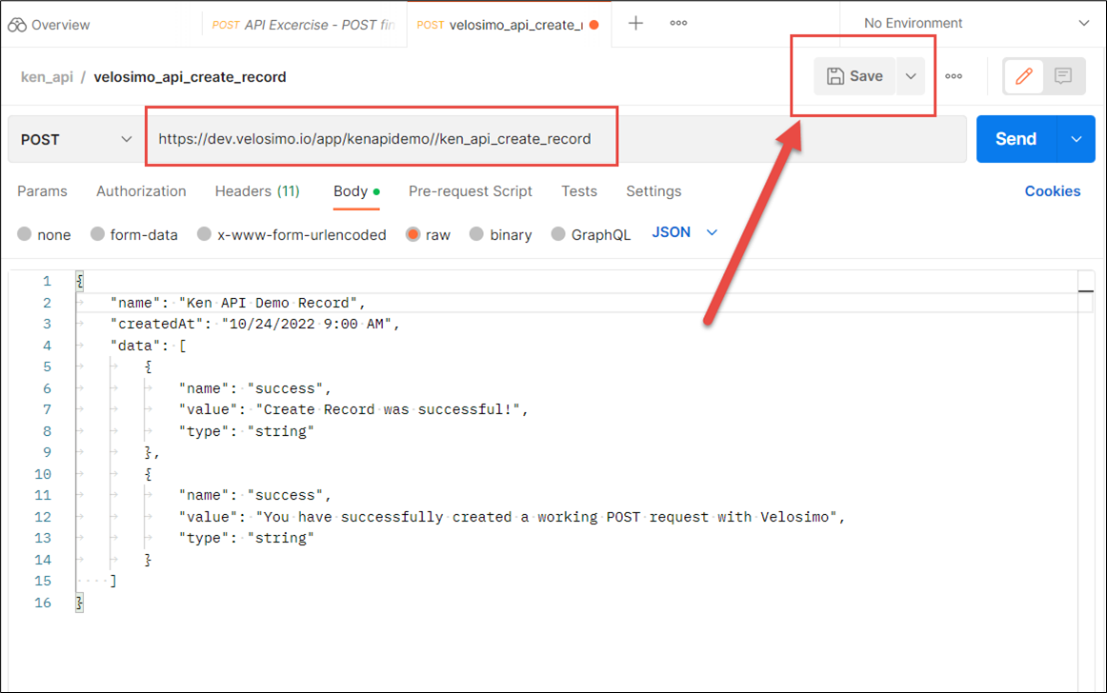
Form Field | Description | Content |
|---|---|---|
Request URL | https:/dev.velosimo.io/app/ | YOUR-APP-SLUG/YOUR-POST-ACTION-PATH_api |
Now it's time to send our test post request to send and create a new record in our Velosimo Database with the use of Postman.
Click "Send"
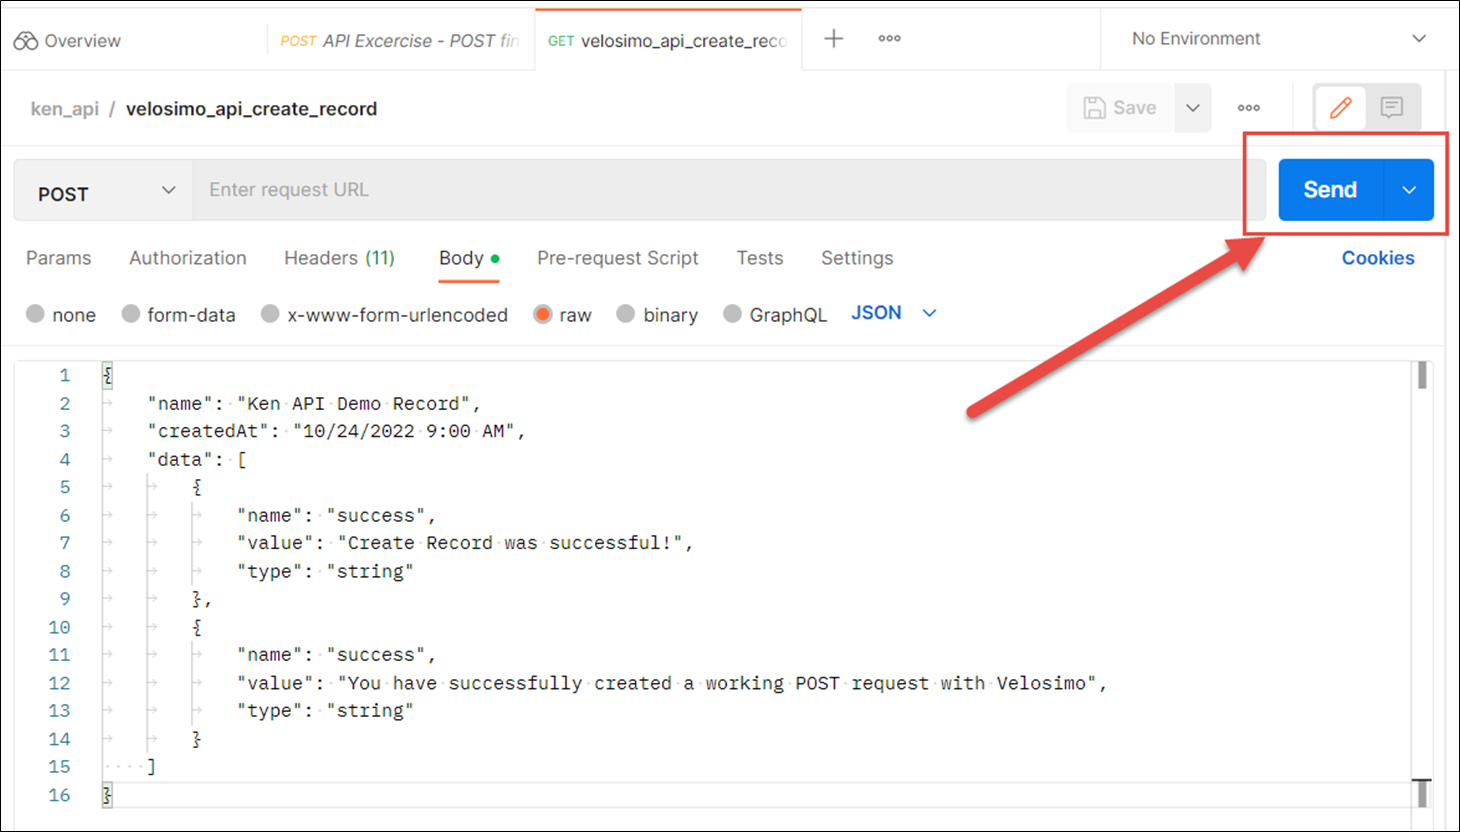
If successful, you will see "application/Json" at the bottom of the screen
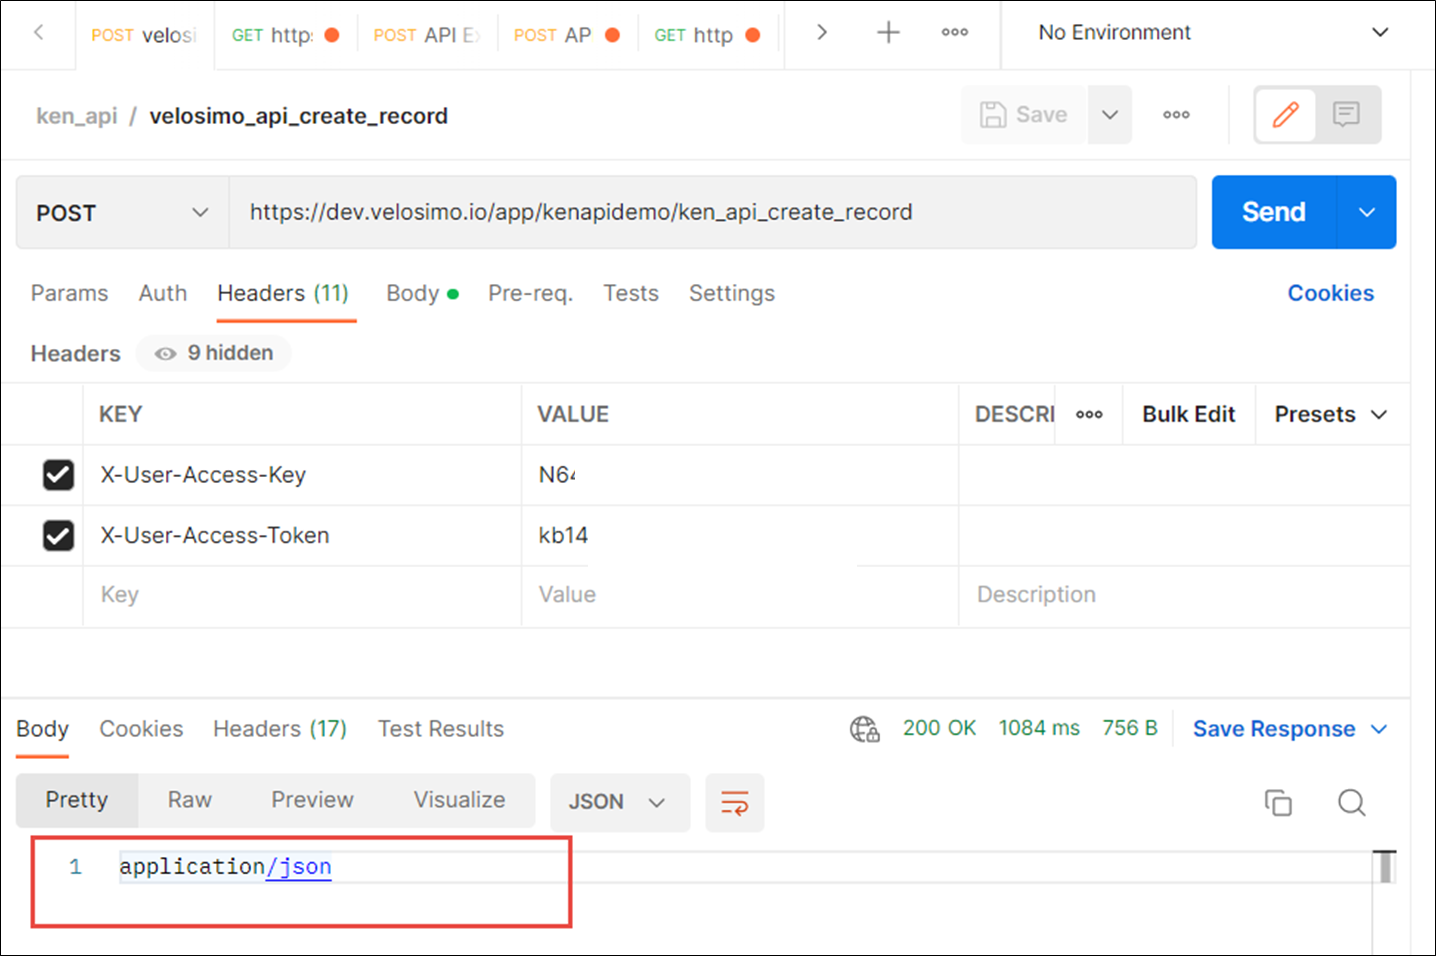
Let's look in our database and confirm the API worked and a record was created. Head back to Velosimo and select Definitions under the Data section of the main menu:
Next, click the Kebab icon next to "Json Types" and select "List."
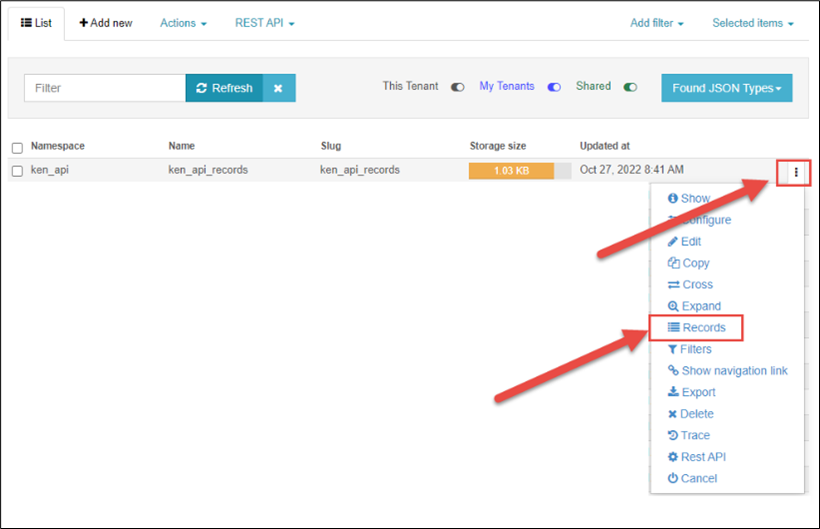
Select the Kabab menu on your Data Type (Data Base) row and then click "Records."
Here you will see the list of records in your database.
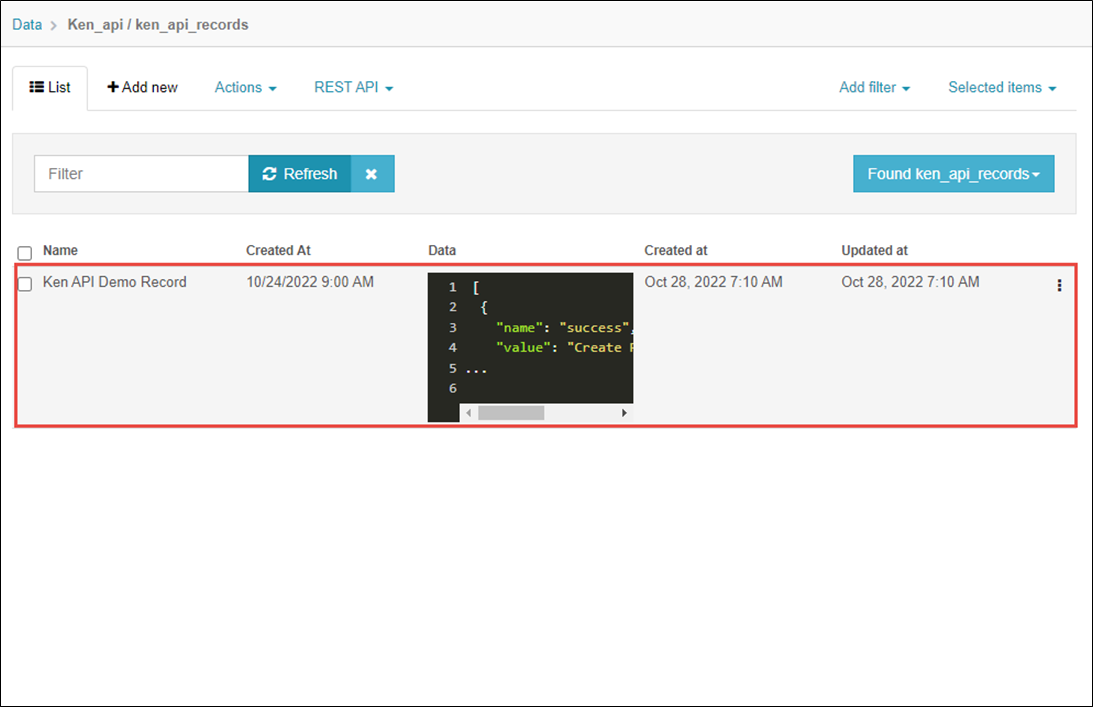
Select the Kabab menu on your new record to see the details and click "Show."
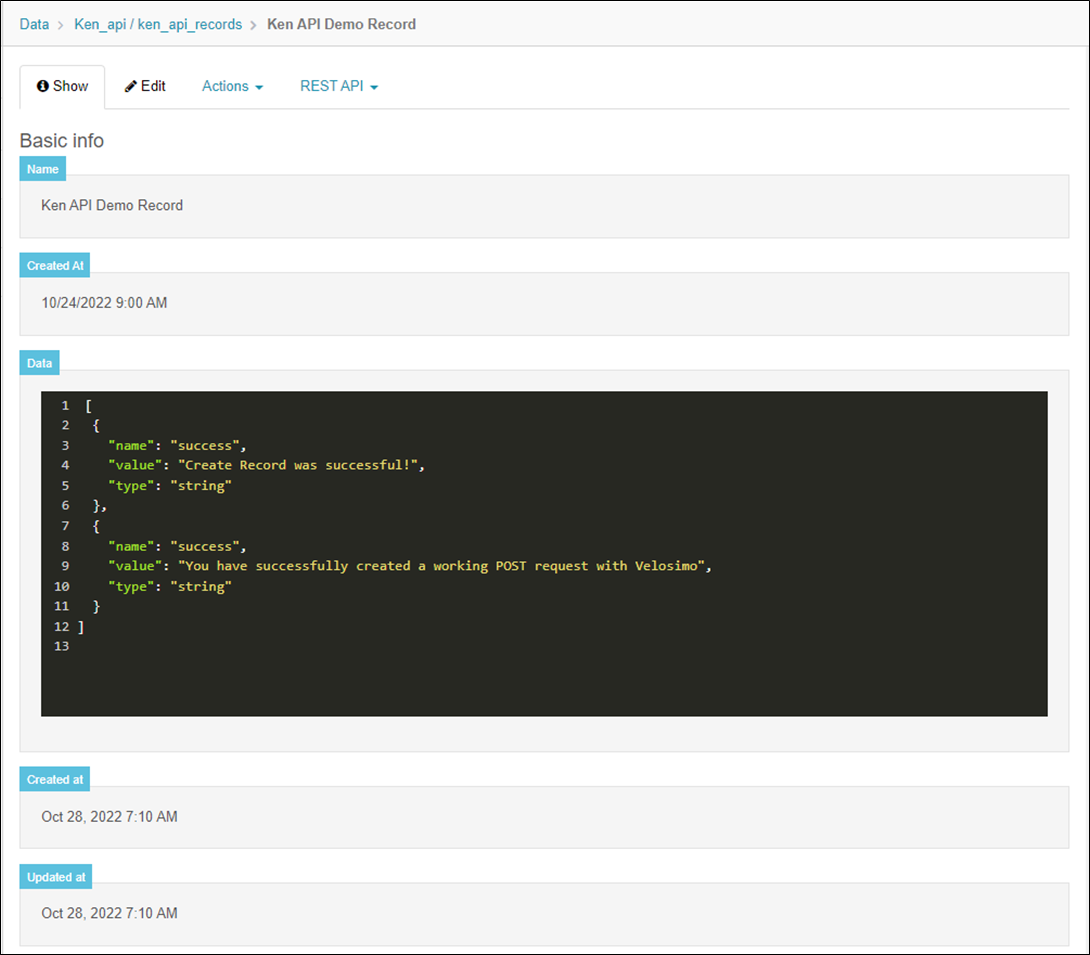
Now that we've successfully created a new record with our POST action request, let's test out the GET request that will retrieve all rows from the database.
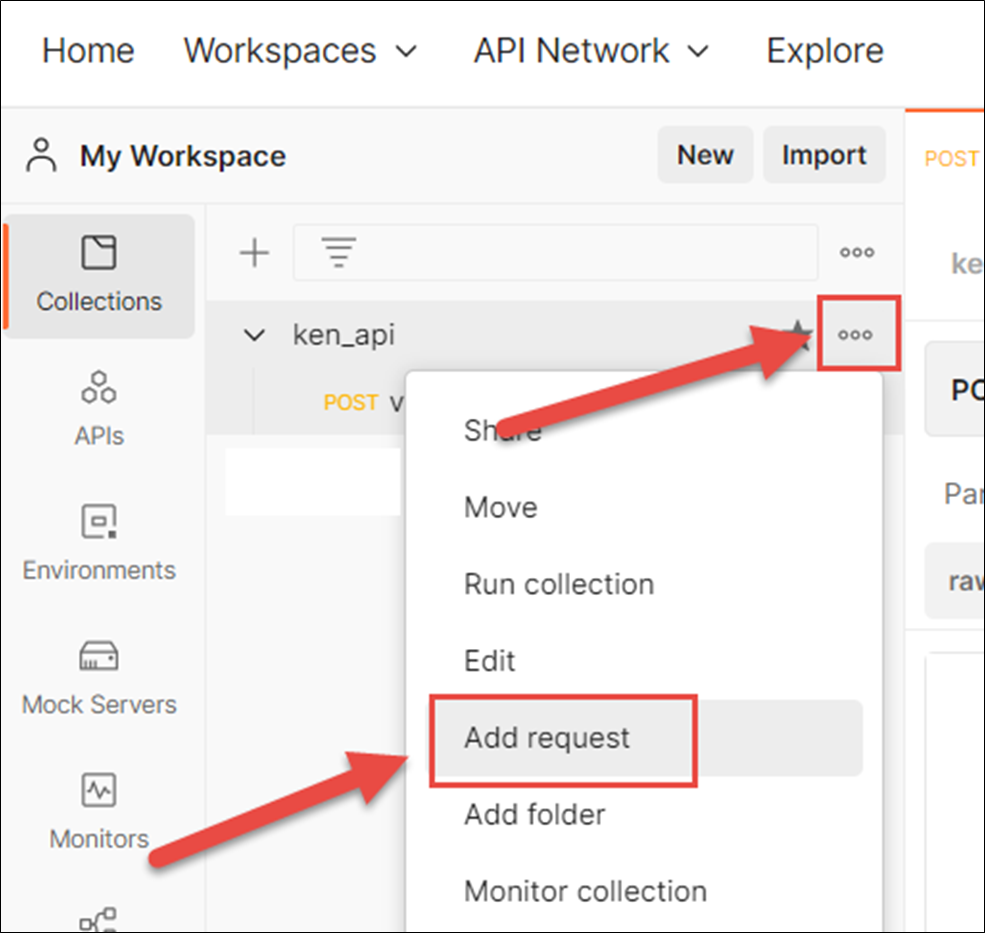
Go back to Postman, select the Kabab menu on your collection, and click "Add request." Note that it will default to a "GET" request, so we do not need to set that value.
Set the name and request URL
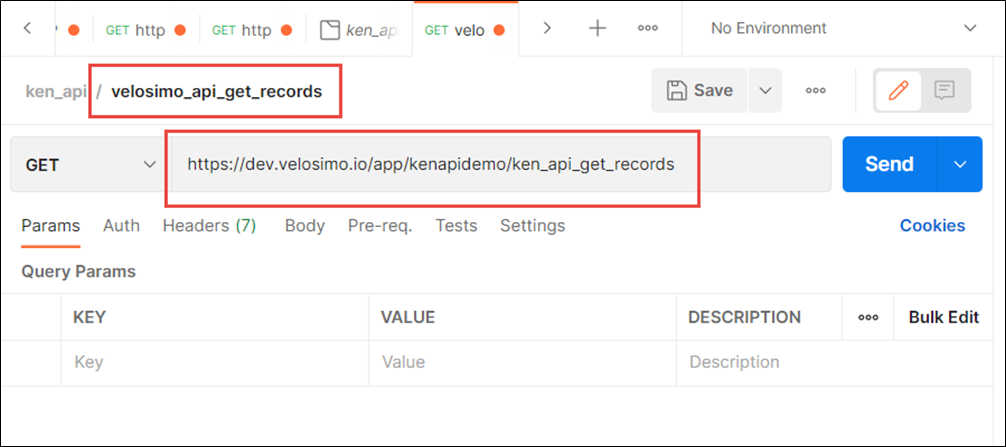
Form Field | Description | Content |
|---|---|---|
Request Name | Request Name in Postman | velosimo_api_get_records |
Request URL | URL to submit a get request to your new API application | https:/dev.velosimo.io/app/YOUR-APP-SLUG/YOUR-POST-ACTION-PATH_api |
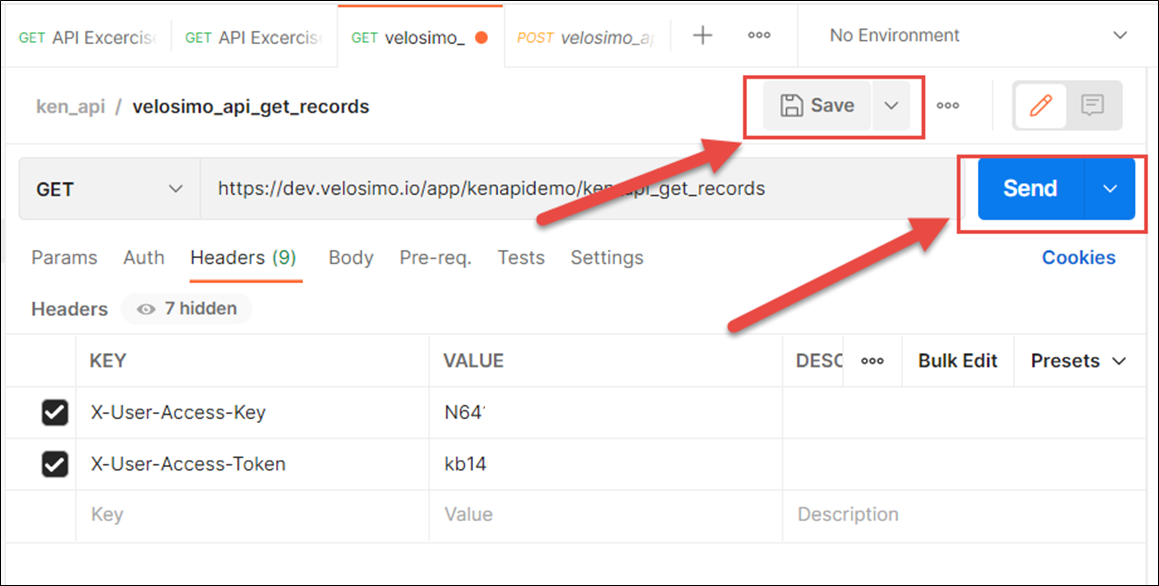
Click "Headers" and add two entries or rows (Key/Value pairs) - the Access key and Token authentication values to access your new Velosimo API application. These entries are identical to those entered for the POST request in Postman prior.
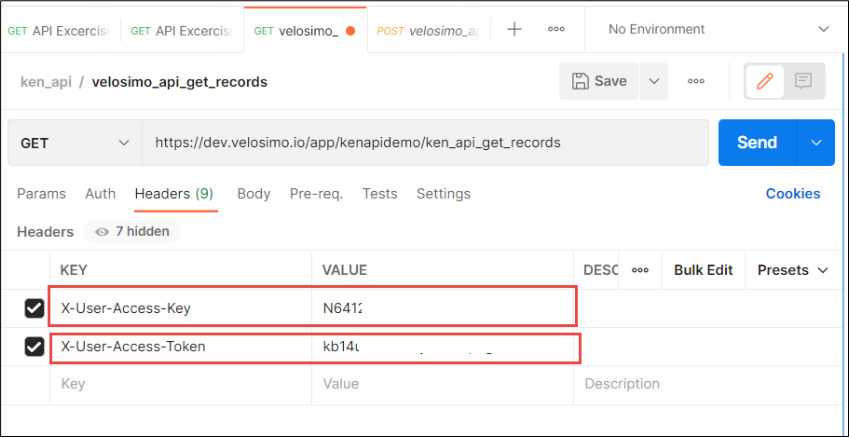
Click "Save," then "Send."
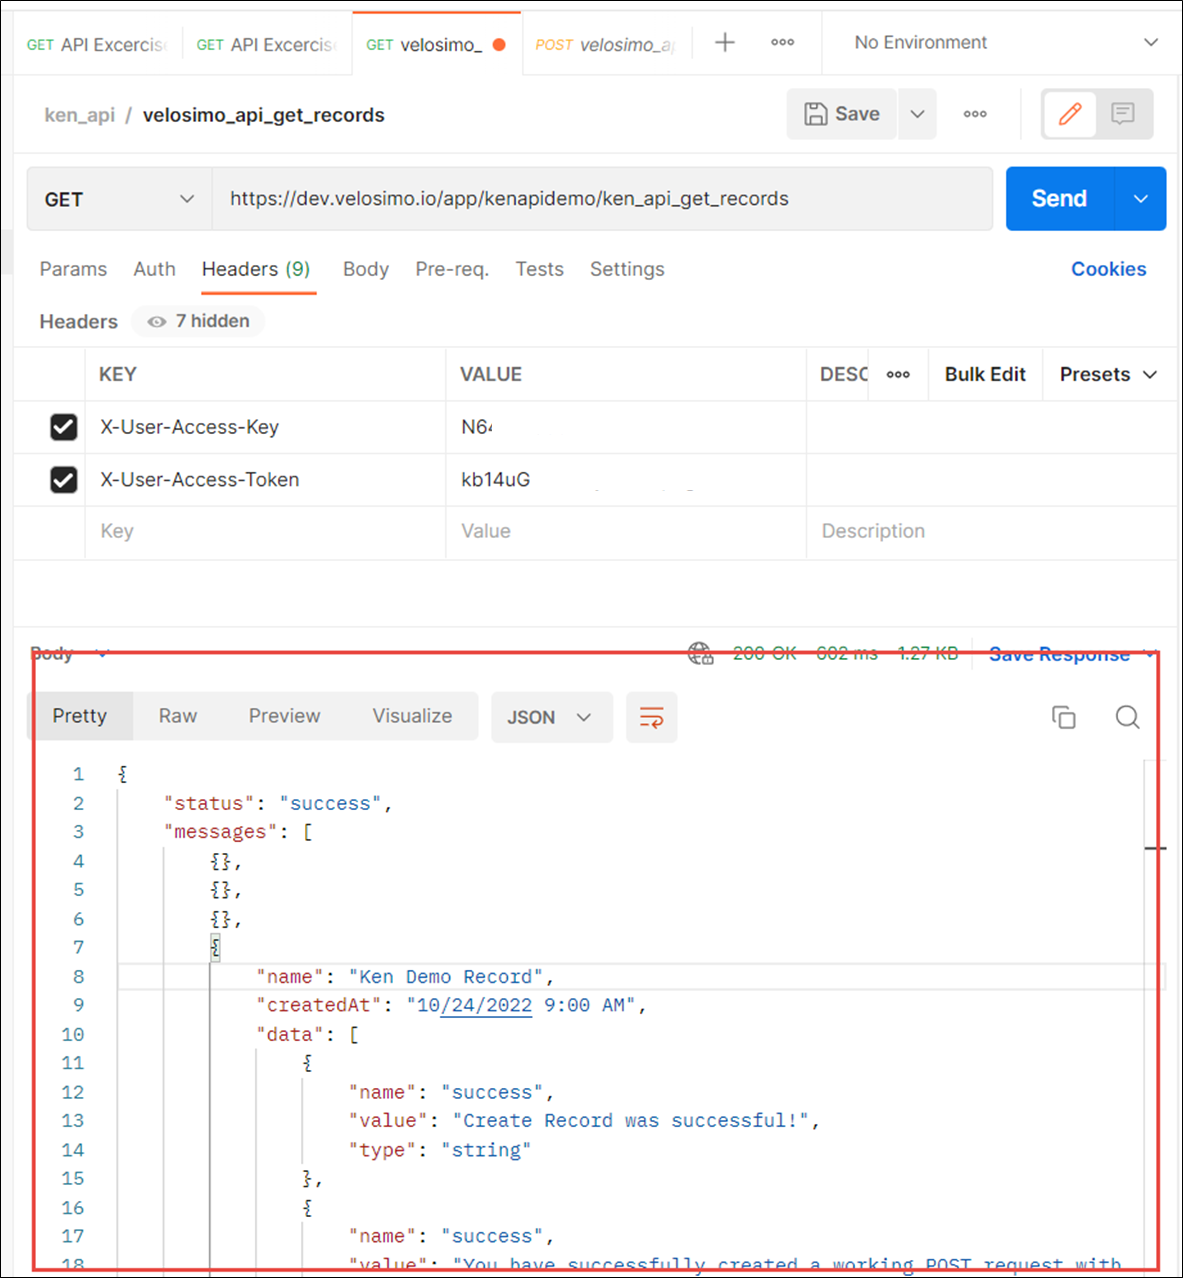
Congratulations! You have successfully created and tested a new API Application with get and post actions and a Velosimo Database.
Updated 3 months ago
