Laserfiche Process Automation to Payflow Pro Setup Guide
Payflow Pro for Laserfiche Workflow Configuration Guide
Velosimo Configuration
- Go to https://connect.velosimo.io and login with your email address
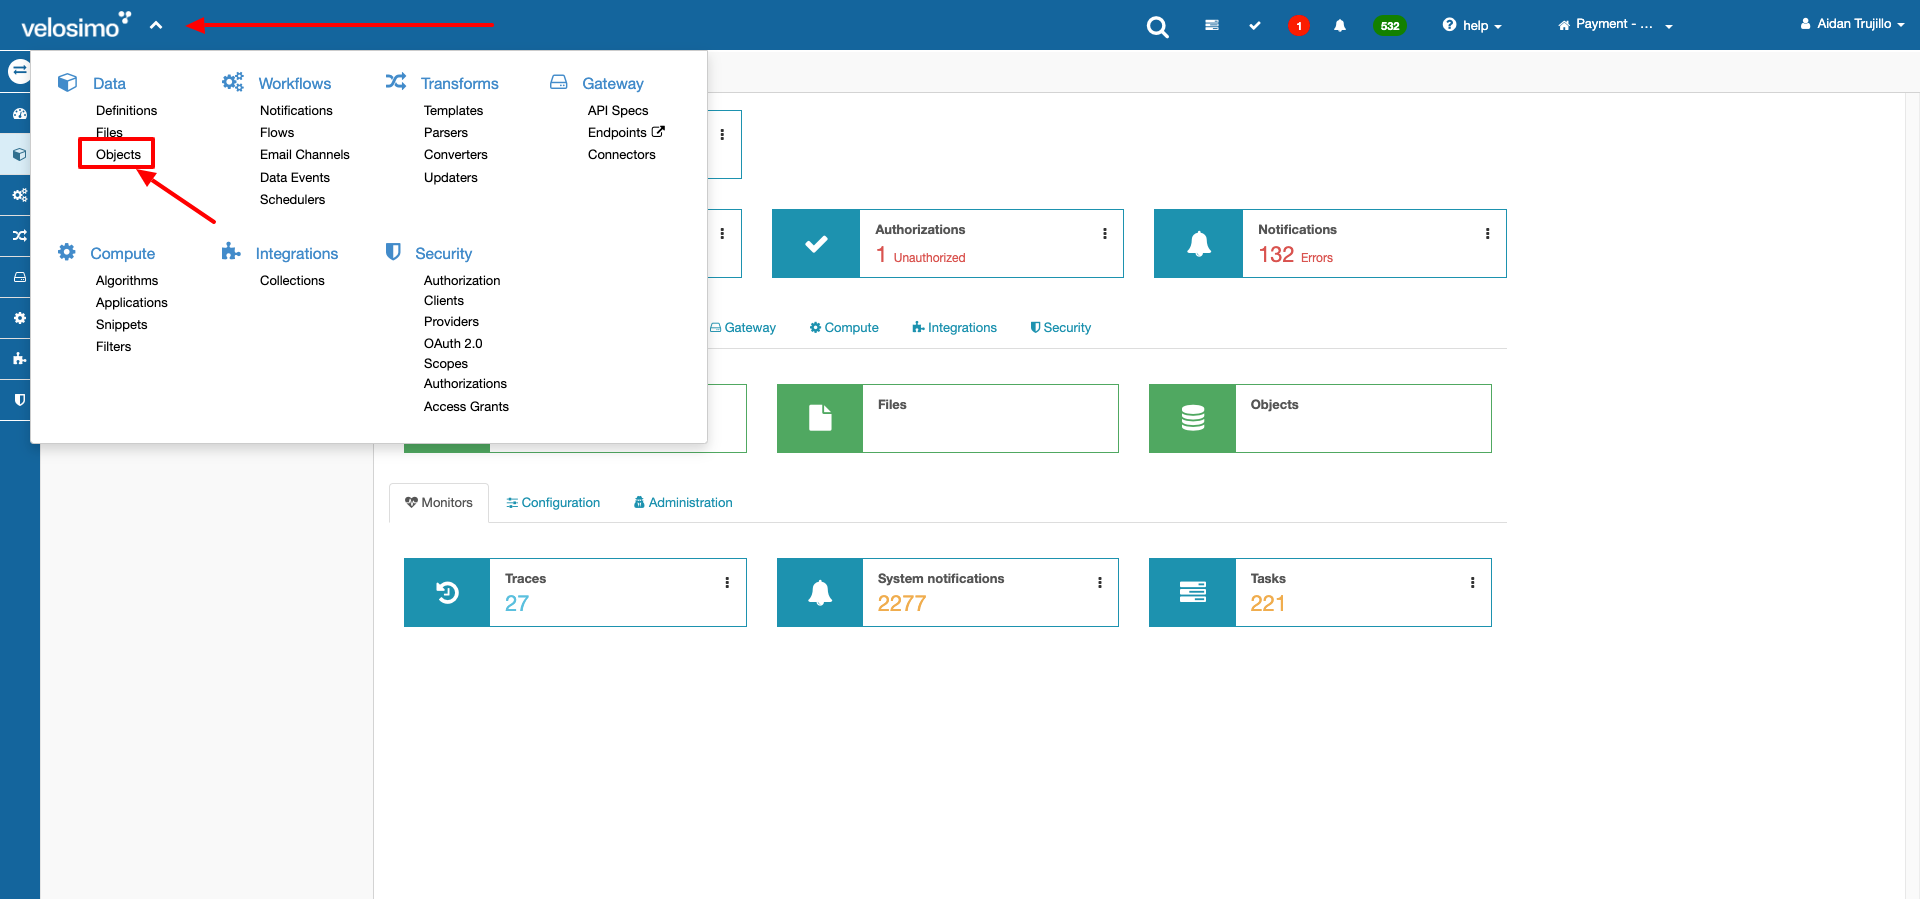
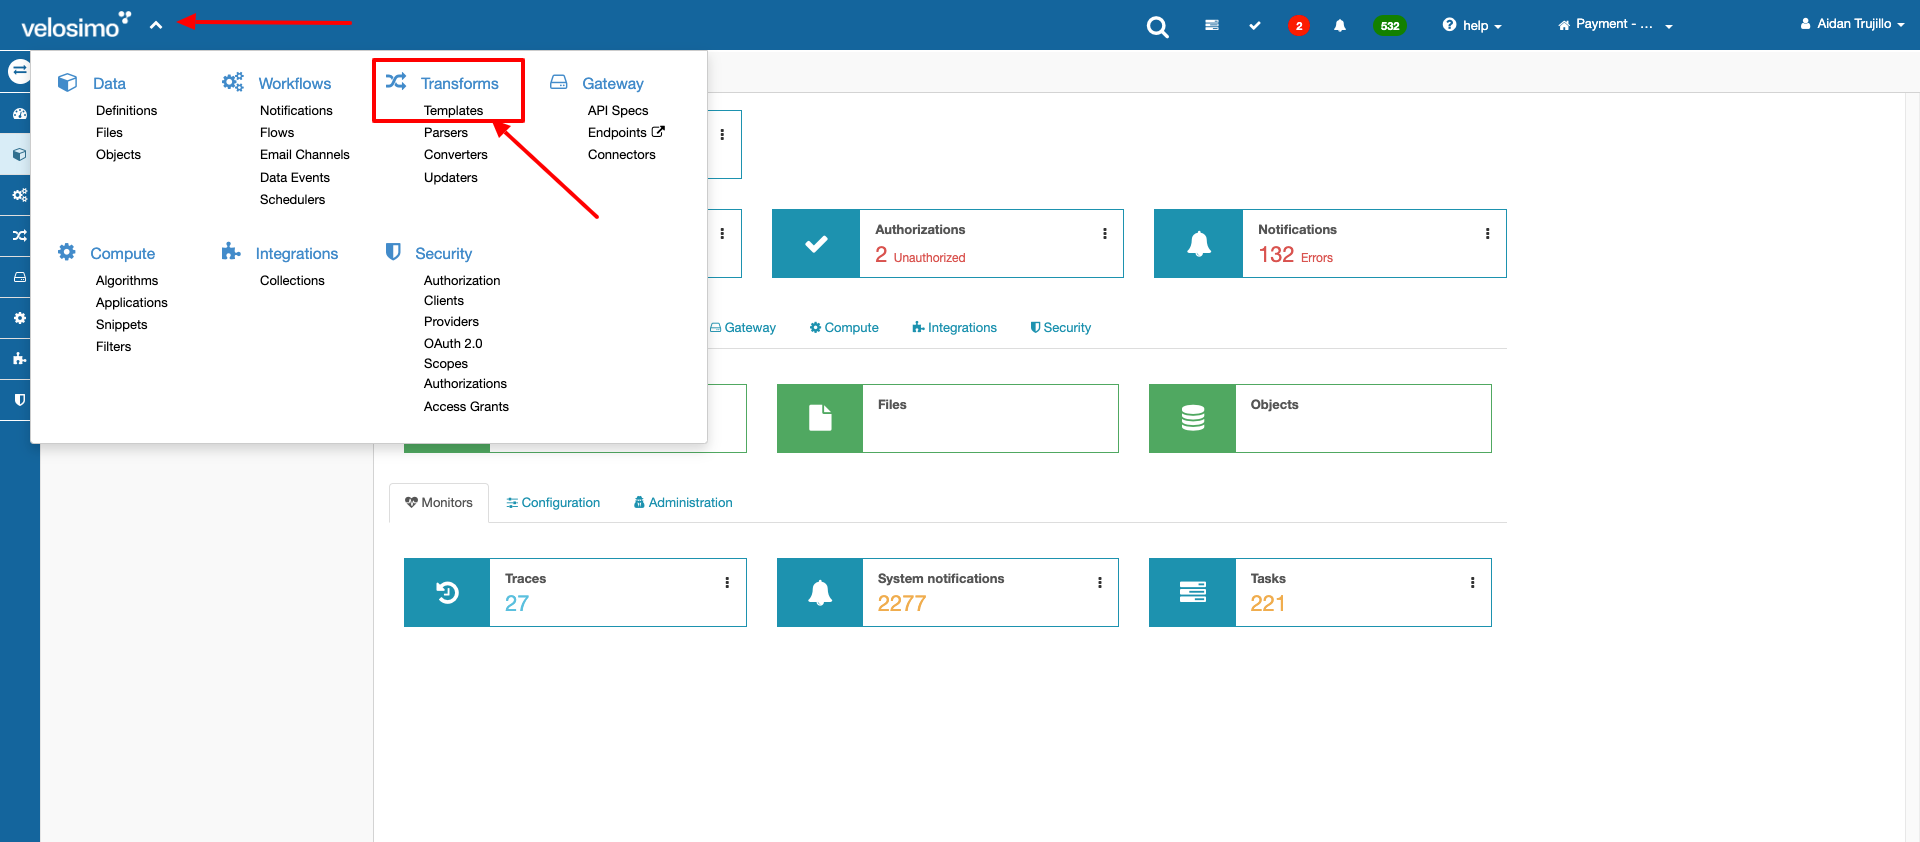
- Using the Velosimo menu, navigate to Data -> Objects
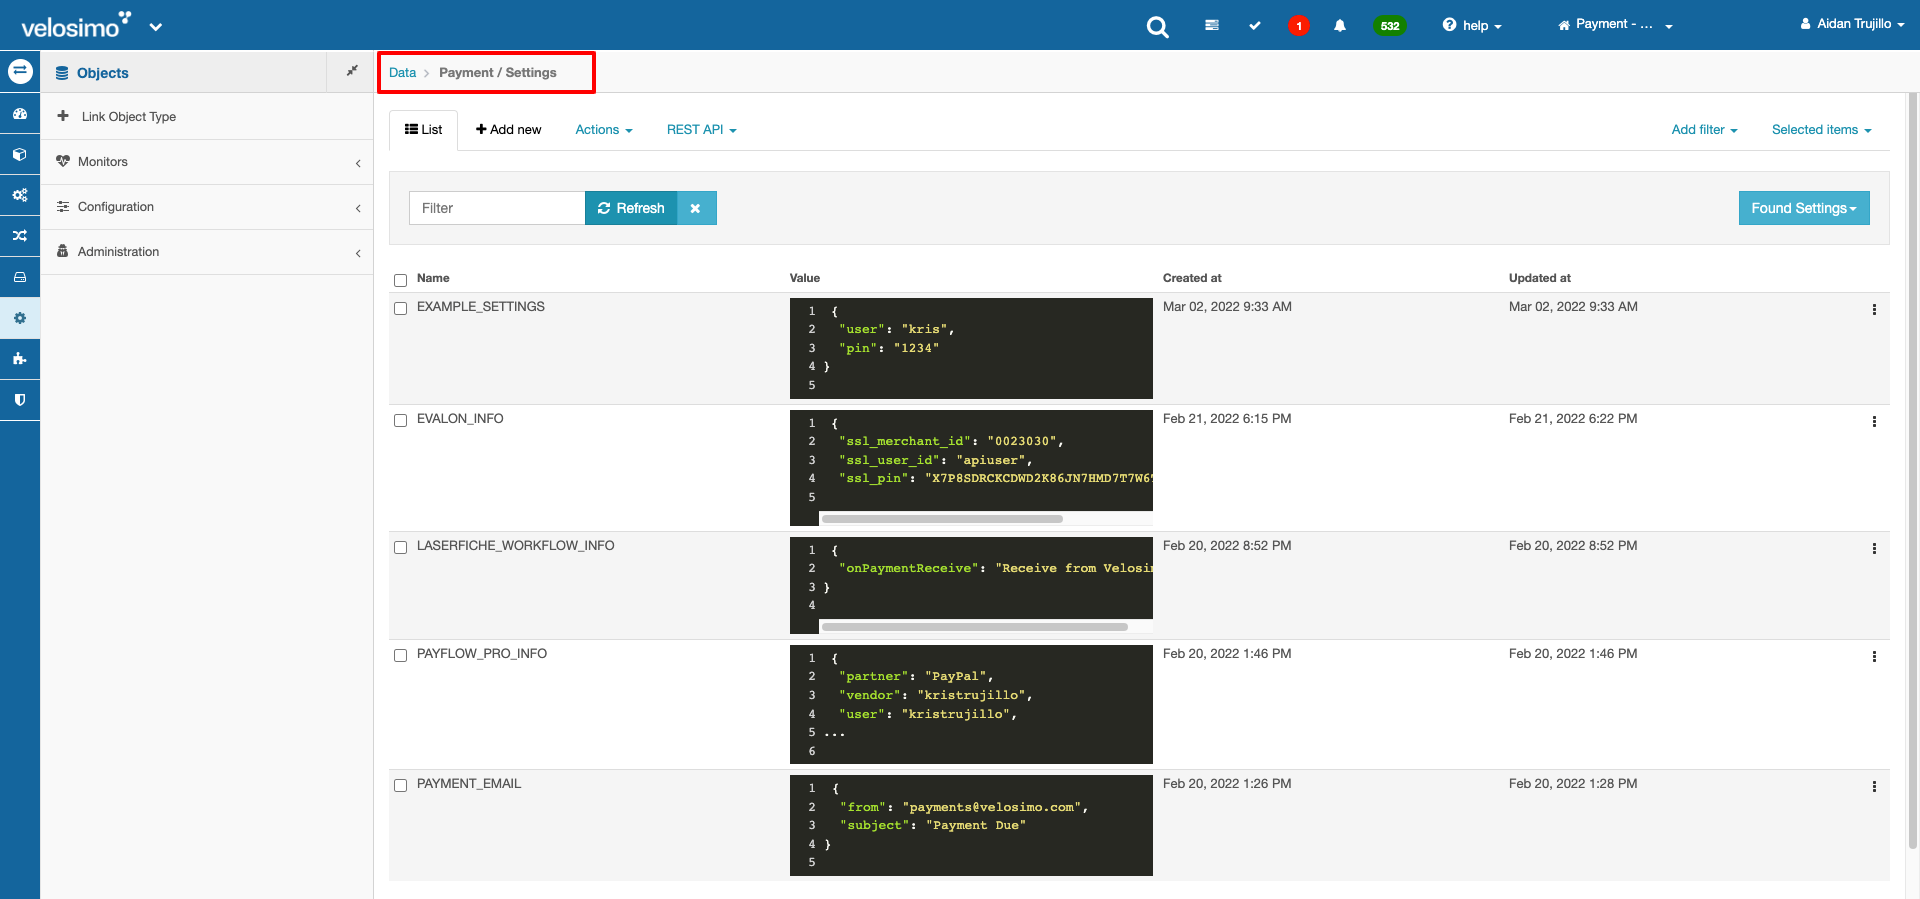
- Under the Objects go to the Payment -> Settings datatype
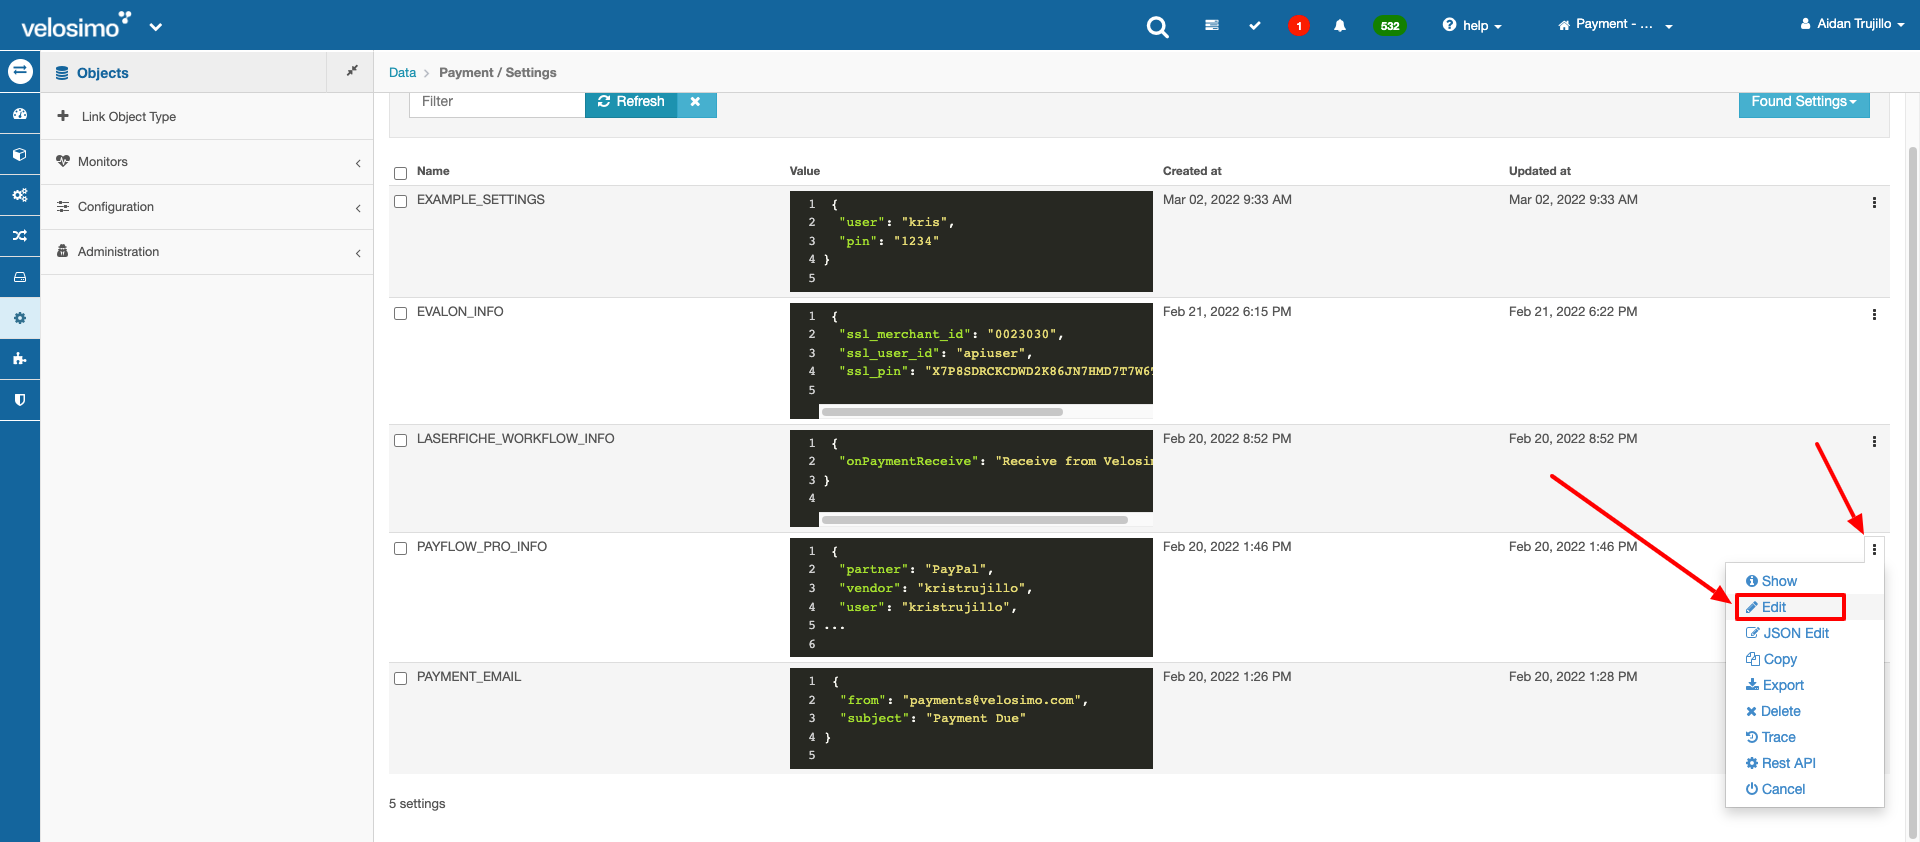
- The Settings datatype contains three entries to configure for your environment. For each entry go to the right row menu and go to Edit.
a. Editing the PAYFLOW_PRO_INFO settings:
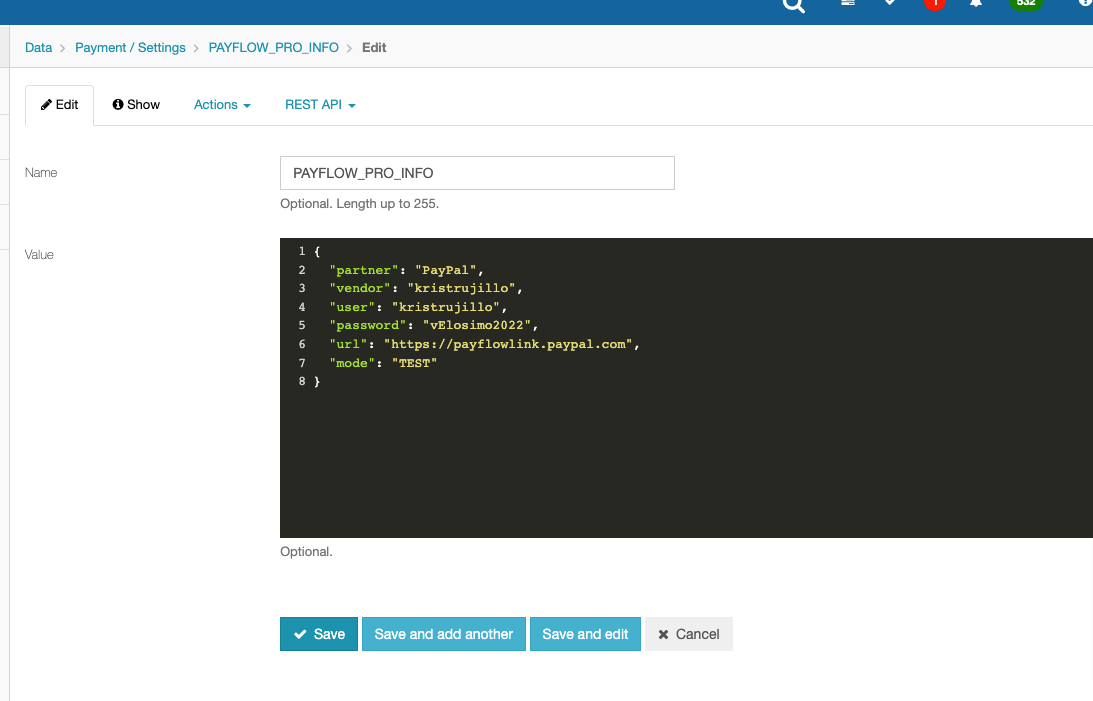
Setting | Value |
|---|---|
partner | Paypal partner name. This is the same partner named as used to login to the Paypal Manager. |
vendor | Paypal vendor name. This is the same vendor name as used to login to the Paypal Manager. |
user | Paypal user. This is the same user name as used to login to the Paypal Manager. |
password | Paypal user password. This is the same password as used to login to the Paypal Manager. Password cannot contain special characters or it will not work (Paypal limitation). |
mode | TEST or LIVE |
url | Leave set to https://payflowlink.paypal.com |
b. Editing the LASERFICHE_WORKFLOW_INFO settings:
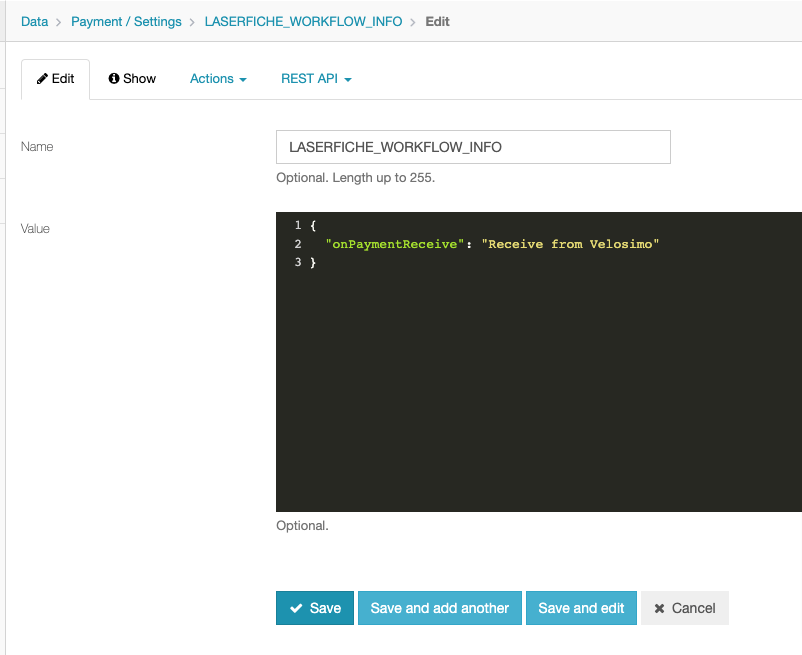
Setting | Value |
|---|---|
onPaymentReceive | The name of the Laserfiche Workflow to call when the payment is completed. The workflow will be sent the following parameters: referenceId |
c. Editing the PAYMENT_EMAIL settings:
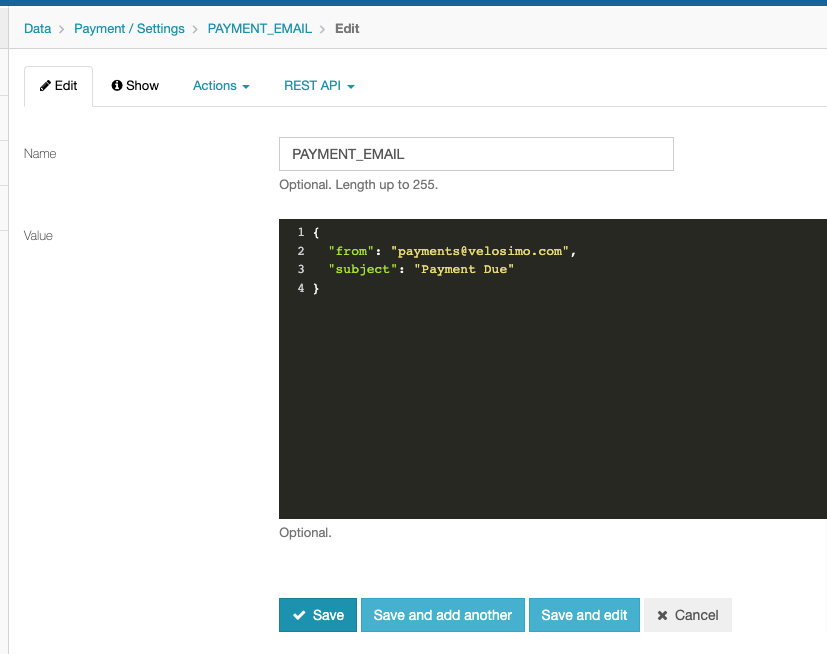
Setting | Value |
|---|---|
subject | The subject of the payment email sent |
- Next, navigate to Gateway -> Connectors.
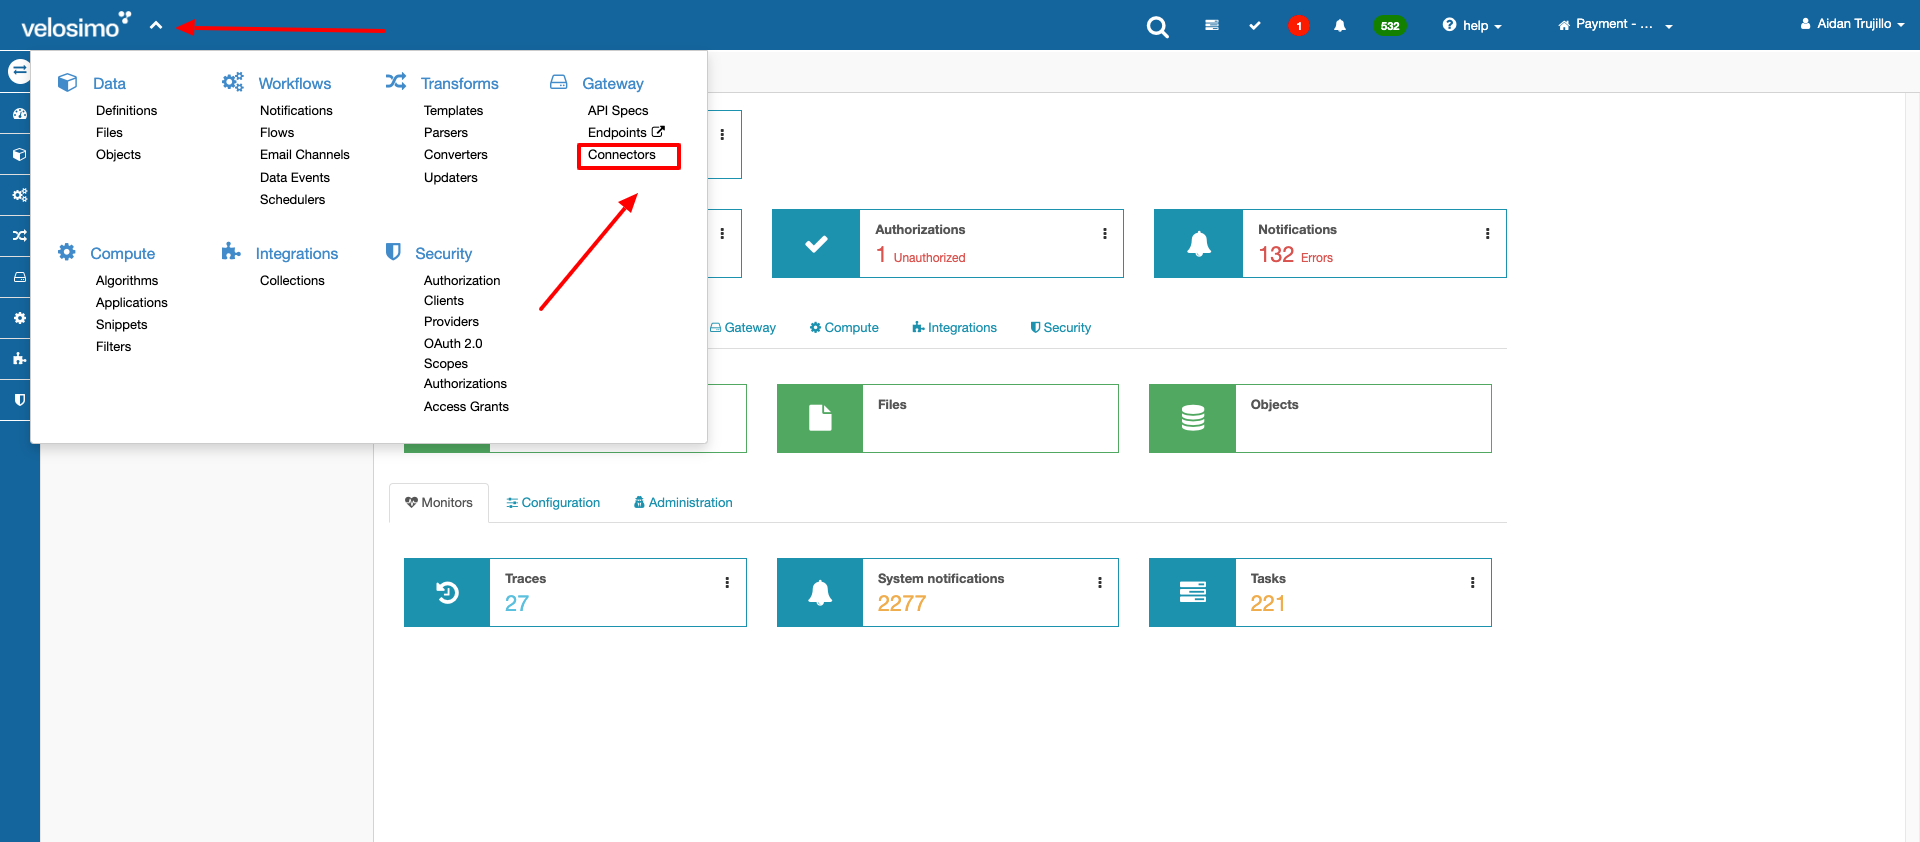
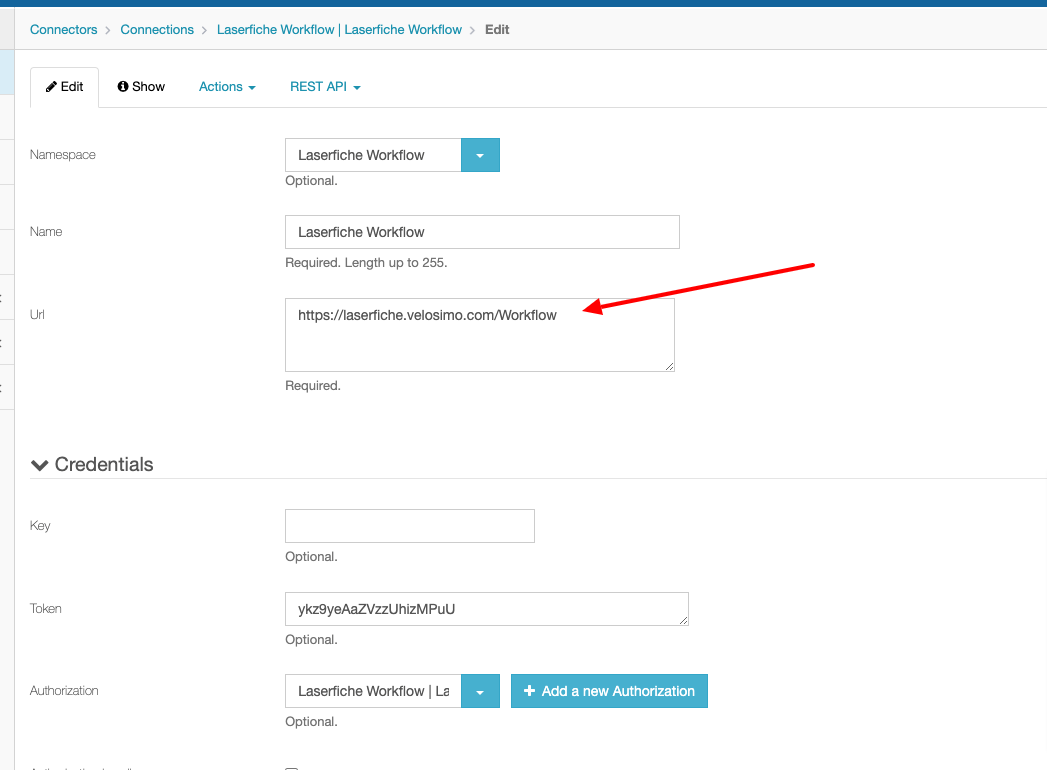
- Under Connectors go to Connections and Edit the Laserfiche Workflow connection.
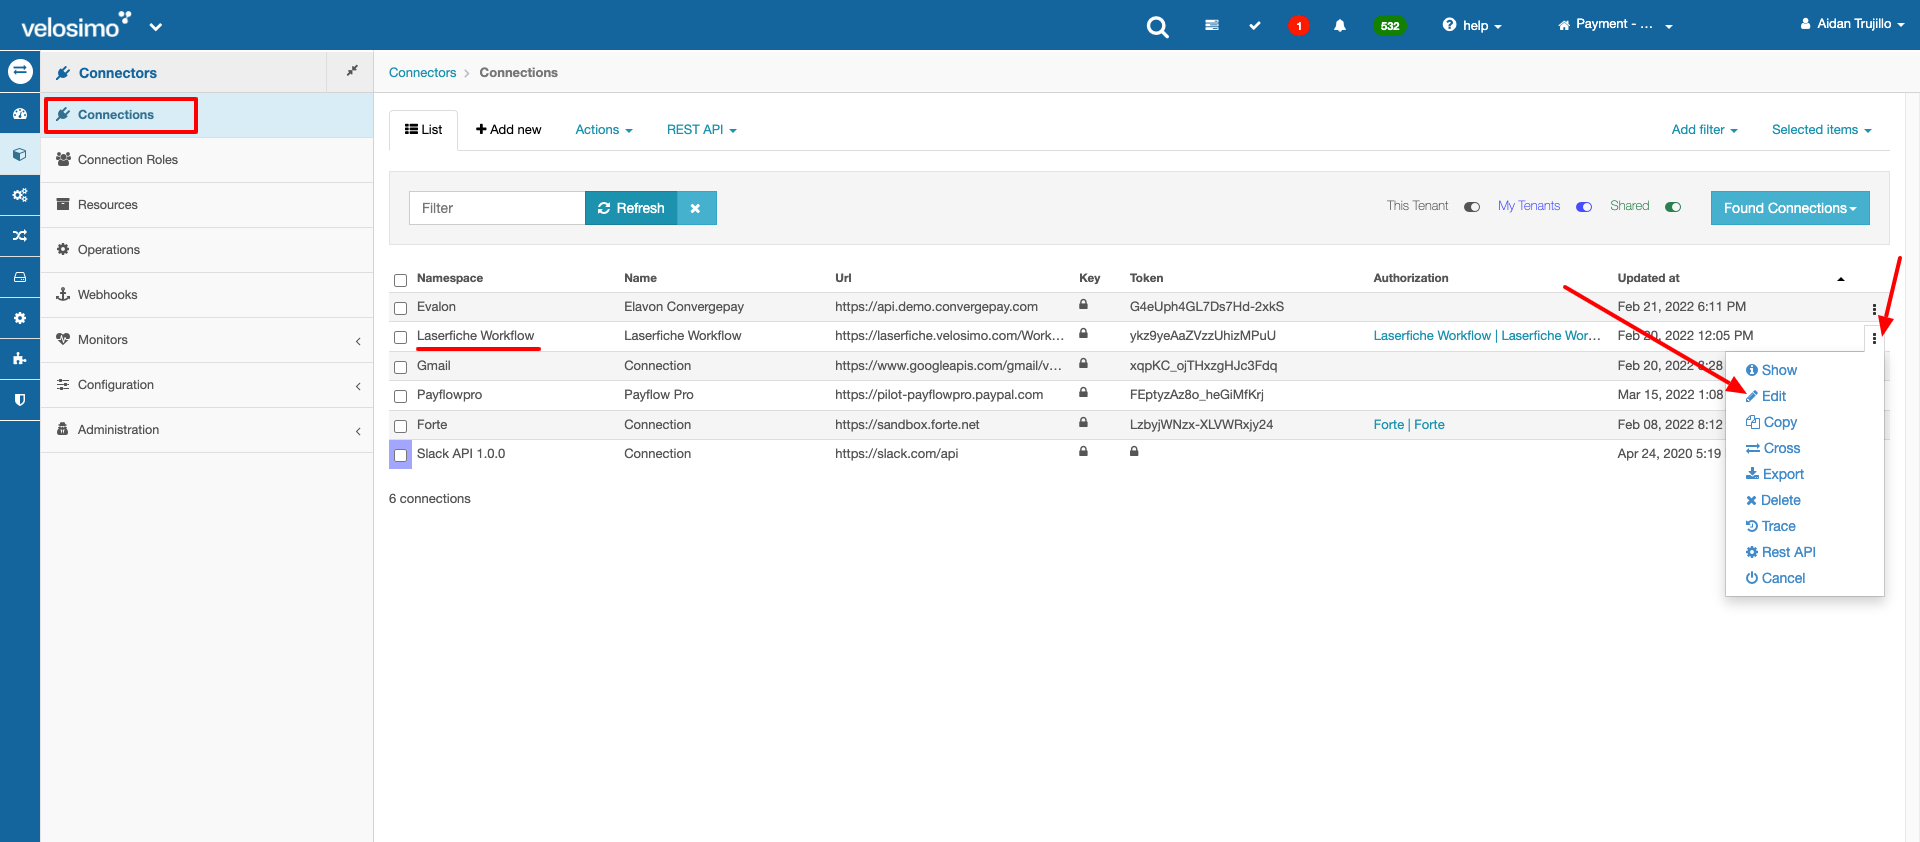
- Change the Url value to the URL of your Laserfiche Workflow API. Your Laserfiche Workflow API must be accessible to the Velosimo Cloud environment. All requests from Velosimo will come from the following IPs 54.70.20.215, 35.164.131.175, 3.222.241.24. Click Save when finished editing the URL.
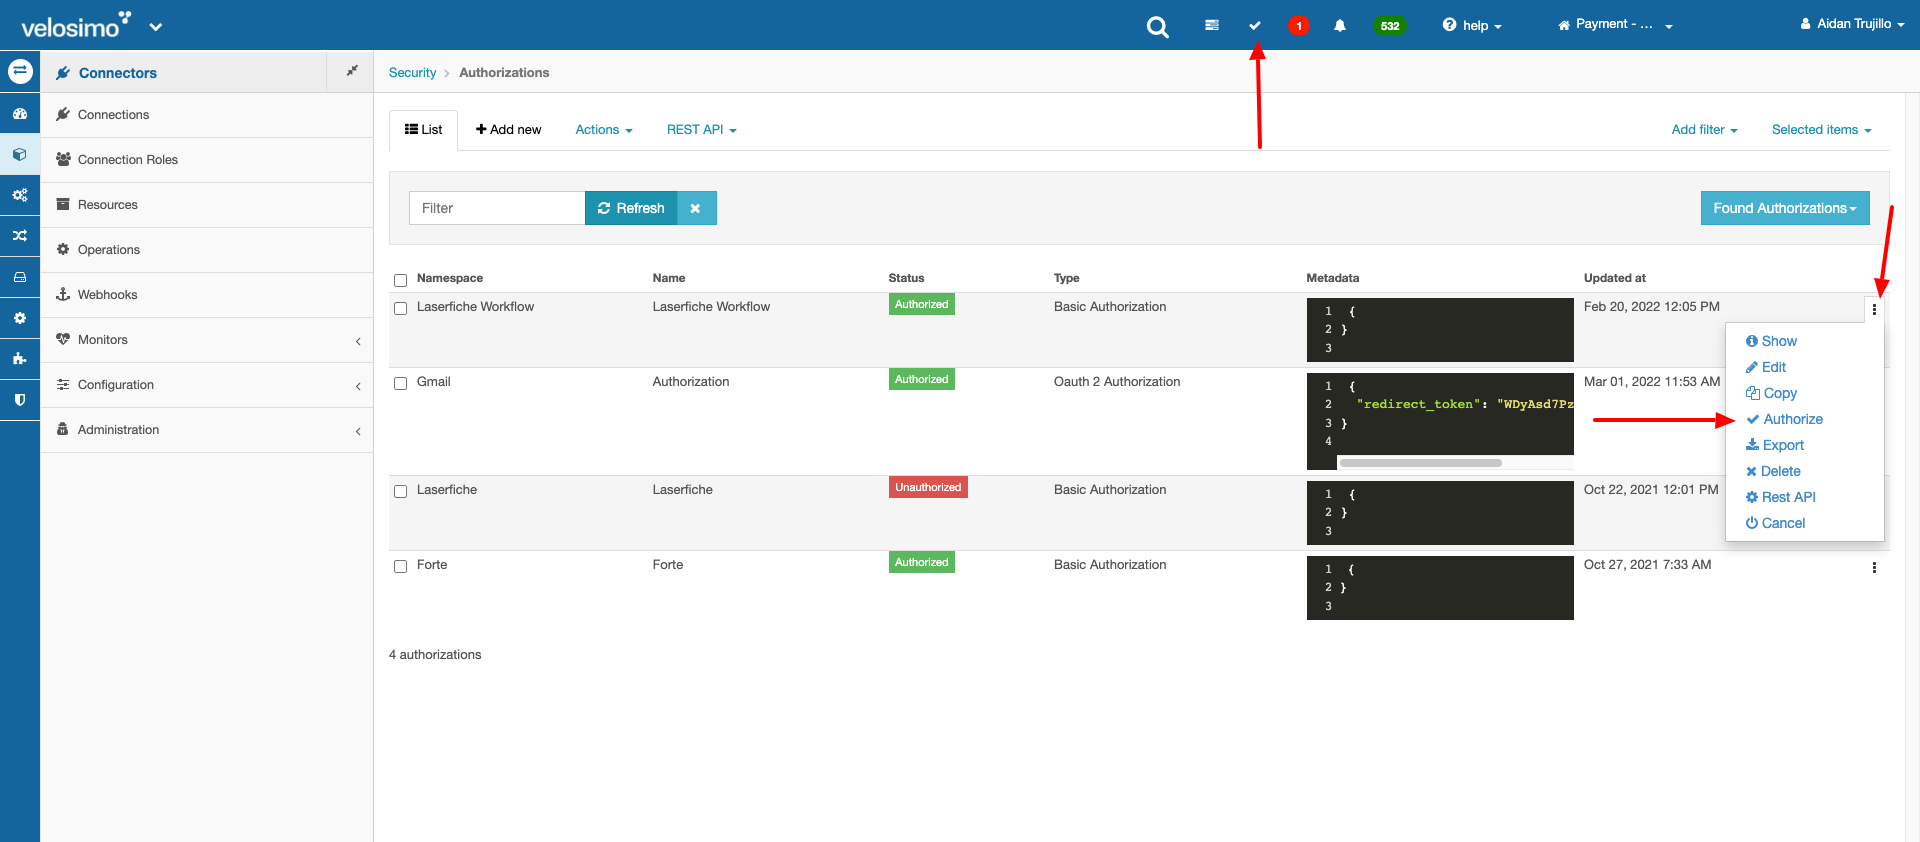
- Next click the checkmark icon on the top menu to access the Authorizations and go to Authorize on the Laserfiche Workflow authorization.
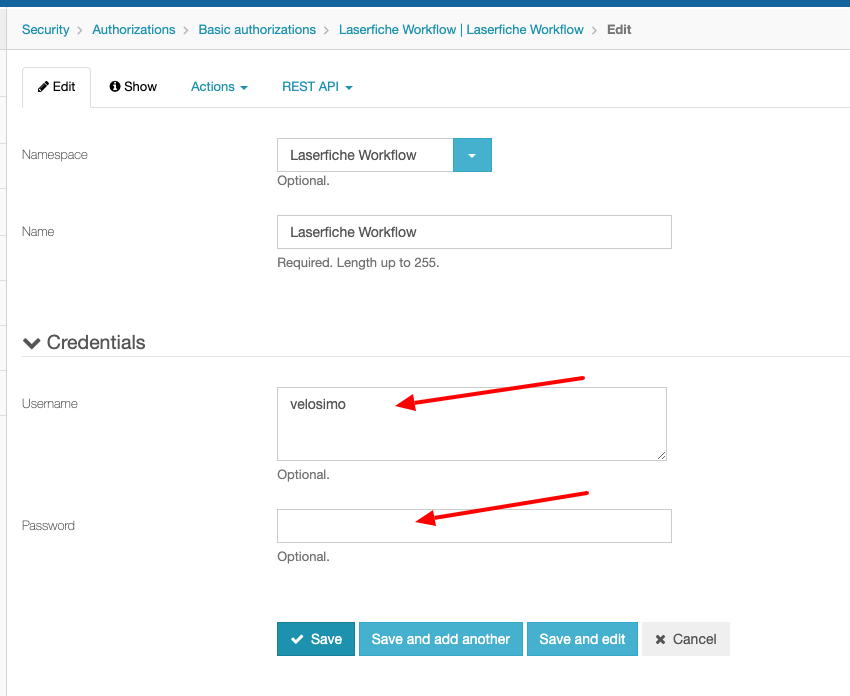
- Enter the username and password of the Laserfiche Workflow user to use for authentication to Laserfiche Workflow and click Save.
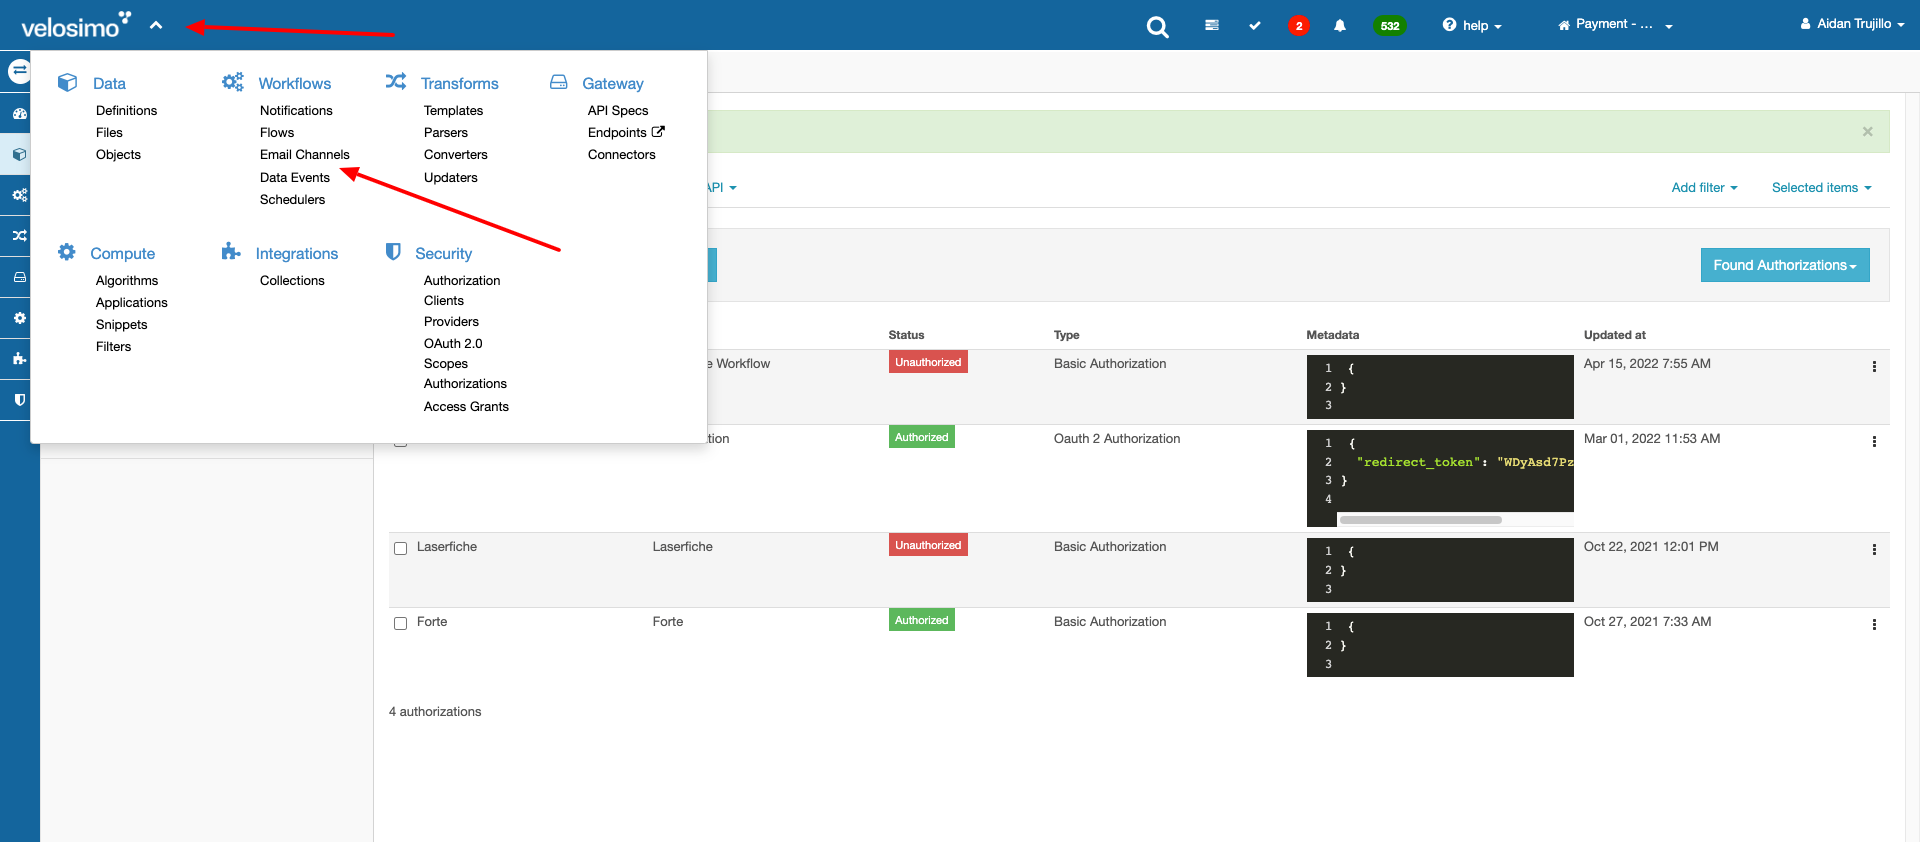
- Next go to Workflows -> Email Channels using the Velosimo menu
- Under Email Channels select SMTP Account and then go to Edit
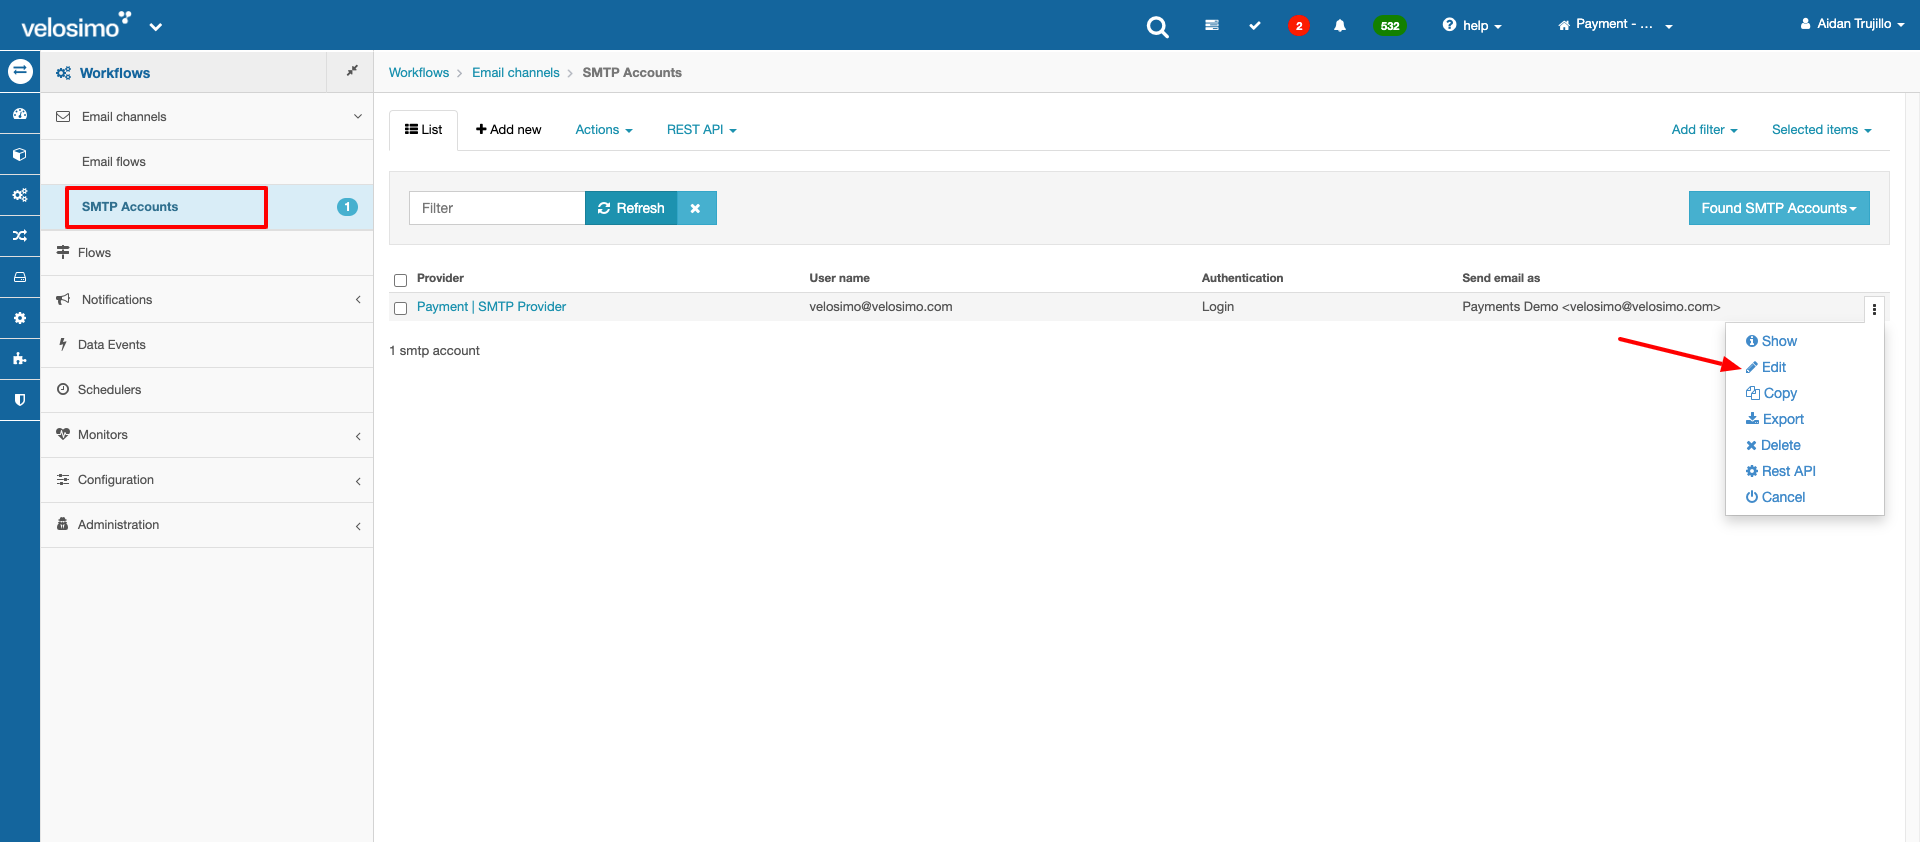
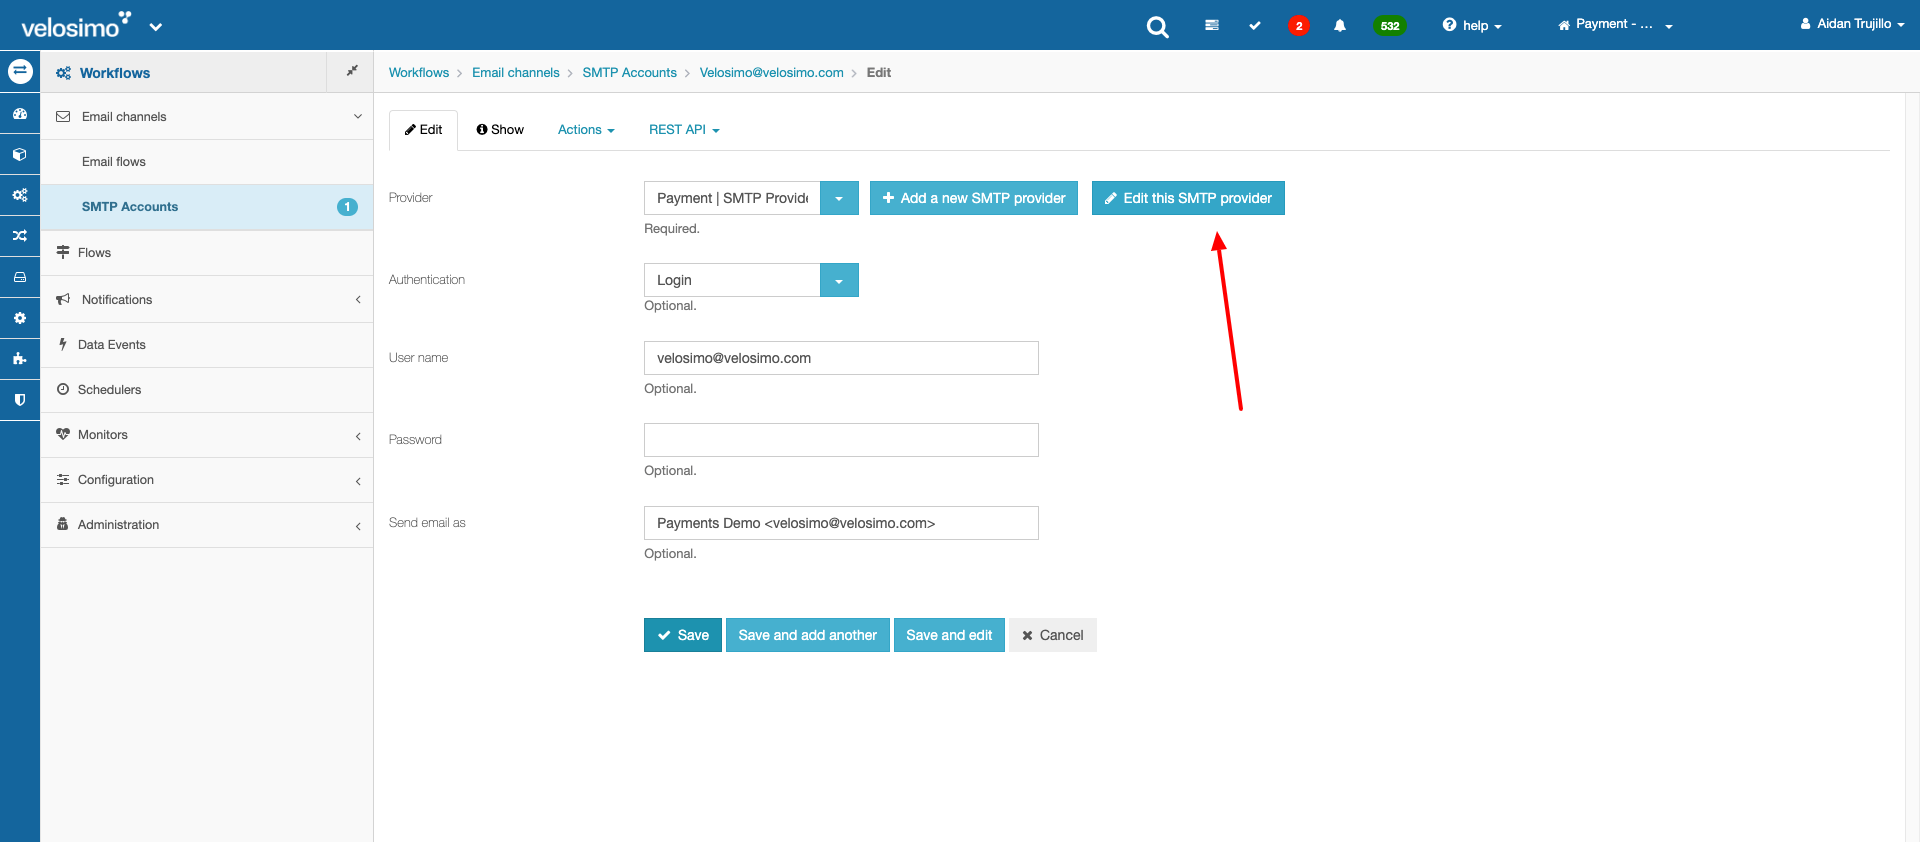
- Next click the Edit this SMTP Provider button
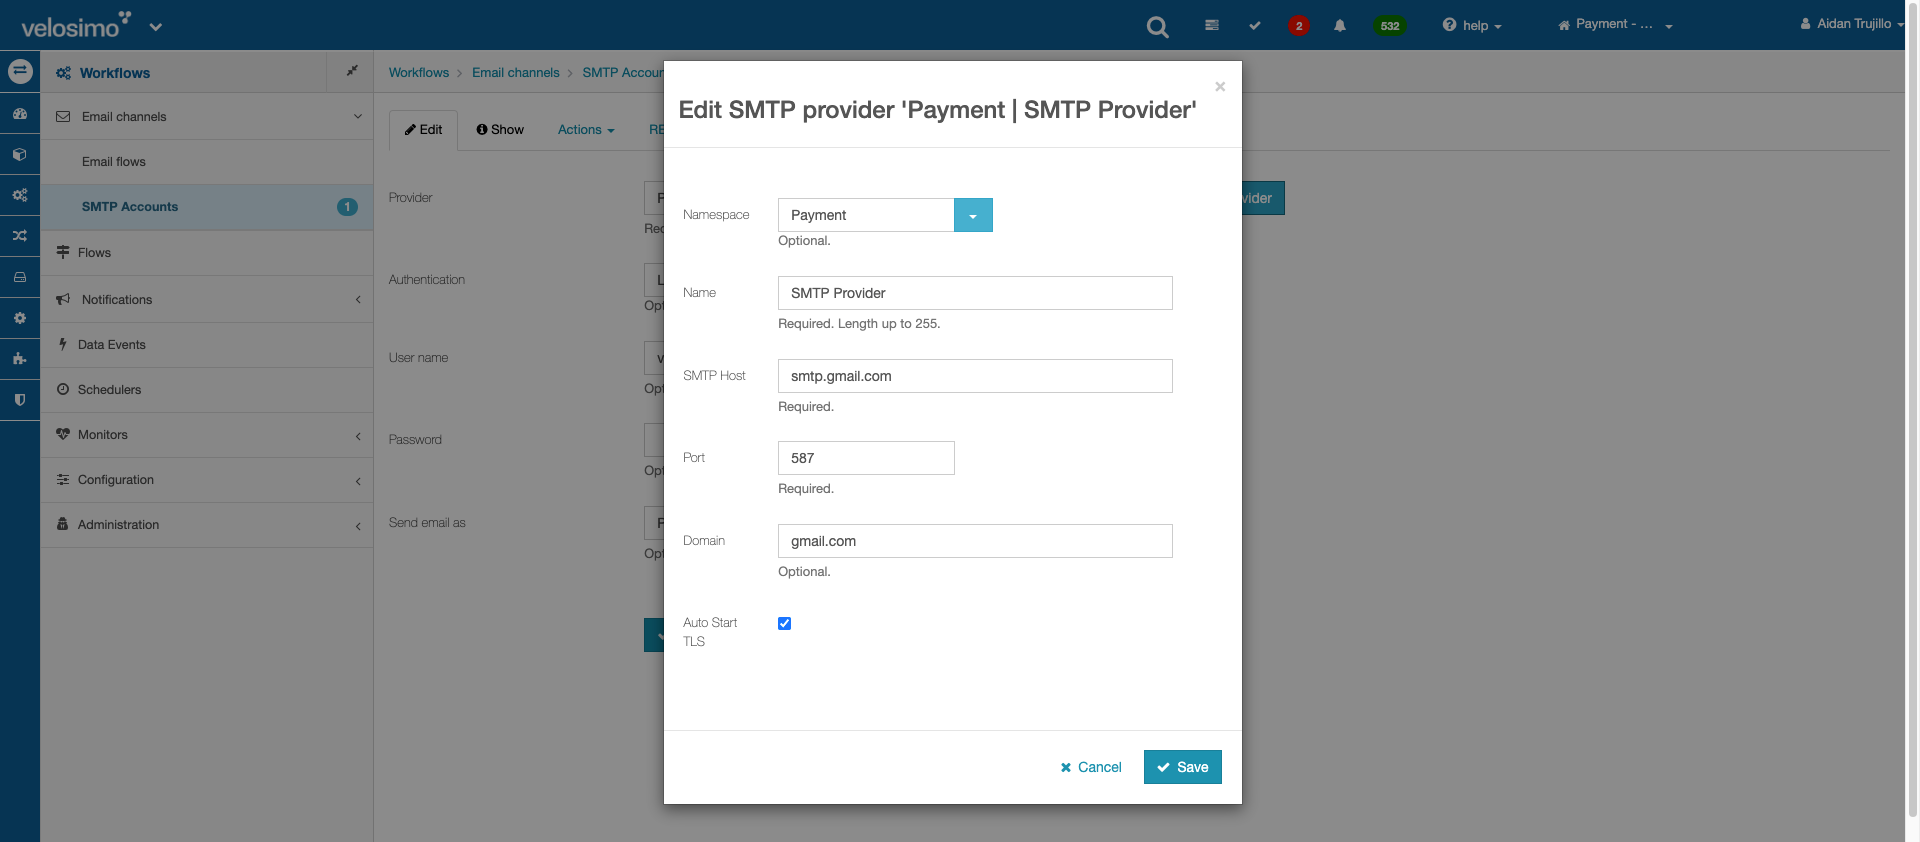
- Change the Host, Port, and Domain (optional) to your SMTP server information. All requests from Velosimo will come from the following IPs 54.70.20.215, 35.164.131.175, 3.222.241.24. Click Save once finished.
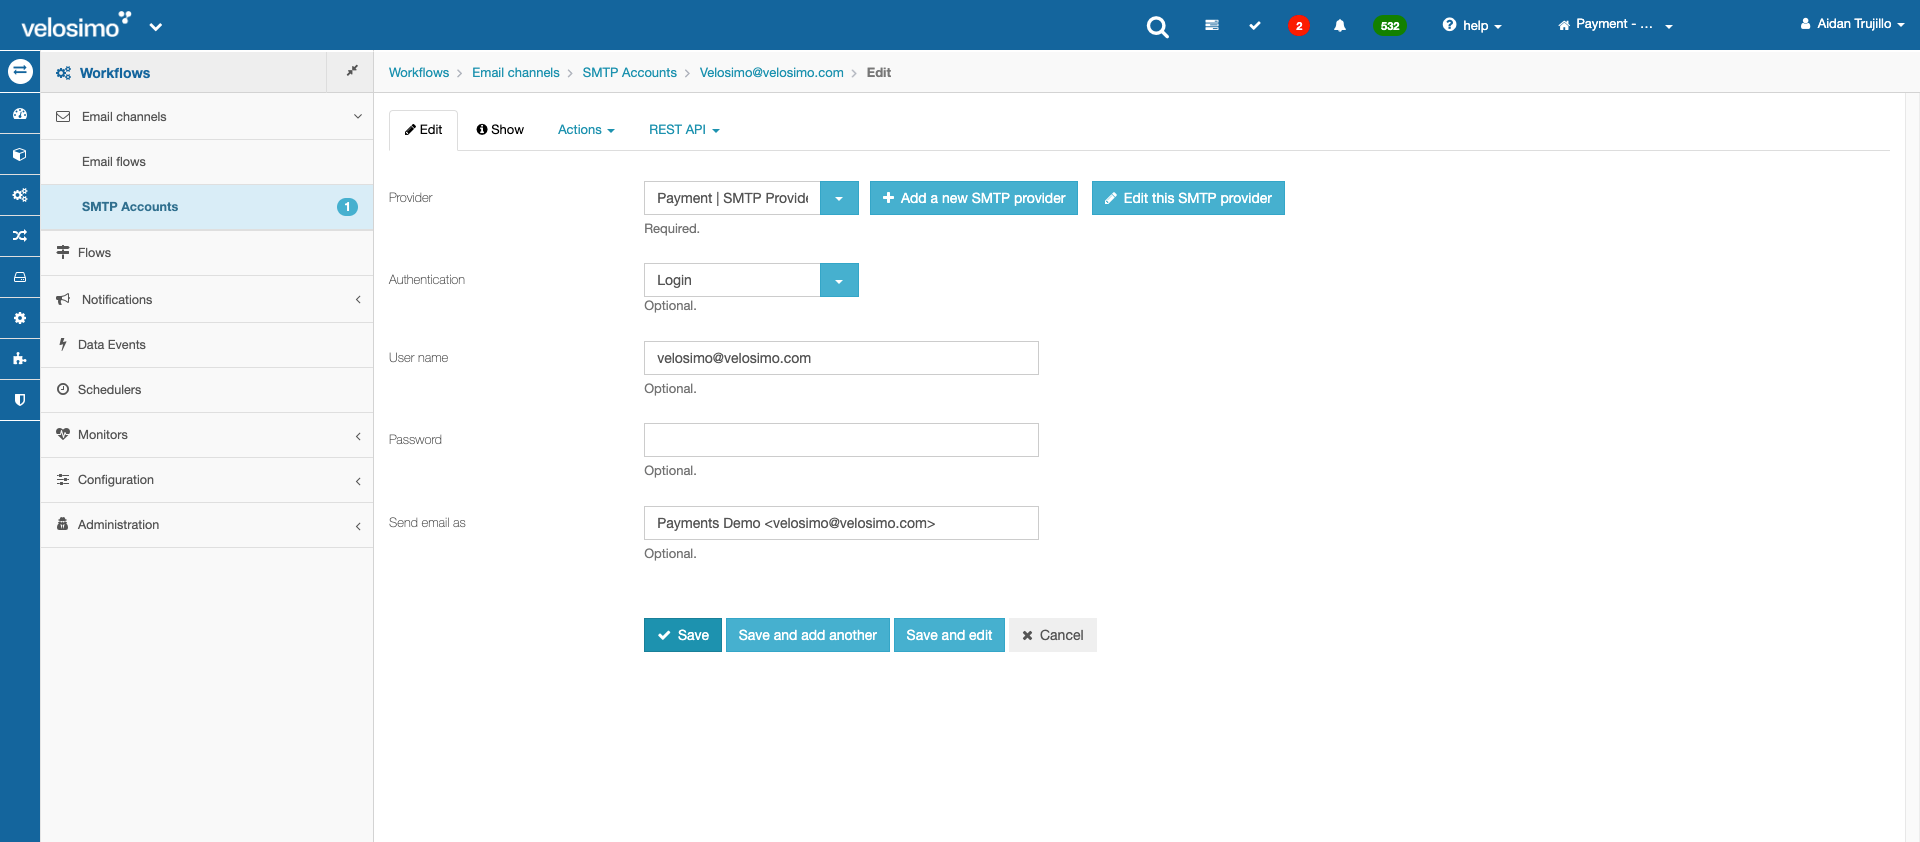
- Next set the Username and Password fields to the email user you wish to use for sending emails against your SMTP server. You can optionally configure the Send email as field to better style the emails From field. Once complete click Save.
Styling the Payment email
- Navigate to Transforms -> Templates
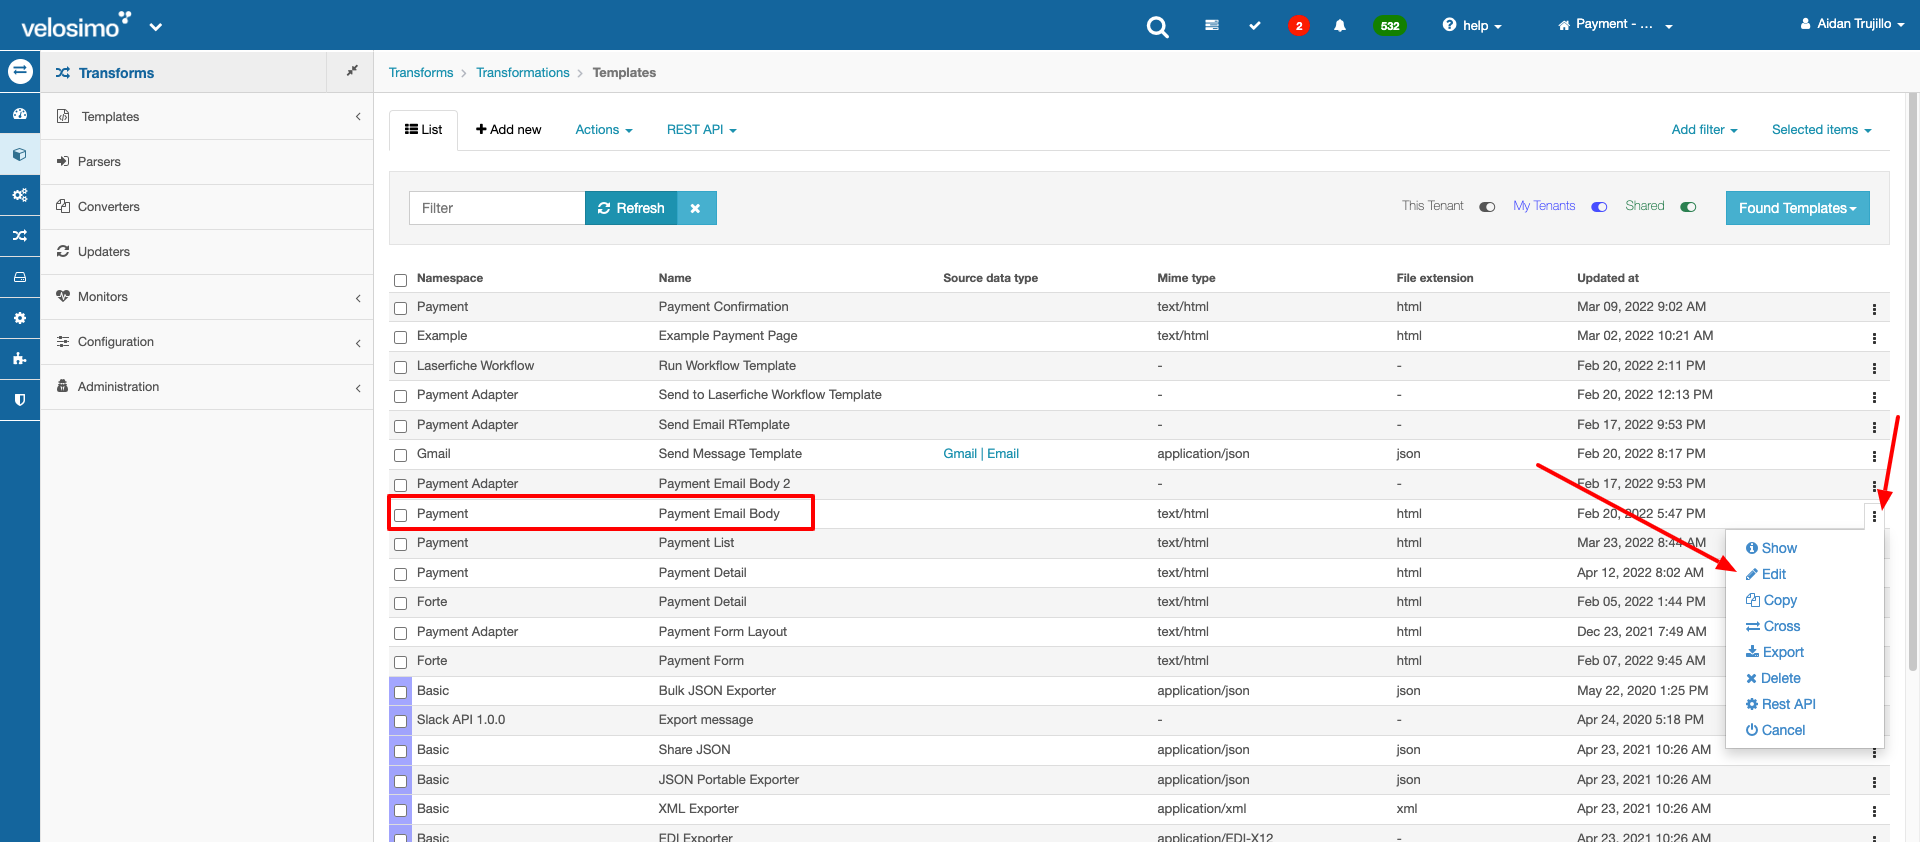
- Edit the Payment Email Body template by going to Edit on the right menu
- The Payment Email Body template is an ERB template, which is essentially HTML with some scripting capabilities using Ruby. To update the style of the email simple edit the HTML within the Code section and click Save once complete.
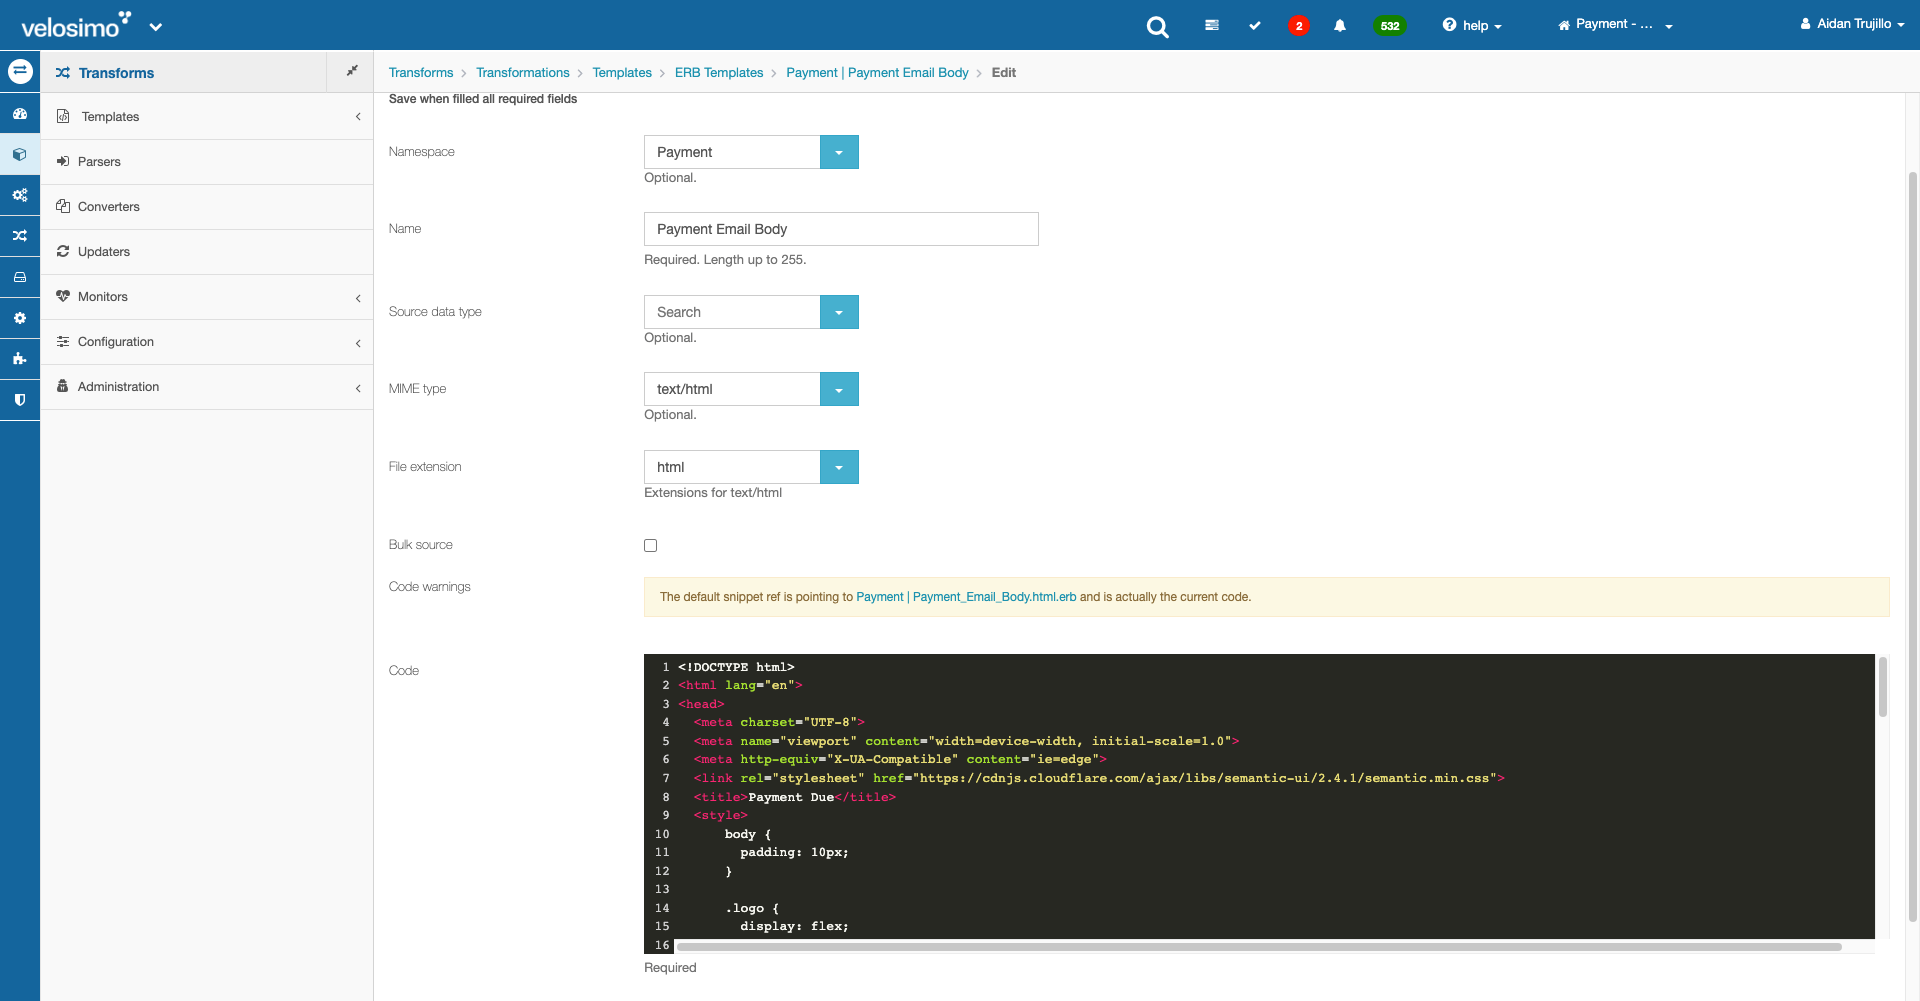
- The template will support any HTML and is currently using Semantic UI. See https://semantic-ui.com/ for more information on Semantic.
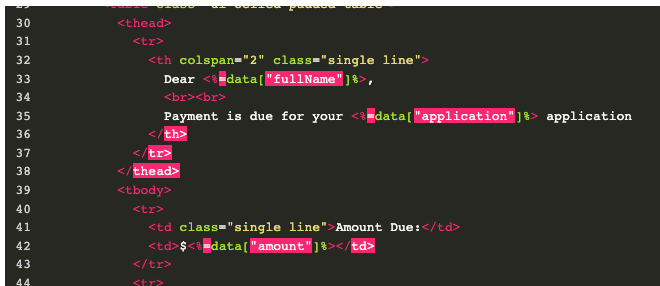
The template will support variable data sent from Laserfiche Workflow. You have full control over the template data sent from Laserfiche Workflow by using <%=data[“<laserficheWorkflowAPIParameterName>”]%> within the HTML. laserficheWorkflowAPIParameterName will map to the name of the input parameter sent to Velosimo from your Laserfiche Workflow. The Laserfiche Workflow configuration section will cover this in more detail.
Payflow Pro Configuration
- Go to https://manager.paypal.com and login with your credentials
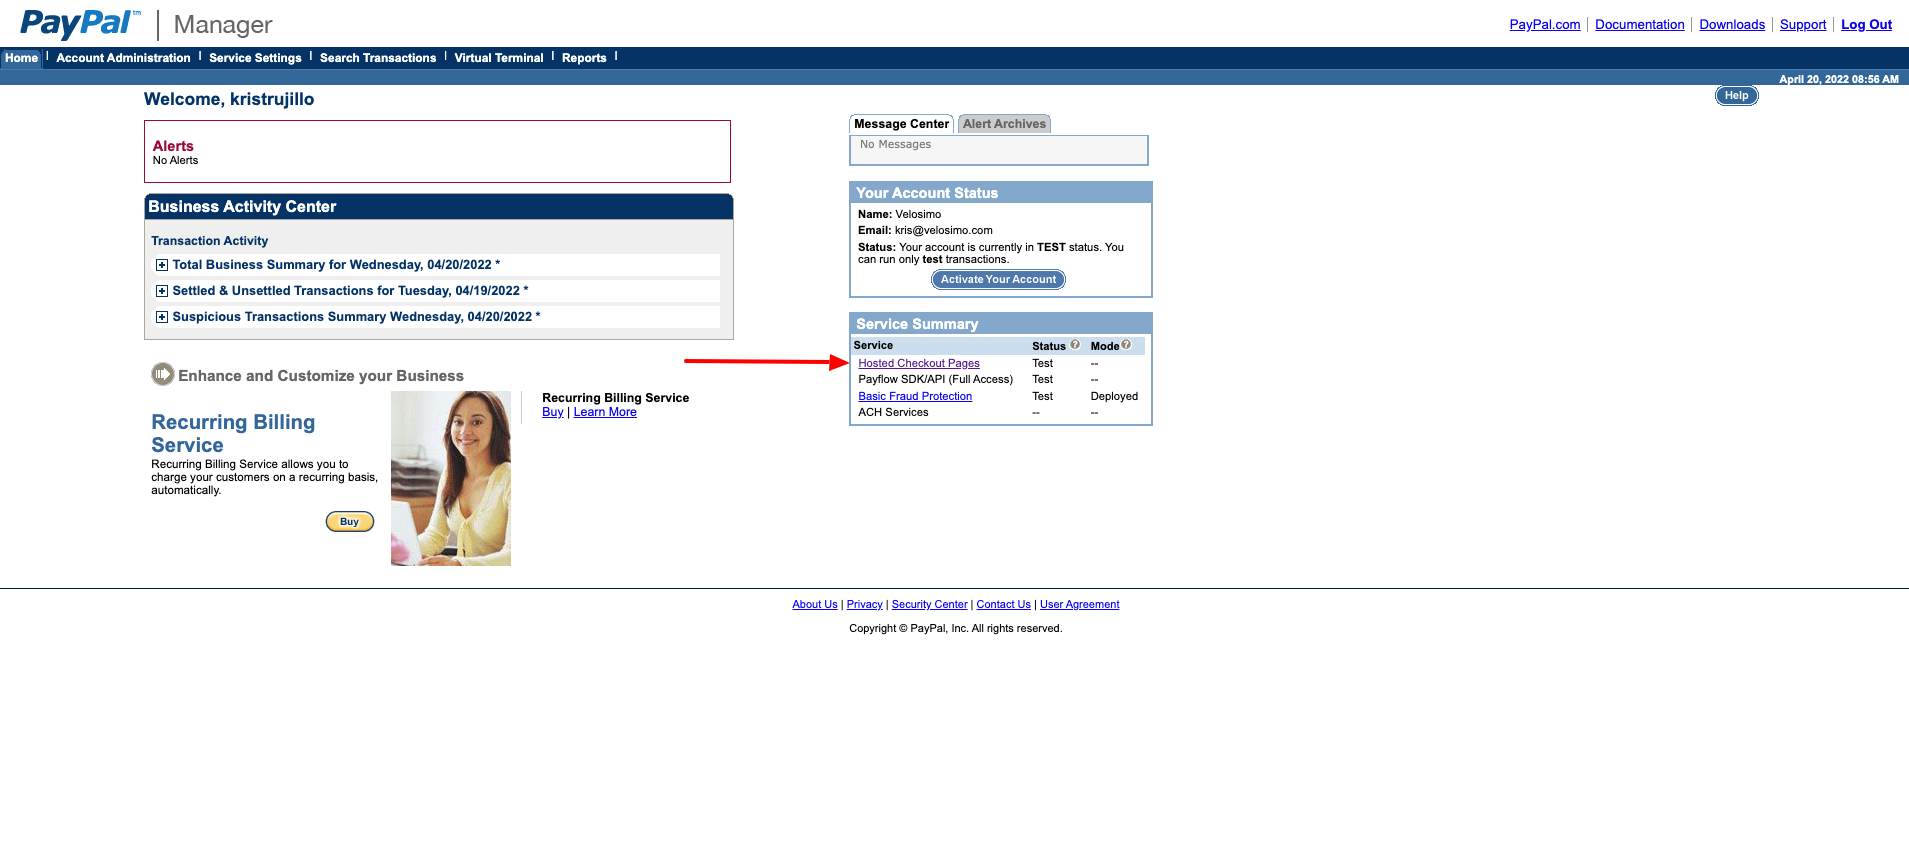
- On the main page go to Hosted Checkout Pages
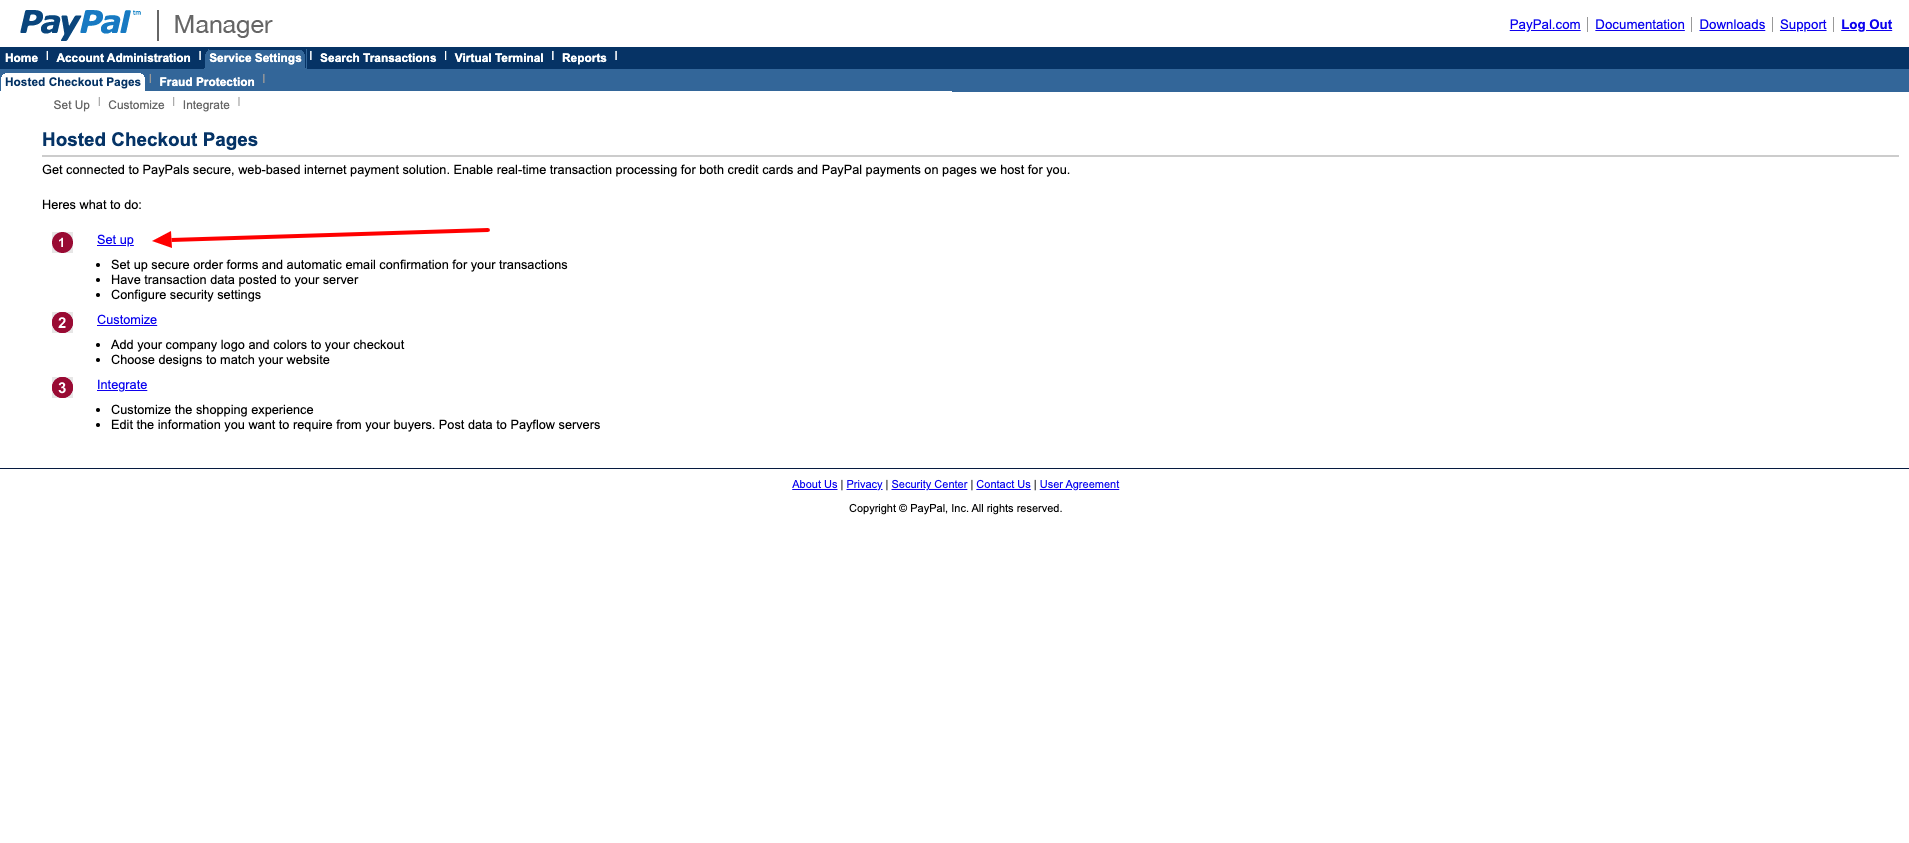
- Next click setup
- On the Set Up page configure the options you would like enabled and enter the correct Velosimo URLs into the fields from the table flow.
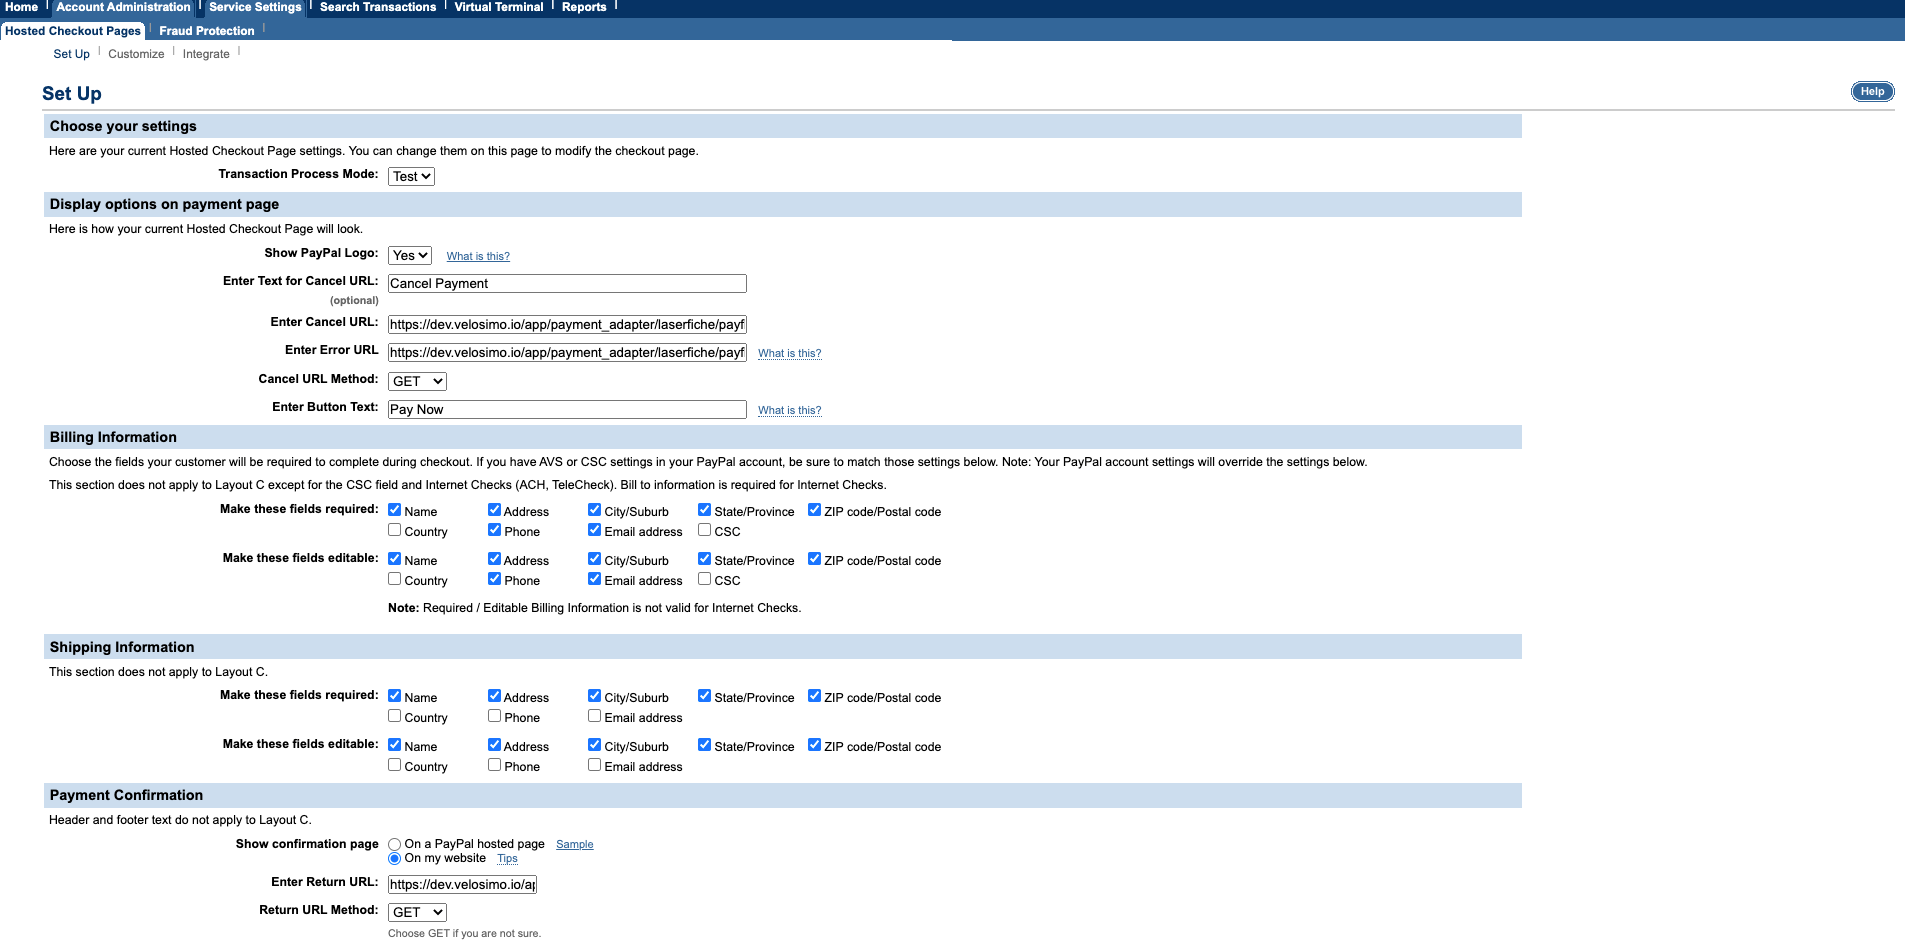
<payment_app_name>: Application regist name
<security_token>: Application ID
Field | URL |
|---|---|
Cancel URL | https://connect.velosimo.io/app/<payment_app_name>/laserfiche/payflowpro/<security_token>/cancel_payment?X-Tenant-Access-Key=A459798590&X-Tenant-Access-Token=G1wycC97U4W1B2qXqSDS |
Error URL | https://connect.velosimo.io/app/<payment_app_name>/laserfiche/payflowpro/<security_token>/payment_error?X-Tenant-Access-Key=A459798590&X-Tenant-Access-Token=G1wycC97U4W1B2qXqSDS |
Return URL | https://connect.velosimo.io/app/<payment_app_name>/accela/payflowpro/<security_token>/payment_confirmation?X-Tenant-Access-Key=A459798590&X-Tenant-Access-Token=G1wycC97U4W1B2qXqSDS |
Silent Post URL | https://connect.velosimo.io/app/<payment_app_name>/laserfiche/payflowpro/<security_token>/process_payment?X-Tenant-Access-Key=A459798590&X-Tenant-Access-Token=G1wycC97U4W1B2qXqSDS Check the checkbox for ‘Void transaction when my server fails to receive data sent by the silent post’ |
Silent Post fails | https://connect.velosimo.io/app/<payment_app_name>/laserfiche/payflowpro/<security_token>/process_payment?X-Tenant-Access-Key=A459798590&X-Tenant-Access-Token=G1wycC97U4W1B2qXqSDS |
- Click Save
Laserfiche Workflow Configuration
Sending a Payment
- To send a payment from a Laserfiche Workflow you will use the HTTP Form Post component. In the workflow you wish to send payment from, add the HTTP Form Post component to the workflow and then go to the Web Services configuration of the HTTP Form Post.
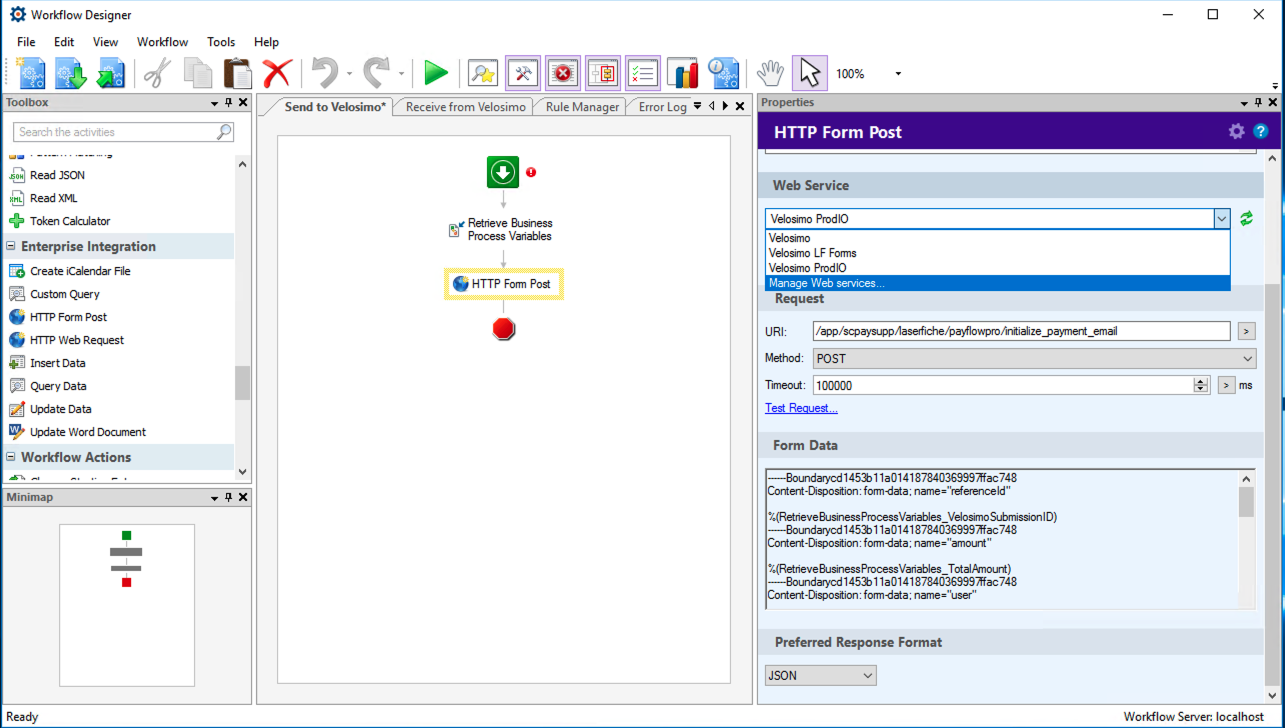
- Configure the HTTP Form Post with the following information:
a. Web Service - select Manage Web Services from the dropdown list and add a new entry for Velosimo.
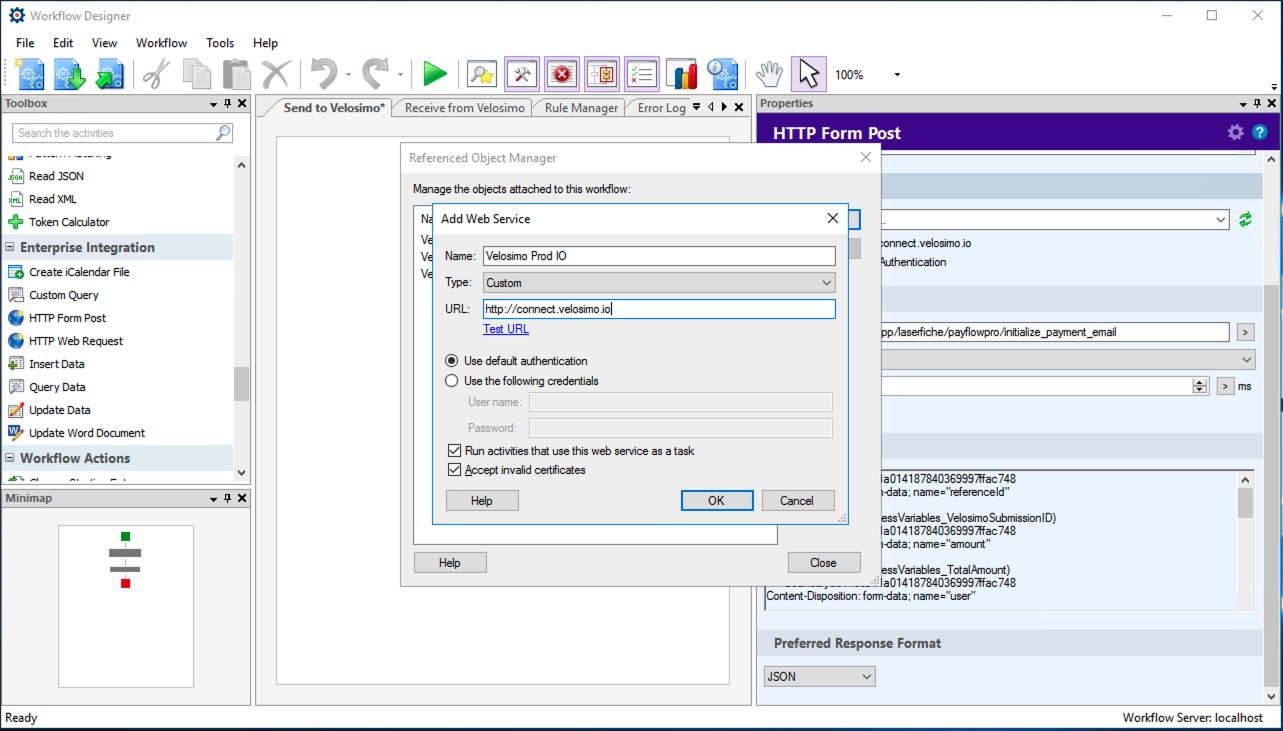
Field | Description |
|---|---|
Name | Velosimo |
Type | Custom |
URL |
b. Request - Enter the request information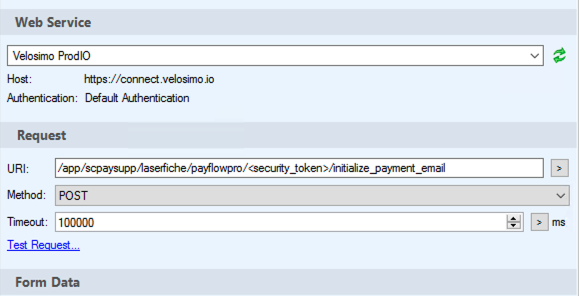
Remember, the <security_token> is the Application ID.
Field | Description |
|---|---|
URI | /app/<payment_app_name>/laserfiche/payflowpro/<security_token>initialize_payment_email |
Method | POST |
c. Form Data - map any data into the variables sent to Velosimo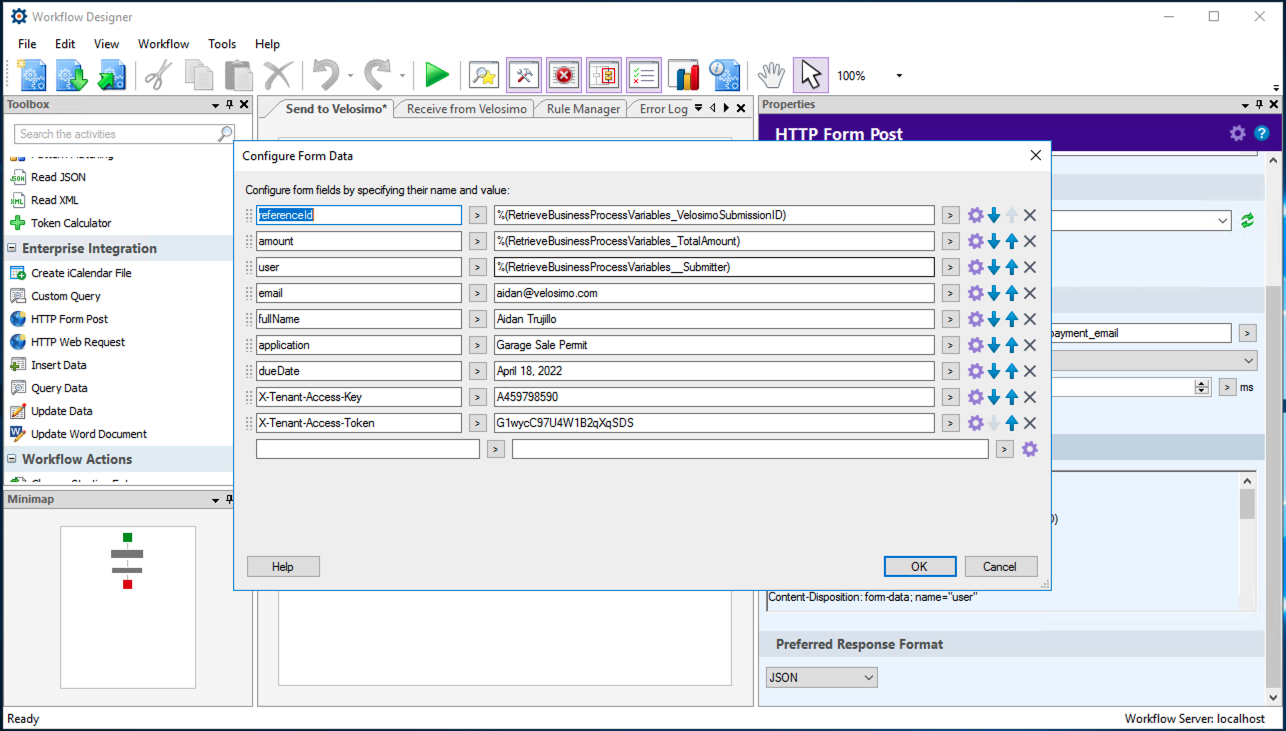
Field | Description |
|---|---|
referenceId | Unique id for this transaction. Can be any value you want to generate. The referenceId sent here will come back in the Receive Payment workflow. You can use the referenceId to tie the receive payment to the send payment. |
amount | Amount to charge |
Email address of the receiving user | |
X-Tenant-Access-Key | A459798590 |
X-Tenant-Access-Token | G1wycC97U4W1B2qXqSDS |
The next set of variables are used in the Payment Email Body template in Velosimo and are customizable. You can send any variables you would like to send here and use in the email body template. The fields below are used in the default template, but can easily be customized by you. | |
fullName | Name of the receiver. Variable is used in the Payment Email Body template in Velosimo. |
application | Type of application. Variable is used in the Payment Email Body template in Velosimo. |
dueDate | Due date of the payment. Variable is used in the Payment Email Body template in Velosimo |
- Run the workflow to test and a payment email will be sent to the email address
Receiving a Payment
- As soon as a successful payment is made in Payflow Pro a call will be made to a receiving Laserfiche Workflow per the Velosimo configuration. The workflow will be sent with three parameters.
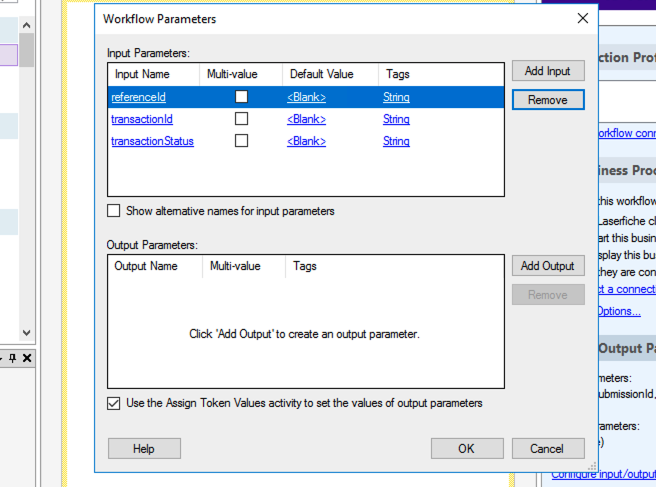
Field | Description |
|---|---|
referenceId | Id sent during the send payment process |
transactionId | Paypal Payflow Pro transaction id. You can use this value to lookup the transaction in Payflow Pro Manager. |
transactionStatus | Status of the transaction as sent by Payflow Pro |
-
Should you wish to use more information from the transaction in your workflow than sent you can make an HTTP Form Post call from within your workflow to a Velosimo API to get more detail about the transaction. To get more detail configure an HTTP Form Post as follows:
a. Request
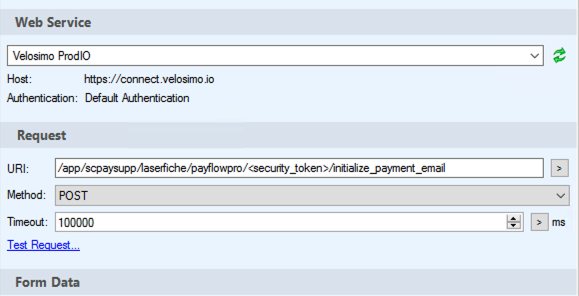
Field | Description |
|---|---|
URI | /app/<payment_app_name>/payment/payment/<security_token>/payment_detail |
Method | POST |
b. Form Data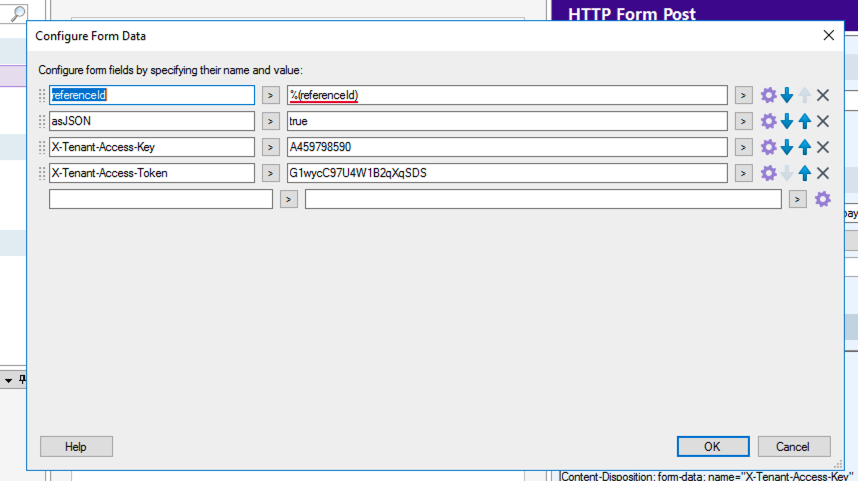
referenceId | Id for this transaction |
asJSON | true |
X-Tenant-Access-Key | A459798590 |
X-Tenant-Access-Token | G1wycC97U4W1B2qXqSDS |
- The Response from the HTTP Post will be a JSON object that looks as follows:
{
   "referenceId":"f23cf9ed1a684",
   "transactionStatus":"Approved",
   "transactionData":{
      "referenceId":"cd187f4a-e84b-45c4-871d-9c92f6a6bea0",
      "amount":"100.00",
      "user":"velosimo",
      "email":"[email protected]",
      "fullName":"Kris Trujillo",
      "application":"Garage Sale Permit",
      "dueDate":"March 1, 2022",
      "app_slug":"laserfiche",
      "path":"payflowpro/process_payment",
      "_source":"laserfiche",
      "_provider":"payflowpro",
      "_operation":"process_payment",
      "paymentLink":"https://connect.velosimo.io/app/scpaysupp/laserfiche/payflowpro/initialize_payment?amount=100.00\u0026referenceId=f23cf9ed1a684",
      "SECURETOKENID":"cd187f4a-e84b-45c4-871d-9c92f6a6bea0",
      "SECURETOKEN":"4tPE9SgyWVkqJyzYtsEhjrwAQ",
      "BILLTOCITY":"Herriman",
      "AMT":"100.00",
      "BILLTOEMAIL":"[email protected]",
      "BILLTOSTREET":"12537 S Brundisi Way",
      "VISACARDLEVEL":"12",
      "SHIPTOCITY":"Herriman",
      "TENDER":"CC",
      "NAMETOSHIP":"Kris Trujillo",
      "ZIP":"84096",
      "BILLTOLASTNAME":"Trujillo",
      "EMAILTOSHIP":"[email protected]",
      "BILLTOFIRSTNAME":"Kris",
      "RESPMSG":"Approved",
      "TYPE":"S",
      "STATETOSHIP":"UT",
      "TAX":"0.00",
      "NAME":"Kris Trujillo",
      "BILLTOZIP":"84096",
      "PNREF":"A10AB1D0E550",
      "ZIPTOSHIP":"84096",
      "TRXTYPE":"S",
      "SHIPTOCOUNTRY":"US",
      "SHIPTOSTREET":"12537 S Brundisi Way",
      "CITY":"Herriman",
      "HOSTCODE":"A",
      "LASTNAME":"Trujillo",
      "STATE":"UT",
      "CITYTOSHIP":"Herriman",
      "COUNTRYTOSHIP":"US",
      "AVSDATA":"YNY",
      "ACCT":"1111",
      "AUTHCODE":"850PNI",
      "PHONE":"8018793789",
      "FIRSTNAME":"Kris",
      "RESULT":"0",
      "POSTFPSMSG":"No Rules Triggered",
      "IAVS":"N",
      "BILLTOSTATE":"UT",
      "BILLTOCOUNTRY":"US",
      "EXPDATE":"0123",
      "BILLTOPHONE":"8018793789",
      "EMAIL":"[email protected]",
      "CARDTYPE":"0",
      "PREFPSMSG":"No Rules Triggered",
      "SHIPTOZIP":"84096",
      "PROCAVS":"A",
      "COUNTRY":"US",
      "AVSZIP":"N",
      "ADDRESS":"12537 S Brundisi Way",
      "BILLTONAME":"Kris Trujillo",
      "ADDRESSTOSHIP":"12537 S Brundisi Way",
      "AVSADDR":"Y",
      "SHIPTOSTATE":"UT",
      "METHOD":"CC",
      "TRANSTIME":"2022-03-15 15:06:16",
      "detailURL":"https://manager.paypal.com/getStandardDetails.do?subaction=transDetailsWithSB\u0026reportName=SettlementReport\u0026id=A10AB1D0E550",
      "type":"Credit Card",
      "payee":"Kris Trujillo",
      "payeeAddress":"12537 S Brundisi Way"
   },
   "transactionId":"A10AB1D0E550"
}
Laserfiche Forms Configuration
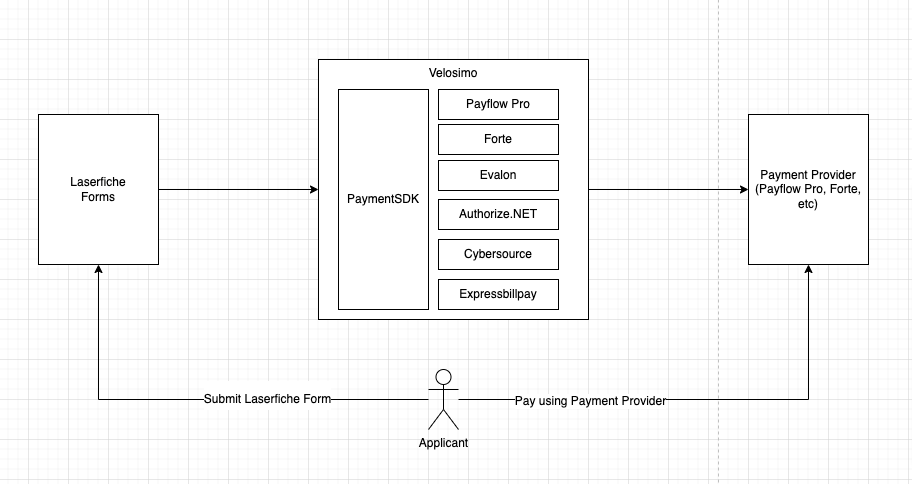
- Go to laserfiche.velosimo.com
- Go to Design and select your form
- Open the details on the form diagram
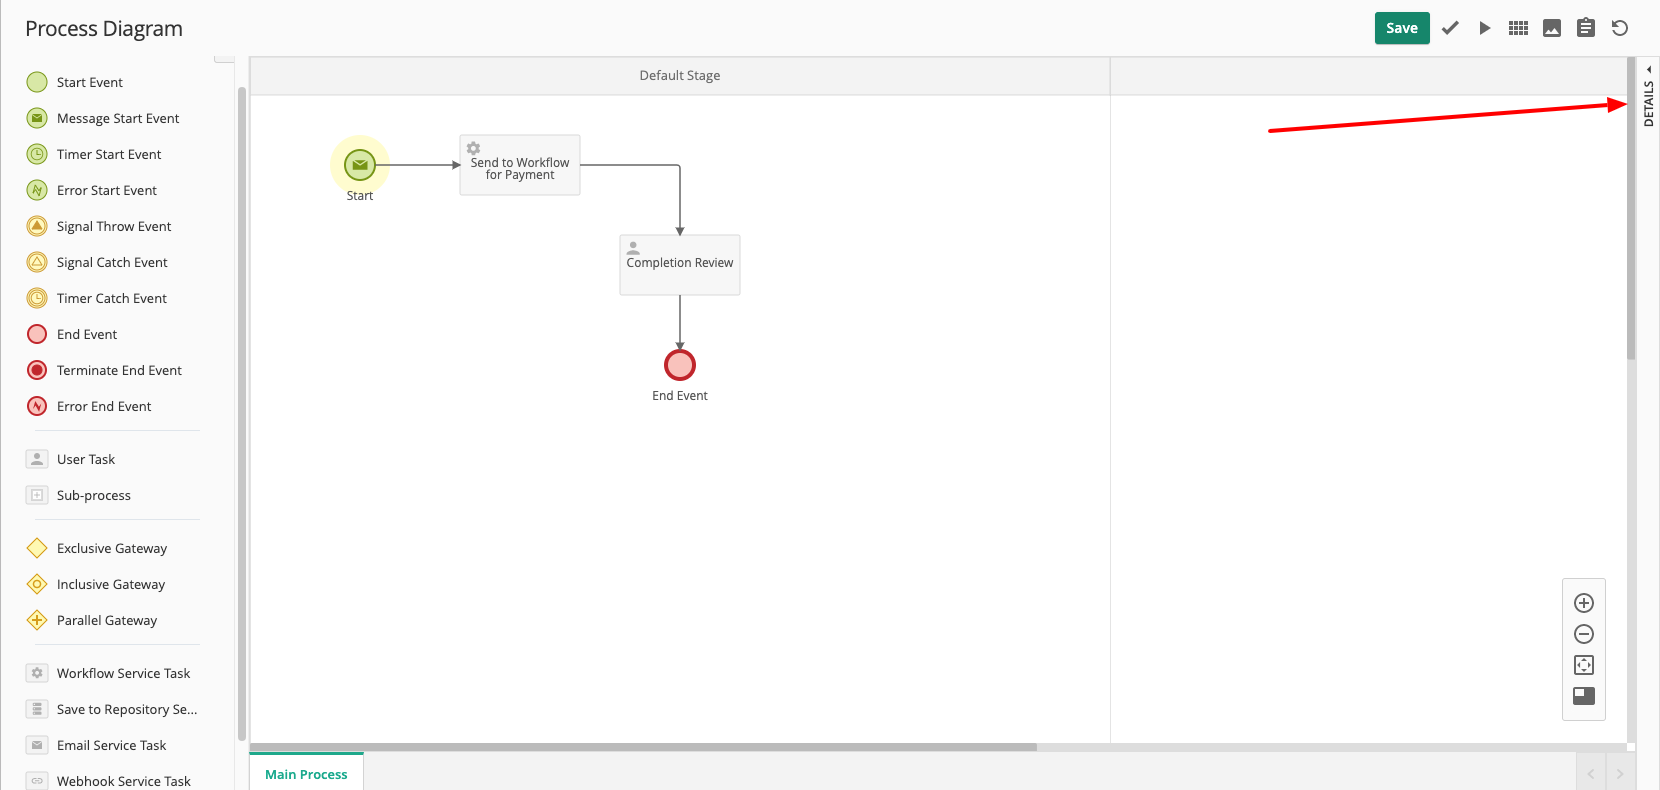
- Select Start and the On Event Completion tab
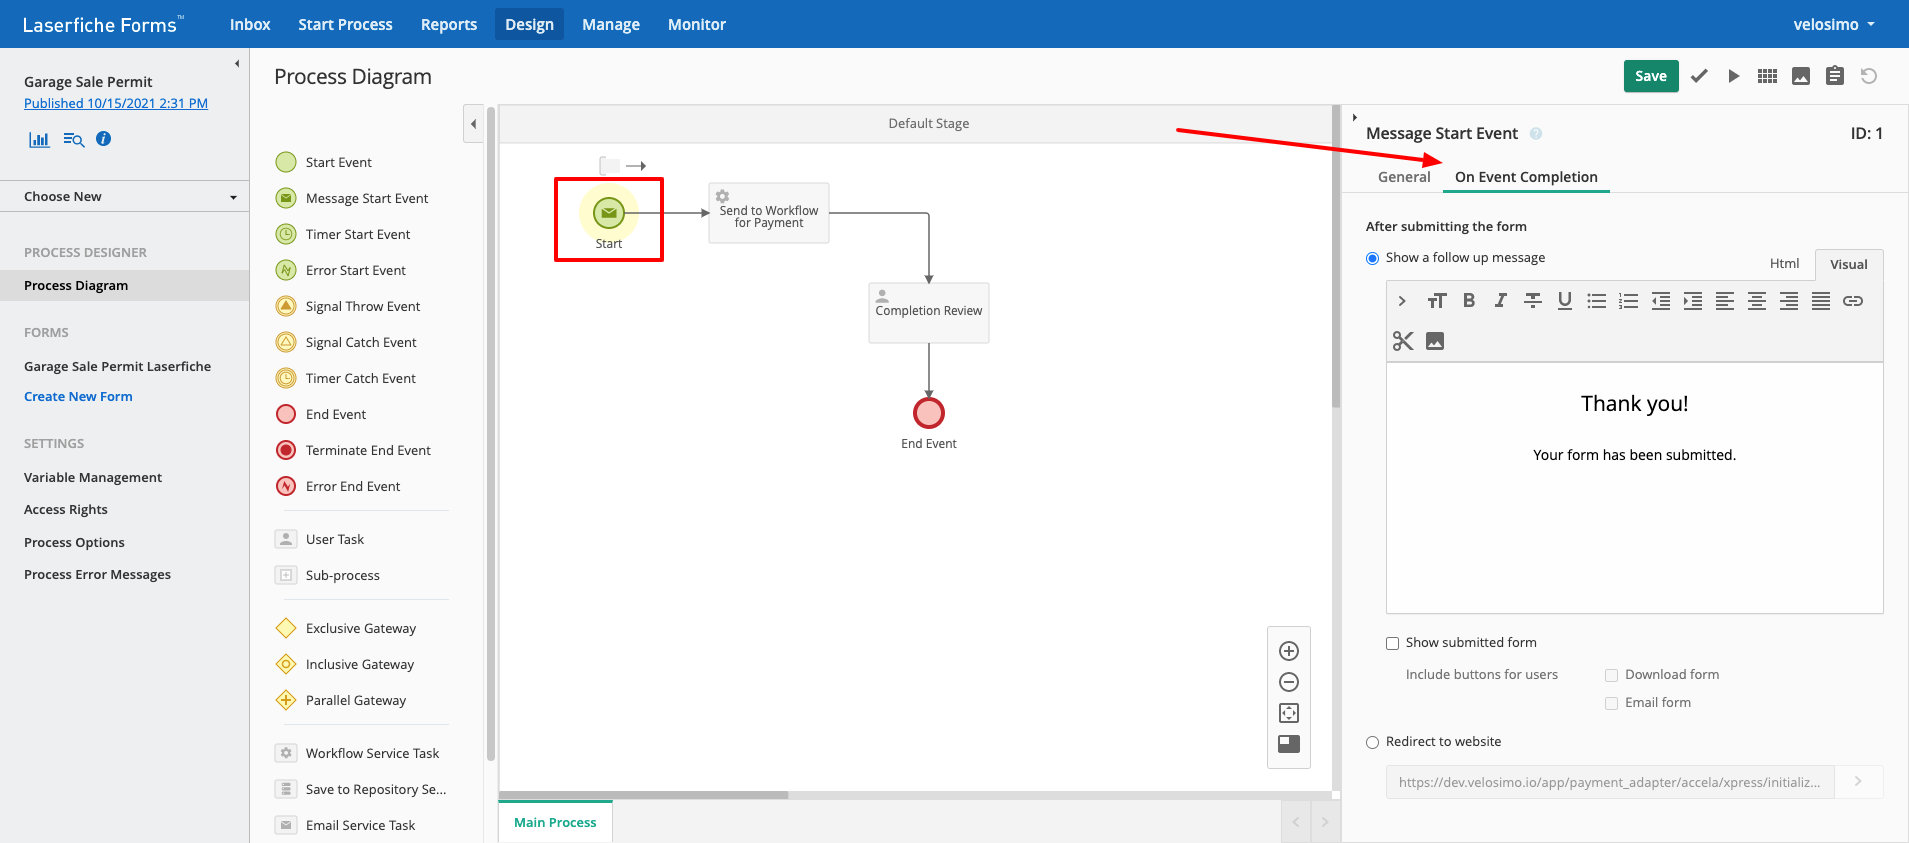
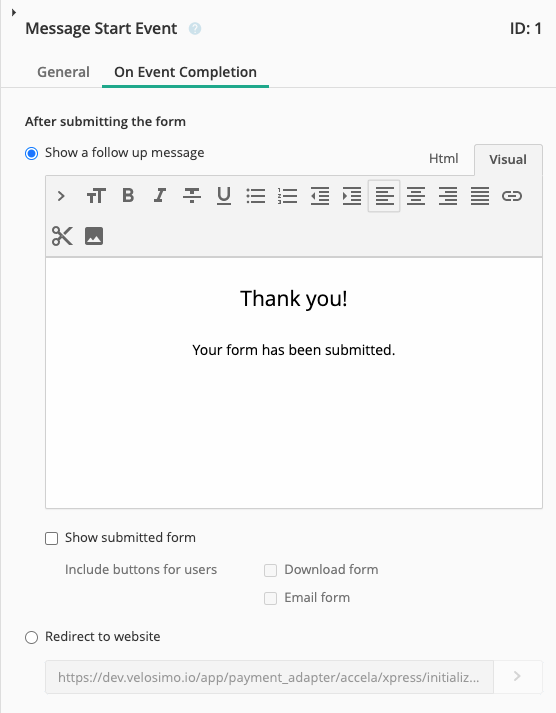
- There are two options with what to do after submitting the form:
a. Show a follow up message - Customize an email to be sent after submitting the form
b. Redirect to website - Enter a URL to redirect to once the form is submitted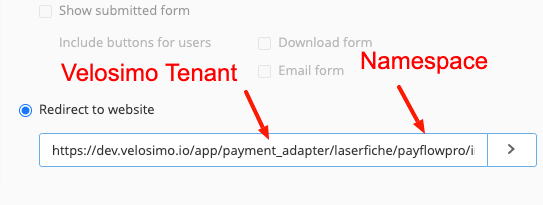
Updated 3 months ago
