Elavon Setup and Configuration
Pre-requisites
- Elavon Hosted Payments Demo and Production environments
- Generally speaking, Elavon will provide a demo (non-production) environment on a limited-time basis.
Recommendation: Request your demo account be available for at least 90-days
- Received from Elavon the following credentials for each environment:
- ssl_merchant_id
- ssl_user_id
- ssl_pin
Elavon Portal Configuration Steps
Call Elavon Support
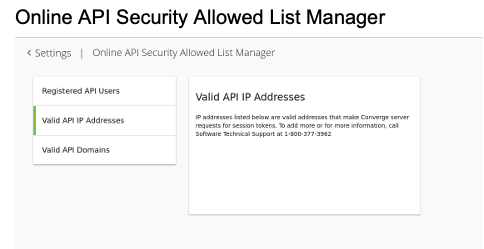
1. Online API Security Allowed List Manager
Whitelist the following IPs with Elavon: 34.202.31.200, 52.0.244.9, and 54.174.42.90
Whitlisting IPs with Elavon is done by calling Elavon Support
2. API User Rights
Please confirm that the API User rights are set to either Manager or Administrator, depending on your preference. This may need to be confirmed or setup when the account is setup with Elavon Support.
3. Have the Transaction IP Velocity Filter disabled.
Login to the Elavon Portal
Response Page
From the Elavon Portal Settings , select Hosted Payments and then Response Page
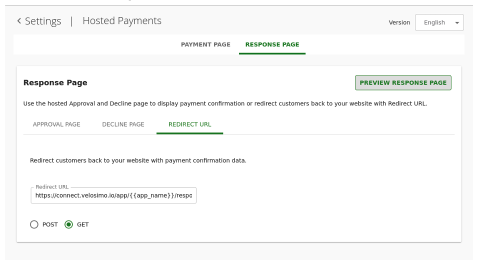
Elavon Portal Redirect URL Page
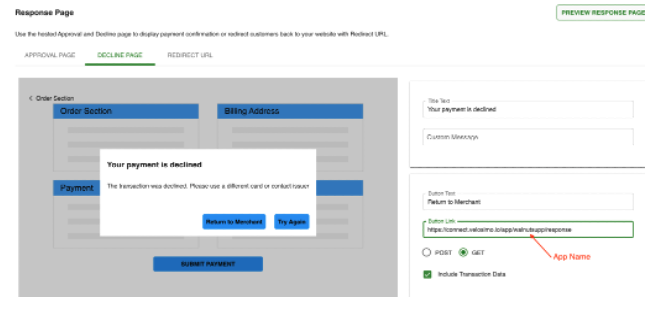
Elavon Portal Decline Page
Velosimo will provide two URLs that will need to be added in the locations indicated in the screenshots the
- Redirect URL
- Decline Page - Return to Merchant
Update the URLs in Elavon's portal and ensure that GET has been selected and the checkbox for 'Include Transaction Data' is selected.
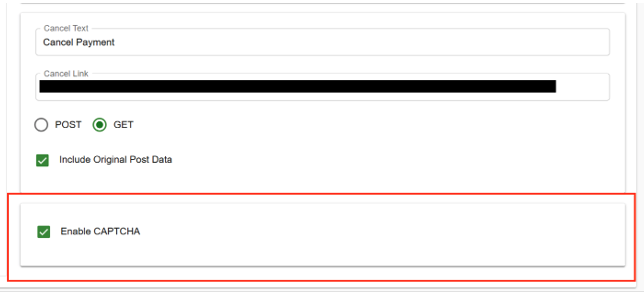
The same DECLINE PAGE URL value should also be setup in the Cancel Link field on the Payment Page tab (The Cancel Link field is not directly shown in this screenshot, but it is lower on this Elavon Portal Page.
Enable CAPCHA
On the Elavon Portal Payment Page, locate teh CAPCHA configuration option and confirm that it is enabled
Custom Payment Fields
Navigate to the Custom Fields section and add 2 fields as follows. The Custom Fields can be found in the Payment Fields section of the Elavon Portal Settings.

Elavon Portal Payment Fields
ACA Transaction ID Custom Field
Setup the ACA Transaction ID Custom Field by completing the required fields as in the screenshot.
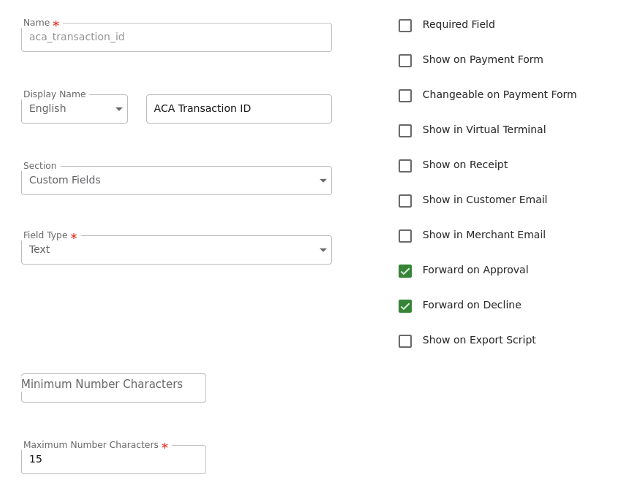
ACA Transaction ID Custom Field Configuration
ACA User ID
Setup the ACA User ID Custom Field by completing the required fields as in the screenshot.
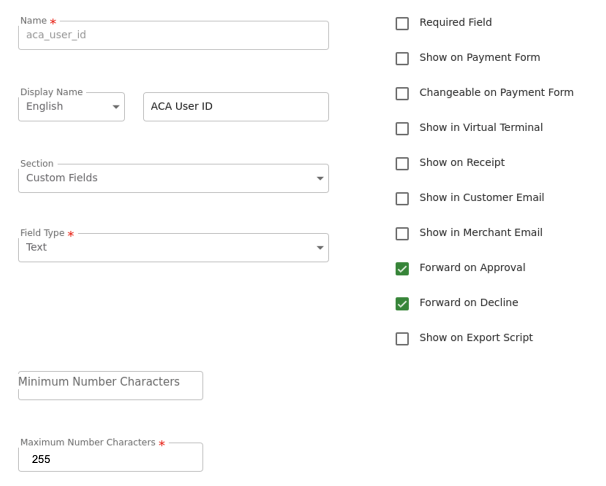
ACA User ID Custom Field Configuration
After the 2 custom fields have been added, it should appear like:

This is the end of the Elavon Portal setup and configuration. Once completed please notify your implementation team.
Test credit card information
To test credit card processing, use this test credit card information:
Visa number - 4111 1111 1111 1111
Expiration date - any future MM/YY
Card security code - any three digits
Your Elavon demo account may not be able to accept payments that have values for dollars and cents. Please make sure your test payments/invoices are whole numbers only (i.e., $360.00), or contact Elavon for assistance to be able to accept test payments that have dollars and cents (i.e., $360.67).
To test ACH payments, you can use this information:
Routing number - 490000018
Account number - any 16 digit number - for example: 123456789000000
Updated 5 months ago